iSCSI Connector for SQL Server on Windows
This connector integrates Microsoft SQL Server with enov8 vME iSCSI storage. It moves databases from local disks onto vME iSCSI LUNs, then mounts vME-created clones on other servers for dev, test, and reporting.
This page is the guide: what the workflow does, how to install and enroll the agent, and how to run a clone cycle from the vME console. A companion page goes deeper:
- API reference - every phase, config field, and CHAP setting, for driving the connector over REST instead of the console.
Download the agent installer: vme-iscsi-agent installer (latest)
Architecture Diagram

Quick start
Install the vME iSCSI Agent on each SQL Server (the source host and each clone host) and enroll it with that server's vME appliance. Create the iSCSI source in vME first, then dispatch the workflow jobs from the vME console. The agent connects the LUNs, migrates the databases, and later mounts the clones.
| Prerequisite | Detail |
|---|---|
| Windows | Windows Server 2019 or 2022, PowerShell 5.1+, sqlcmd in PATH |
| SQL Server | SQL Server 2017+, Windows authentication: a login for NT AUTHORITY\SYSTEM with sysadmin |
| Ports | 3260 (iSCSI) and 443 (agent to vME), from each SQL host to its vME appliance |
| vME | An iSCSI source created in vME first, one per database. See iSCSI Source Form Instructions |
Full detail on each of these follows below.
How Agent Orchestration Works
The VME iSCSI Agent is the bridge between a Windows server and the vME platform. Rather than an administrator logging into each server and running scripts manually, the orchestration model lets vME assign and trigger workflow jobs centrally - the agent on each server picks up and executes them automatically.
The Polling Model
Each agent runs as a Windows background service. It continuously polls the vME platform for assigned jobs. When a job is found, the agent executes the relevant workflow phase on the local server and reports progress and results back to vME.
This means:
- No inbound connections are required. The agent always initiates communication outward to vME on port 443, so no inbound ports need to be opened on the Windows server. The iSCSI data path that mounts the LUNs uses port 3260, also outbound from the Windows server to the vME appliance.
- No manual script execution. Once a job is assigned in vME, the agent handles everything without anyone needing to be logged in to the server.
- Two vME appliances. The workflow clones a database from a source vME to a target vME (for example, a staging/prod source and a test target). Each agent enrolls with one vME URL and only receives jobs from that appliance. Each agent is identified by its label and a free-text environment tag you choose, so you can assign the right job to the right server.
Everything the console does here is available over REST. If you want to drive the workflow from your own tooling or a scheduler, see Agent Jobs for the job model and the API reference for this connector's phases and config fields.
What the Workflow Does
The workflow attaches and mounts vME iSCSI LUNs and migrates SQL Server databases onto them. Snapshot and clone creation are performed in vME. Each job runs one phase:
Source Prep
- Connects the Windows iSCSI initiator to your vME targets.
- Brings the new empty LUNs online.
- Initializes and formats the selected LUNs as NTFS with 64K allocation units.
- Mounts the volume at its own folder under the server's vME folder,
<vME folder>\sources\<source id>, labelledSQL_DB. No drive letter is used. A source created before vME 1.10 has a data LUN and a log LUN; those keep two drive letters, labelledSQL_DataandSQL_Log.
Source Migrate
- Creates
MSSQL\Data,MSSQL\LogsandMSSQL\Backupsunder that folder (on a two-LUN source, on the data and log drives). - Grants SQL Server service account permissions on those folders.
- Migrates databases using one of three modes - backup and restore, restore from existing
.bakfiles (including striped backups), or raw.mdf/.ldffile copy. - Creates new databases with the prefix
ISCSI_. - Restarts the SQL Server service (backup/restore and skip-backup modes only).
Clone Mount
- Connects to the cloned iSCSI target(s).
- Brings only the disks on the job's own targets online, without formatting. Any other offline iSCSI disk on the server is left offline.
- Mounts the cloned volume at its own folder under the server's vME folder,
<vME folder>\clones\<clone id>, so a host is not limited by free drive letters. A clone made before vME 1.10 keeps its drive letters. - Attaches MDF/LDF files using
CREATE DATABASE ... FOR ATTACH.
Clone Unmount
- Detaches the active workflow's
ISCSI_databases from SQL Server. - Disconnects the selected sessions and offlines only the disks behind them (scoped to this workflow). For a volume under the vME folder, releases the mount point and removes its folder.
- Performs a full iSCSI reset (removes all persistent targets, portals, and sessions) when
fullCleanupis set. vME sendsfalseon every teardown it creates; a job created over the API that omits the field gets the reset, because it defaults totrue.
Bookmark or roll back an attached volume
A source or clone that a SQL Server host has mounted is never changed under that host. When you bookmark or roll one back, vME asks the host's agent to:
- Quiesce: set every database with files on that volume OFFLINE, flush the volume and take its disk offline.
- vME takes the snapshot, or rolls back.
- Resume: bring the disk back online at the same folder and set those databases ONLINE again. Resume runs even if step 2 failed.
vME shows each step as the host reports it:
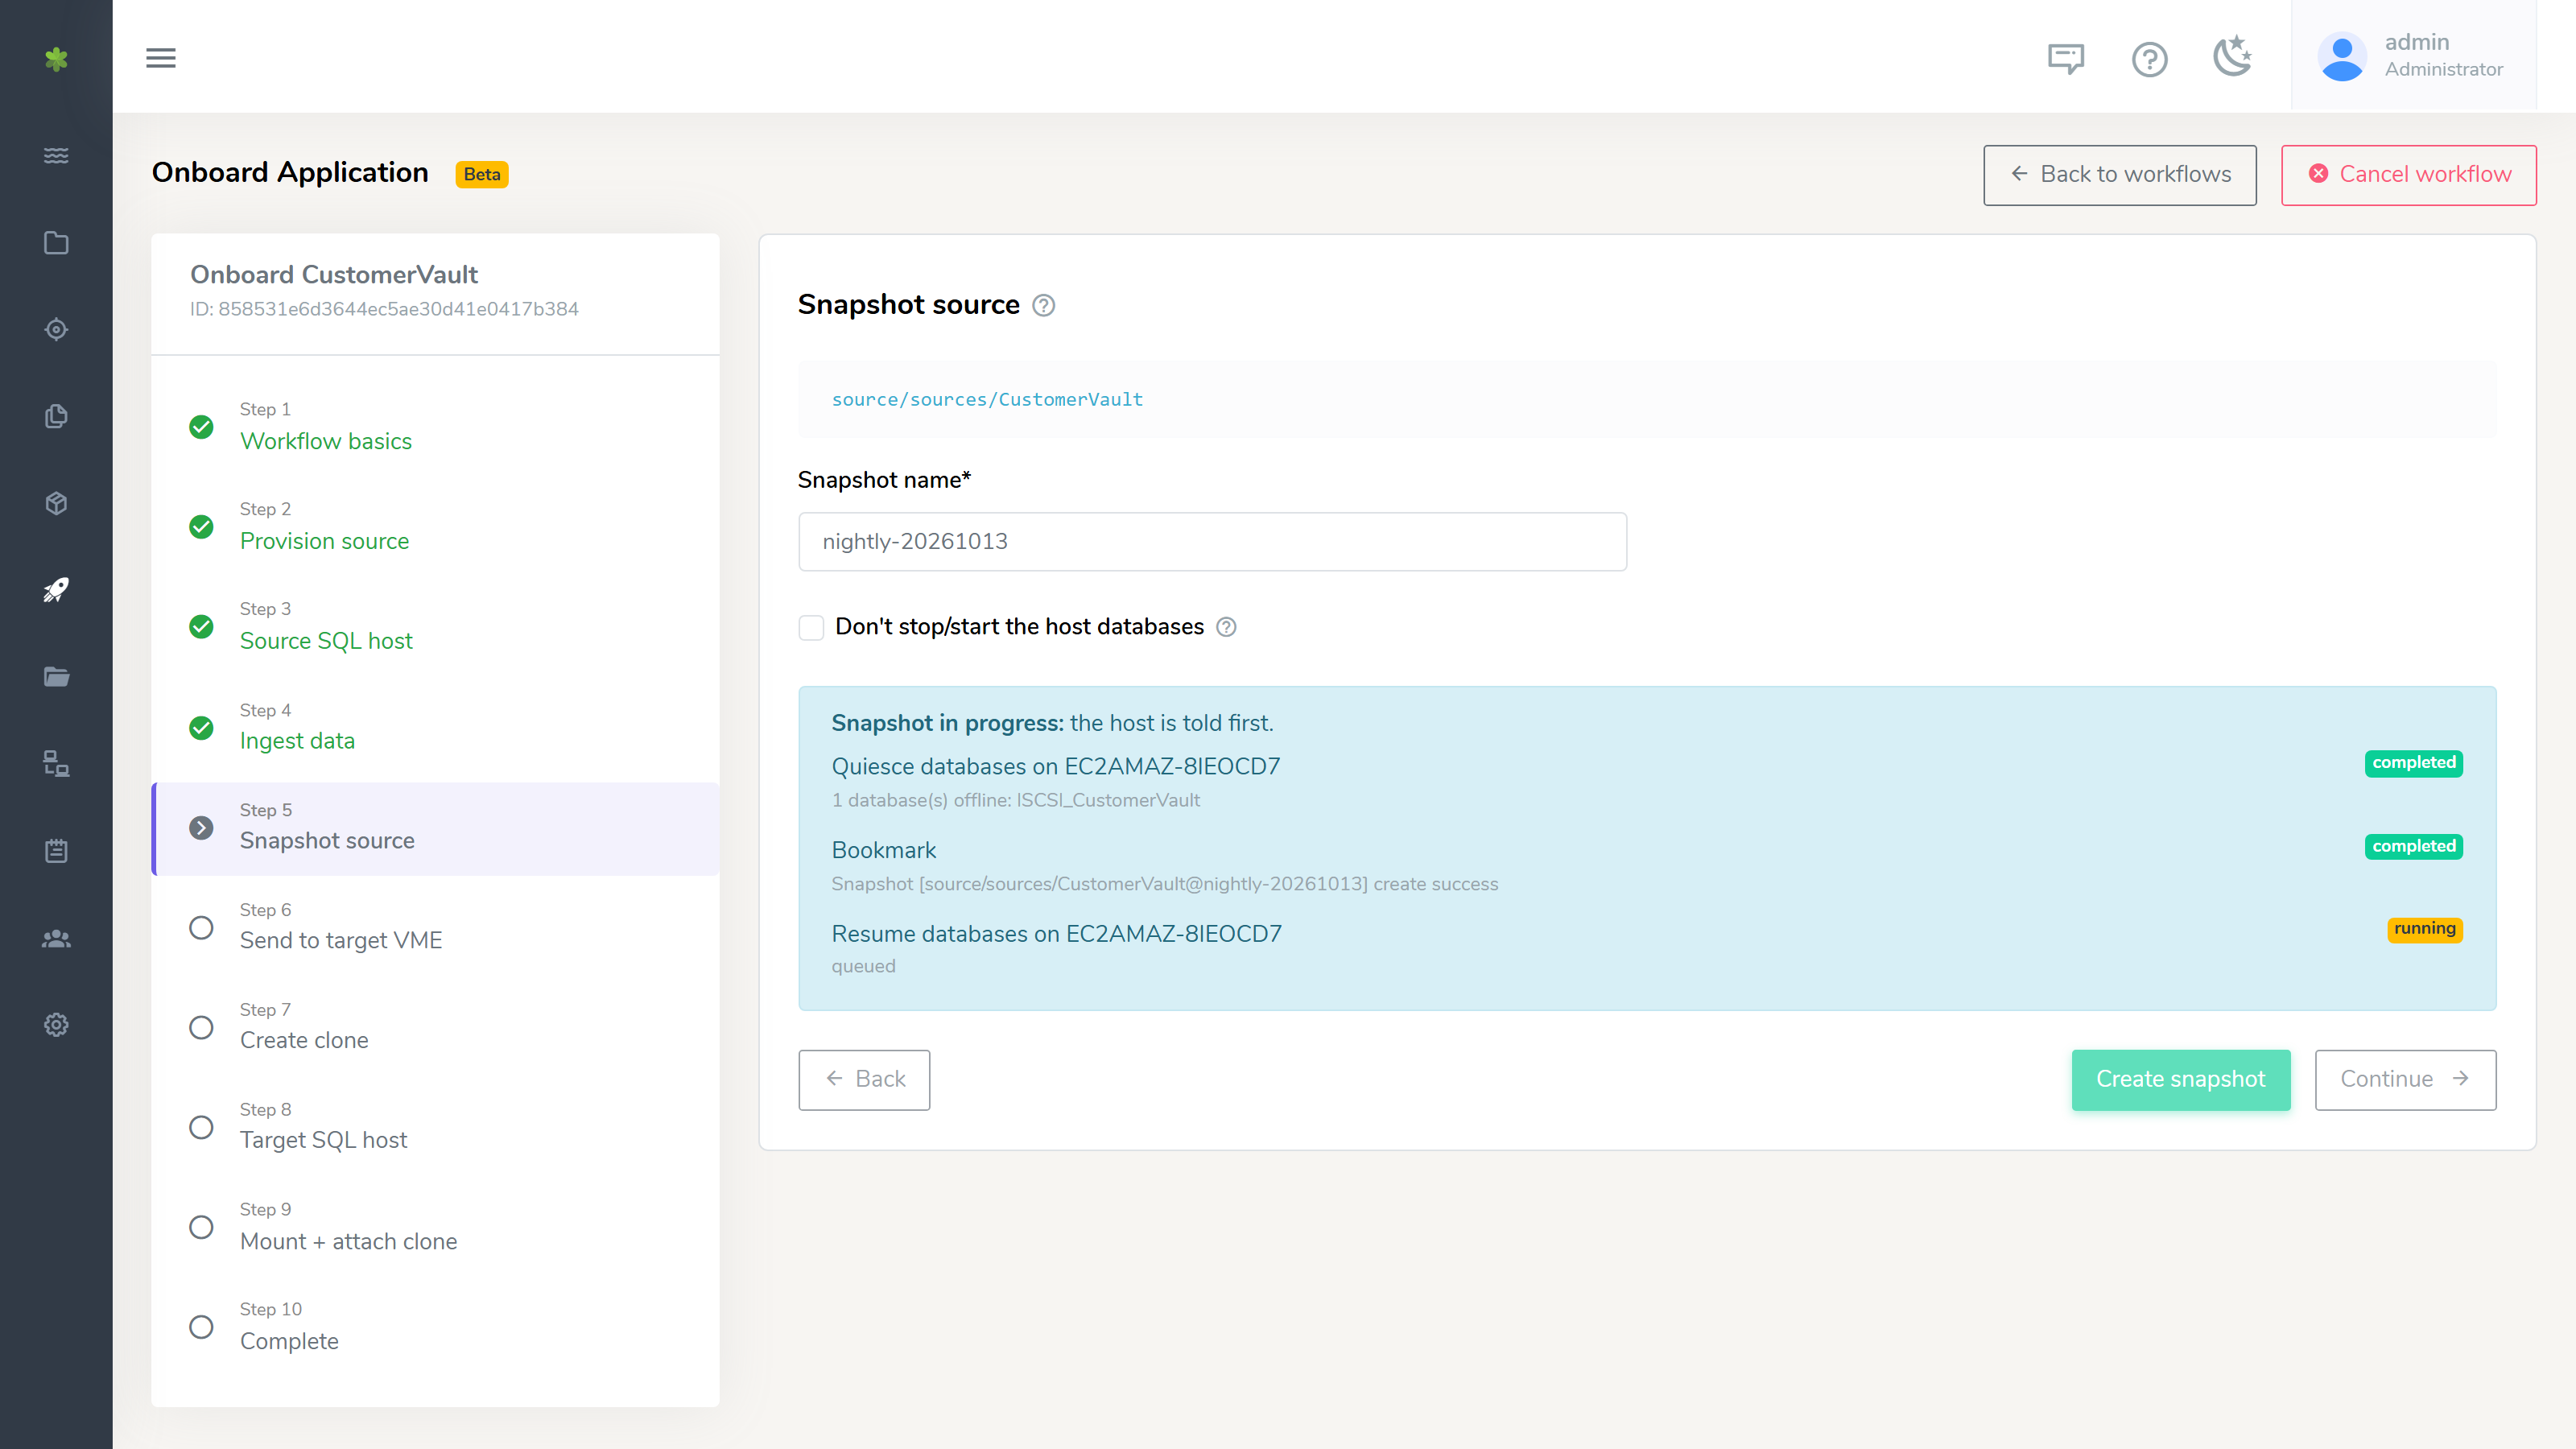
If Quiesce fails, nothing is snapshotted or rolled back. A database that also has files on another volume is refused, because taking only part of it offline would leave it inconsistent.
Roles - Source vs Clone Server
An agent is installed on each server that participates in the workflow. Jobs are dispatched to the appropriate agent from the corresponding vME web console.
| Server role | vME appliance | Jobs it runs |
|---|---|---|
| Source server (the SQL host you clone from) | Source vME | Source Prep to prepare LUNs, then Source Migrate to move databases. |
| Clone server (the SQL host you clone to) | Target vME | Clone Mount to attach clones, then Clone Unmount to detach and clean up. |
Prerequisites
Windows / SQL
- Windows Server 2019 or 2022.
- SQL Server 2017+.
sqlcmdavailable in PATH.- Windows authentication with sysadmin privileges for
NT AUTHORITY\SYSTEM. The agent service runs as LocalSystem, so that is the login SQL Server sees for every job. - The agent requires Administrator rights for all entry modes. The tray and console self-elevate via a UAC prompt if launched unelevated, and the Windows service runs as LocalSystem - so orchestrated jobs run with the privileges the workflow needs, without anyone launching PowerShell as Administrator.
vME / Network
- Two enov8 vME appliances with iSCSI enabled - a source and a target (for example, staging/prod and test).
- iSCSI targets and LUNs created in the appropriate vME appliance before running jobs - source LUNs on the source vME, clone LUNs on the target vME.
- Complete source setup in vME first: iSCSI Source Form Instructions. For SQL Server, follow that Microweb form flow twice to create one Data source and one Log source.
- Outbound HTTPS (port 443) from each Windows server to its vME appliance for the agent.
- Network access to port 3260 between each SQL server and its corresponding vME appliance for iSCSI traffic.
Safety Notes
- Source Prep can format disks. Only new empty LUNs are selected.
- Source Migrate creates new databases with the
ISCSI_prefix and may restart SQL Server. - Clone Unmount can clear iSCSI configuration when a full reset runs. Over the API that is the default - send
unmount.fullCleanup: falsefor a teardown scoped to one workflow.
Agent Installation
Before running any jobs, the VME iSCSI Agent must be installed on each Windows server that will participate in the workflow - both the source server and any clone servers. The agent runs quietly in the background and connects the server to its respective vME appliance: source servers enroll with the source vME, and clone servers enroll with the target vME. Jobs are dispatched from each vME web console independently and monitored from the agent tray on each Windows server.
Before You Start
Make sure you have the following ready before beginning:
| Requirement | Details |
|---|---|
| Access to vME web console | You need an admin account to log in |
| The Windows server | Must have SQL Server installed and be powered on |
| The agent installer file | The .msi installer - download the latest, or use the file provided by your vME administrator |
| A stable network connection | The server must be able to reach the vME platform over the network |
Not sure if you have admin access? Ask your vME administrator to create the enrollment token for you (Part 1 below) and send it to you before you start.
Part 1 - Create an Enrollment Token in vME
An enrollment token is a one-time passcode that lets your server register itself with the vME platform. Think of it like a welcome code - it is only valid once and for a limited time.
Step 1 - Open Agent Manager and click Add Agent
Log in to the vME web console. In the left-hand menu, navigate to Agent Manager.
At the top of the agents list, click the + Add Agent button.
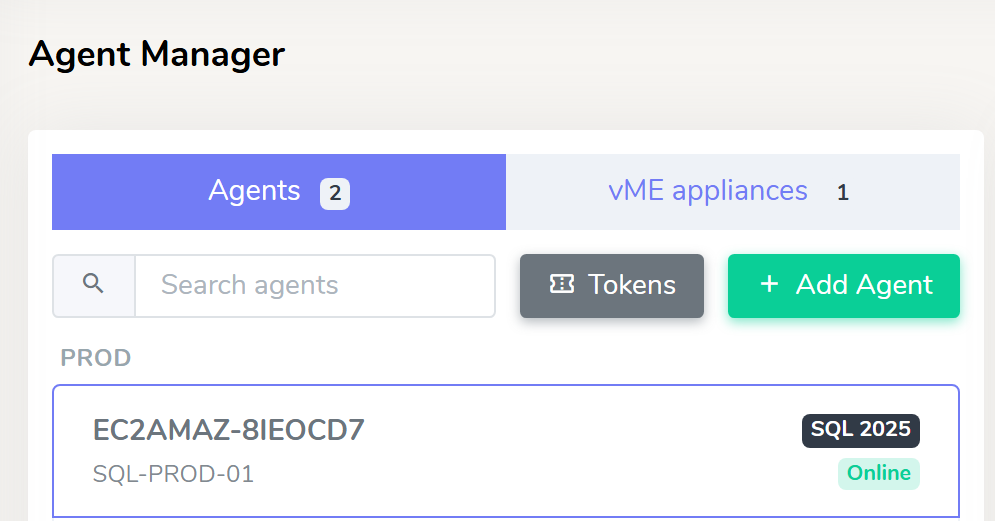
The Add Agent dialog will open.
Step 2 - Fill in the agent details and create the token
Fill in the three fields:
| Field | What to enter |
|---|---|
| Label | A friendly name for this agent, e.g. sql-source-01. This is just for your reference. |
| Environment | A free-text tag for this server, e.g. staging or test. Use whatever labels fit your setup. |
| TTL (minutes) | How many minutes the token stays valid. The default 60 is fine for most installs. Increase it if you need more time. |
Once filled in, click Create Token.
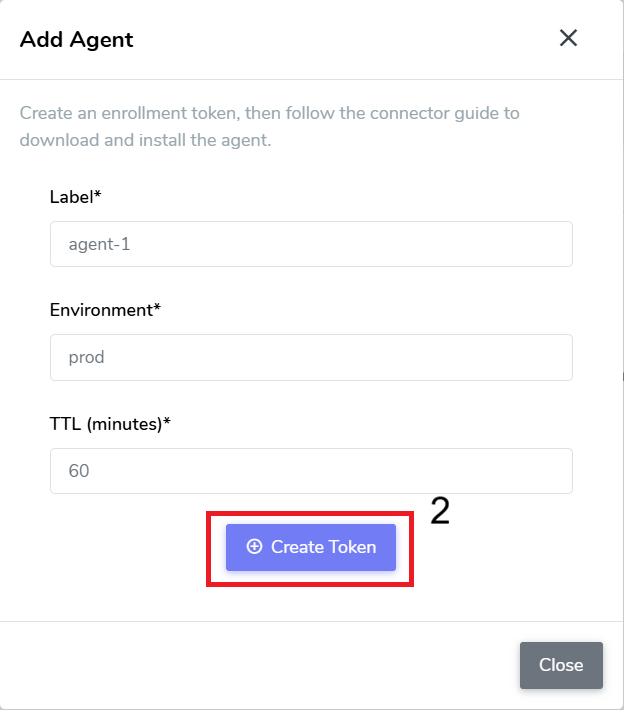
Step 3 - Copy the token immediately
After clicking Create Token, a one-time token will appear on screen.
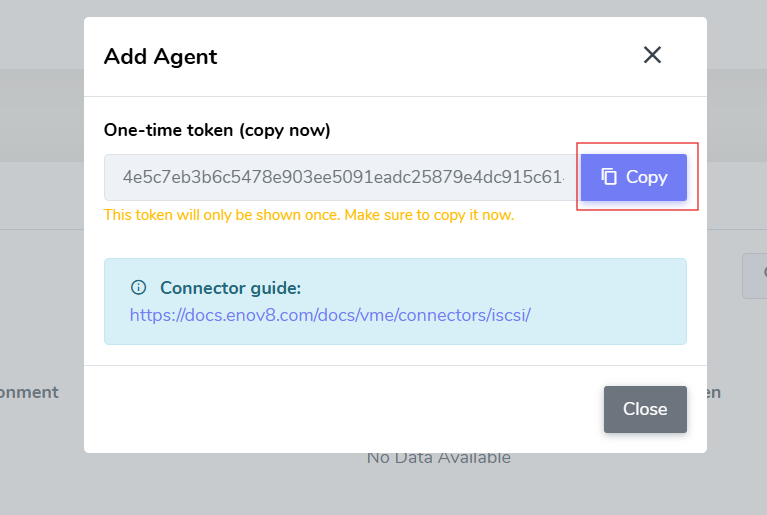
Important: This token is shown only once. Once you close this dialog, the token cannot be retrieved again. If you lose it, you will need to create a new one.
Click the Copy button to copy the token to your clipboard, then paste it somewhere safe (such as a Notepad file) - you will need it in Part 2.
Click Close when done.
Part 2 - Install the Agent on the Windows Server
Run the .msi file on the Windows server where you want the agent to run.
Step 4 - Run the installer
Double-click the downloaded VME iSCSI Agent .msi to launch the setup wizard.
Run as Administrator if prompted. Right-click the file and choose Run as administrator if the installer does not open automatically.
The first screen you will see is the Licence Agreement.
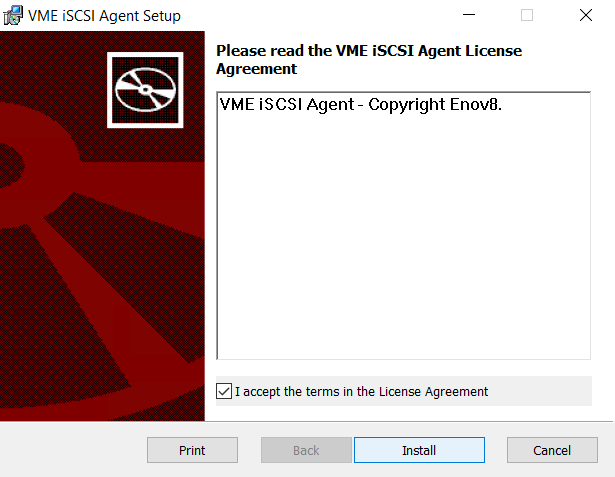
Tick the I accept the terms in the Licence Agreement checkbox, then click Install.
Step 5 - Fill in the registration details
After accepting the licence, the VME iSCSI Agent Registration screen will appear. This is where you connect the agent to your vME server.
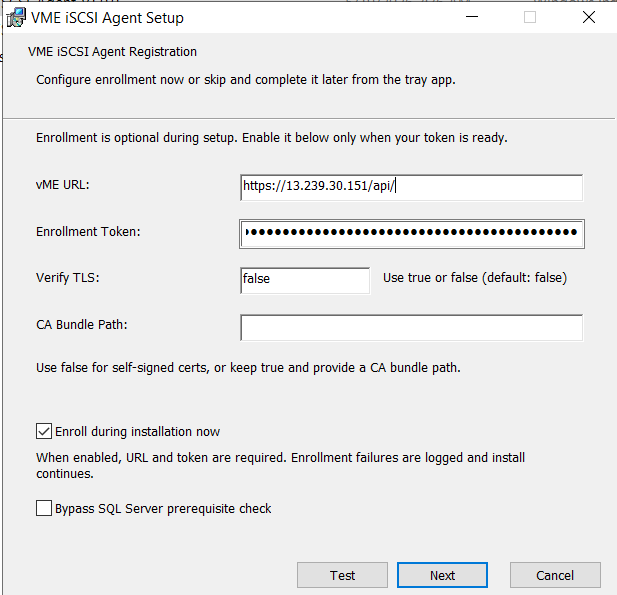
Fill in each field:
| Field | What to enter |
|---|---|
| vME URL | The web address of your vME server, e.g. https://10.0.0.5 or https://10.0.0.5/api. Either format works - the agent handles it automatically. |
| Enrollment Token | Paste the token you copied in Step 3. The characters are hidden for security. |
| Verify TLS | Type false if your vME server uses a self-signed certificate (most on-premise setups). Type true if it uses a trusted certificate. |
| CA Bundle Path | Leave blank unless your IT team has given you a certificate file path. |
Below the fields there are two checkboxes:
| Checkbox | Recommendation |
|---|---|
| Enroll during installation now | Leave this ticked. The agent will register itself with vME as part of the install - no extra steps needed after. |
| Bypass SQL Server prerequisite check | Only tick this if SQL Server is not yet installed on this machine. |
Step 6 - Test the connection (optional but recommended)
Before clicking Next, click the Test button to check that the vME URL and token are working.
A message will appear at the bottom of the screen. If the test passes, proceed. If it fails, double-check the vME URL and make sure the token has not expired (tokens expire after the TTL you set in Step 2).
Step 7 - Complete the installation
Click Next. The vME Storage Folder screen appears with one field, vME folder, prefilled with C:\vME. This is the folder on this server under which vME mounts database volumes: sources under sources\, clones under clones\, each in its own subfolder, so no drive letters are used. Keep the suggestion, or enter another folder on a local NTFS drive. The folders are created the first time a volume is mounted.
Click Install. The wizard will copy the agent files, write the configuration, and register and start the agent service automatically.
When installation finishes, the Setup Wizard Completed screen will appear.
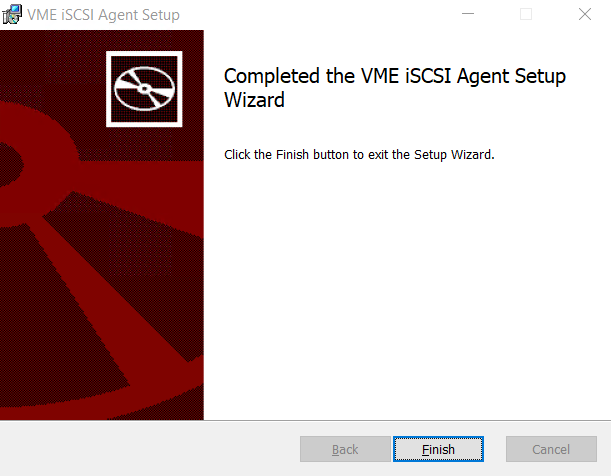
Click Finish to close the wizard. The agent tray icon will launch automatically.
Part 3 - Verify the Agent is Online
Step 8 - Check the system tray
After installation, look for the agent icon in the system tray (bottom-right corner of the taskbar). The green icon confirms the agent is running.

Right-click the icon to open the tray menu.
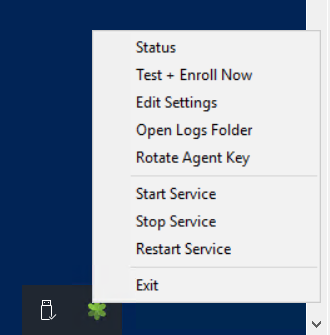
Click Status to open the status window.
Step 9 - Confirm the agent is online
The Status window shows the current state of the agent.
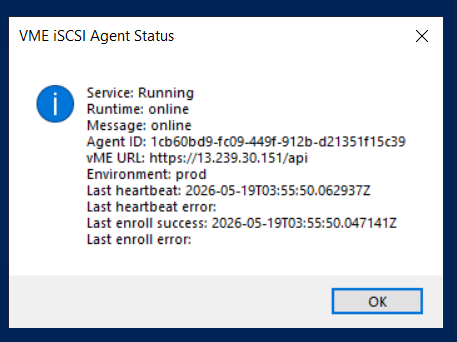
Check that the following values are shown:
| Field | Expected value |
|---|---|
| Service | Running |
| Runtime | online |
| Message | online |
| Last enroll success | A recent date and time |
Note down the Agent ID shown in this window - you will need it if you ever need to rotate the agent key (see Part 5).
If the status shows online, the agent is fully set up and communicating with vME. You are done.
Not showing online? Wait 30-60 seconds and re-open Status. If it still does not show online, see the Agent Troubleshooting section below.
Part 4 - Edit Agent Settings (If Needed)
Use this section if you need to update the vME URL, enrollment token, or any other configuration after the agent is already installed.
Step 10 - Open Edit Settings from the tray
Right-click the agent tray icon and click Edit Settings.
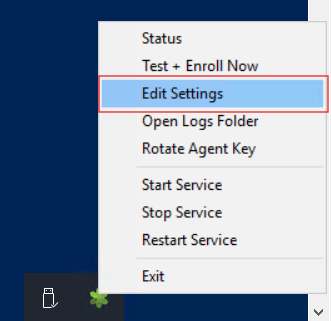
The VME iSCSI Agent Settings window will open.
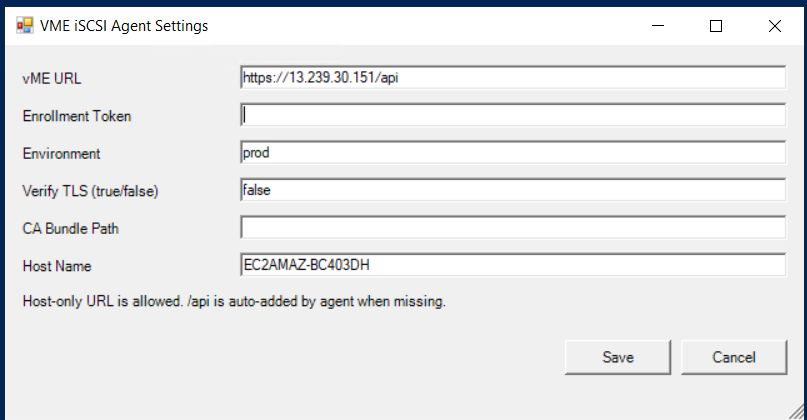
Update the fields you need to change:
| Field | Description |
|---|---|
| vME URL | The vME server address. |
| Enrollment Token | Paste a new token here only if you need to re-enroll this agent. Leave blank to keep the current enrollment. |
| Environment | The agent's free-text environment tag (e.g. staging or test). |
| Verify TLS | true or false. |
| CA Bundle Path | Path to a custom certificate file. Leave blank if not applicable. |
| Host Name | The name used to identify this server in vME. Auto-filled - only change if needed. |
| vME folder | The folder under which vME mounts source and clone volumes on this server. Takes effect on the next job. |
Click Save when done. Changes take effect on the next heartbeat (within 60 seconds).
Part 5 - Rotate Agent Key (If Needed)
The agent key is a security credential used to authenticate the agent with vME. Rotating it replaces the old key with a new one. This is done in two places - first in the vME web console, then on the agent itself.
When would you need this? Rotate the key if the agent stops connecting to vME with an authentication error, or if your security policy requires regular key rotation.
Step 11 - Generate a new key in vME
Log in to the vME web console and go to Agent Manager. Pick your agent in the list.
In the agent's details, click the Rotate Key button (the key icon).

A dialog will appear showing the new key.
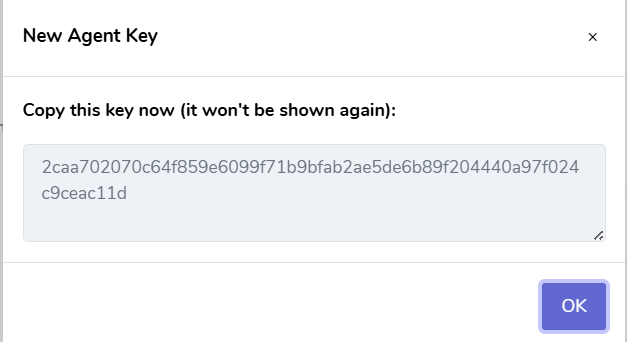
Copy this key immediately - it will not be shown again.
Click OK when done.
Step 12 - Apply the new key on the agent
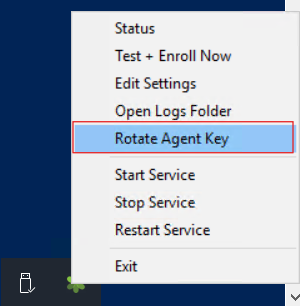
On the Windows server, right-click the agent tray icon and click Rotate Agent Key.
The Rotate Agent Key dialog will appear.
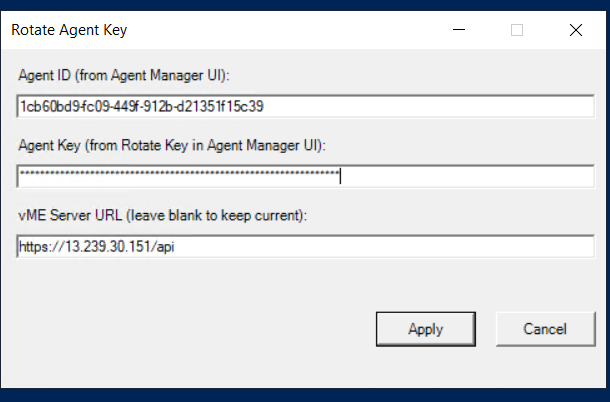
Fill in the two fields:
| Field | What to enter |
|---|---|
| Agent ID | The Agent ID shown in the Status window (Step 9). You can also find it in the vME Agent Manager (see tip below). |
| Agent Key | Paste the new key you copied in Step 11. The characters are hidden. |
| vME Server URL | Already filled in - leave it as is unless your server address has changed. |
Click Apply. The agent will reconnect with the new key within a few seconds.
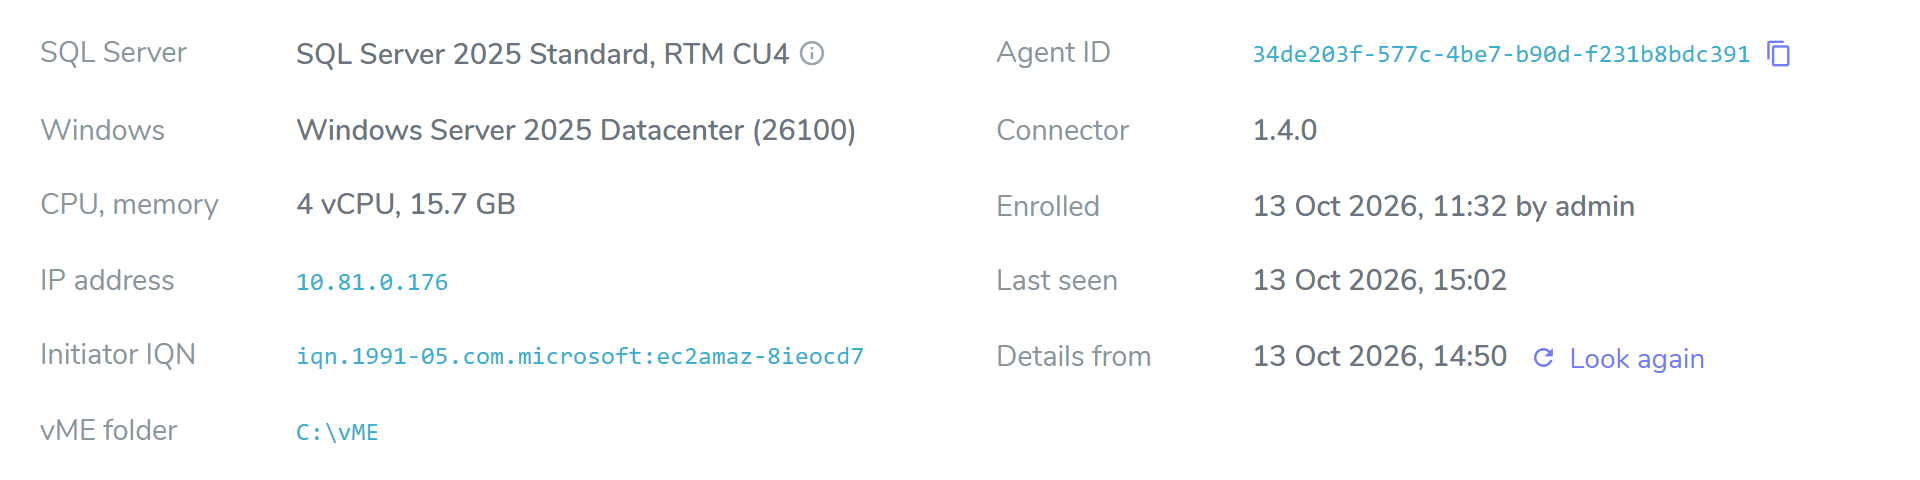
Tip - finding the Agent ID in vME: You can also find the Agent ID in the vME web console under Agent Manager. Pick the agent in the list: the Agent ID is shown in its details. Click the copy icon next to it to copy it to the clipboard.
Upgrading the Agent
Run the new .msi on a server that already has the agent. It upgrades in place: the service is stopped and started by the installer, the agent keeps its identity and registration with vME, and every setting is carried across. No new enrollment token is needed.
After the licence, the wizard shows the vME Storage Folder screen. It is prefilled with the folder already set on this server, or with C:\vME when none is set. Keep it or change it, then click Install.
Databases already attached at drive letters are not affected by the upgrade. They stay where they are and are torn down as before. Volumes mounted after the upgrade go under the vME folder, and both kinds can be present on one server at the same time.
For an unattended upgrade, run msiexec /i VME_iSCSI_Agent_v<version>.msi /qn. The existing folder is kept; add VME_ROOT="C:\vME" to set one.
Agent Troubleshooting
Two ways to connect an agent to vME - you do not always need a new enrollment token.
- Enrollment token - used for first-time registration. Single-use and expires after the TTL you set.
- Rotate Agent Key - if an agent record already exists in vME (reinstall, migration, or after a key rotation), you can skip the token entirely. In the vME web console, go to Agent Manager, find the agent, and click the Rotate Key button - this generates a new key and displays it once. Copy it, then on the Windows server right-click the tray icon → Rotate Agent Key → enter the Agent ID and the key you just copied.
| Problem | What to do |
|---|---|
| Token expired before install | Create a new token in vME (Part 1) and re-run the installer. |
| "SQL Server not detected" error during install | Tick Bypass SQL Server prerequisite check in Step 5. |
Status window shows Runtime as error or heartbeat is stale | Check network from the server to the vME URL. Right-click tray → Test + Enroll Now. Check agent.log (C:\ProgramData\Enov8\VMEiSCSIAgent\agent.log) for the specific error. |
| Tray icon does not appear after install | Open Start Menu → search for VME iSCSI Agent and launch it manually. |
| Enroll error: "Enrollment token is missing" | The agent has no token and no identity. If enrolling for the first time, go to Part 4 (Edit Settings) and enter a new token. If the agent record already exists in vME, skip the token: in vME Agent Manager click Rotate Key for this agent → copy the key shown → on the server right-click tray → Rotate Agent Key → enter the Agent ID and that key. |
| Enroll error: "token has already been consumed and cannot be reused" | The token was already used in a previous enrollment and cannot be reused. If the agent record still exists in vME, go to vME Agent Manager → click Rotate Key for this agent → copy the new key → on the server right-click tray → Rotate Agent Key → enter the Agent ID and key. If no record exists, generate a new enrollment token in vME and apply it via Edit Settings. |
| Enroll error: "credentials were rejected by the server (401/403)" | The agent's stored credentials are no longer valid. In vME Agent Manager, click Rotate Key for this agent → copy the new key → on the server right-click tray → Rotate Agent Key → enter the Agent ID and the new key. |
| Agent reinstalled or moved to a new machine - agent record already in vME | Do not generate a new enrollment token. In vME Agent Manager, click Rotate Key for this agent → copy the new key → on the server right-click tray → Rotate Agent Key → enter the Agent ID and the new key. The agent reconnects to the existing record in vME without creating a duplicate. |
| Agent authentication error after key rotation | Repeat Part 5 - ensure you copied the key correctly before the dialog closed. The key is exactly 64 hex characters. |
| Installation fails silently | Check Windows Event Viewer → Application log for MSI errors. |
Job Lifecycle
Each job carries a phase that tells the agent what to do, and moves through queued → claimed → running, finishing at completed, failed, or cancelled. The states, the job envelope, timeouts, and cancellation behaviour are the same for every connector and are covered in Agent Jobs. The phases this connector accepts, and every config field each one reads, are in the API reference.
Two of those phases are host-orchestration steps that run before the SQL phases:
| Phase | What it does |
|---|---|
| DiscoverHost | Inventories the host - classifies local vs iSCSI disks, and reports SQL instances/databases, drives, portals, targets, and sessions back to vME. It does not touch storage. |
| ConnectTargets | Connects the selected iSCSI targets so the disks become visible to the subsequent SQL phases. |
The rest - SourcePrep, SourcePrepOnly, SourceMigrateOnly, CloneMount, and CloneUnmount - run the workflow steps described above on the server.
Monitoring a Running Job
While a job is running, monitor it from the tray Status window on the Windows server. Open it by right-clicking the tray icon and clicking Status.
- Runtime will show
running_job - Message will show
Running <job-id>(e.g.Running job-abc123)
For live output detail, open the agent log: right-click the tray icon → Open Logs → open agent.log. This opens C:\ProgramData\Enov8\VMEiSCSIAgent\agent.log. Job output lines are written there in real time as the workflow runs.
Each job also writes a dedicated per-job log file under a per-workflow directory:
%PROGRAMDATA%\Enov8\VMEiSCSIAgent\logs\workflows\<workflow_id>\<job_id>.<phase>.log
Jobs that are not associated with a workflow (for example, pre-onboarding discovery probes) are placed under ...\logs\workflows\unassigned\<job_id>.log. This makes it easy to isolate the output of a single job or a single workflow without searching the shared agent.log.
What Happens if the Agent Goes Offline Mid-Job
If only the reporting lapsed - a network blip, or the service restarting while the workflow's own process survives - the job shows timed_out in vME while the work carries on, and the returning agent moves it to its real outcome. Keep polling; there is nothing to recover.
If the workflow itself stopped, the agent does not resume a partially completed job when it comes back online. To recover:
- Open
agent.log(right-click tray → Open Logs, or navigate directly toC:\ProgramData\Enov8\VMEiSCSIAgent\agent.log) and review how far the workflow progressed before the agent stopped. - If the job failed mid-migration (e.g. some databases were migrated but not all), assess the partial work manually - there is no automatic rollback.
- Correct any issues on the server and re-assign a new job from vME.
A job in timed_out does not distinguish the two cases - agent.log does. Check whether the workflow's output continued past the point where reporting stopped.
The same applies to a cancelled job, and to a job that hits its own timeout. See Timeouts for raising the budget on a long migration.
Job History
The full record of what each job did is in the agent log files on the Windows server (right-click tray → Open Logs):
- Flat log -
C:\ProgramData\Enov8\VMEiSCSIAgent\agent.logcontains every job's output, with each line written under the job ID prefix (e.g.[job:abc123] ...), making it easy to search for a specific job's activity. - Per-workflow logs -
C:\ProgramData\Enov8\VMEiSCSIAgent\logs\workflows\<workflow_id>\<job_id>.<phase>.loggives each job (and phase) its own file, grouped by workflow. Jobs with no workflow are placed under...\workflows\unassigned\. Open the file matching the workflow and job you want the history for.
CHAP Authentication
If your vME iSCSI targets require CHAP authentication, the credentials are supplied with the job configuration and delivered to the agent securely as job secrets - they are kept out of the logged (redacted) job configuration. Both one-way and mutual CHAP are supported, and per-target credentials can be provided when different targets use different secrets.
CHAP secret length - Windows iSCSI Initiator enforces a length range of 12-16 ASCII characters on the CHAP secret. Shorter or longer values are rejected at connection time. For predictable behavior, prefer 16 characters of mixed-case alphanumeric - Windows may auto-decode pure-hex strings to fewer bytes and reject them as too short.
For the full CHAP field set and a worked example, see CHAP in the API reference.
Job Troubleshooting
| Problem | What to do |
|---|---|
| Job fails quickly with "Invalid iSCSI portal address" or "unreachable on port 3260" | The portal is validated before the iSCSI initiator is touched, so a bad portal fails fast. Invalid iSCSI portal address (exit 400) means the value is malformed - fix the portal host/IP. iSCSI portal <addr> unreachable on port 3260 (exit 502) means the format was valid but a TCP probe on port 3260 got no answer - check that the vME appliance is up, the IP is correct, and firewall/routing allows port 3260 from this server. |
| No targets discovered | Check the vME portal IP and access rules, confirm port 3260 is open, and ensure SendTargets is enabled on vME. |
| Clone Mount or Source Prep fails with "No disk is attached for this job's target(s): ..." | None of the targets the job named has a disk on this server. The job log lists the IQNs it expected and the iSCSI disks it did find. The job never uses another disk in their place. Check that the target is exported to this server in vME and that its session is connected, then run the job again. If the disk is slow to appear, raise diskWaitSeconds (Source Prep) or attach.diskWaitSeconds (Clone Mount); the default is 60 seconds. |
| Clone Mount fails with "... did not come online within ...s" | One of the job's disks was found but stayed offline. The message names the disk, its target, and the reason Windows gave. A very large disk can take several minutes to come online; raise attach.diskOnlineTimeoutSeconds (default 600) and run the job again. |
| Clone Mount fails with "This job's disk(s) are no longer attached to this host" | The disks were found and then disappeared while the job ran, usually because the iSCSI session dropped. Check the network path to the vME appliance on port 3260, then run the job again. |
| Clone Mount log shows "Disk ... is offline (...) and is not one of this job's targets; leaving it offline" | Informational. Clone Mount brings only its own disks online. When the reason mentions a signature collision, that disk is a copy of another disk on this server - for example a clone and its source attached to the same host - and Windows keeps one of the pair offline. Leave it offline: bringing it online makes Windows write a new disk signature onto it. |
sqlcmd fails | Verify the SQL Server service is running, confirm Windows auth and sysadmin access, and check that sqlcmd is in PATH. |
| Sector size mismatch | Ensure the LUN sector size is compatible with SQL Server, and recreate LUNs if needed. |
| Restore file/path conflicts | Ensure target ISCSI_ database names are not already in use, and verify target data/log file paths are not already used by another database. |
For agent connectivity and enrollment issues, see Agent Troubleshooting above.
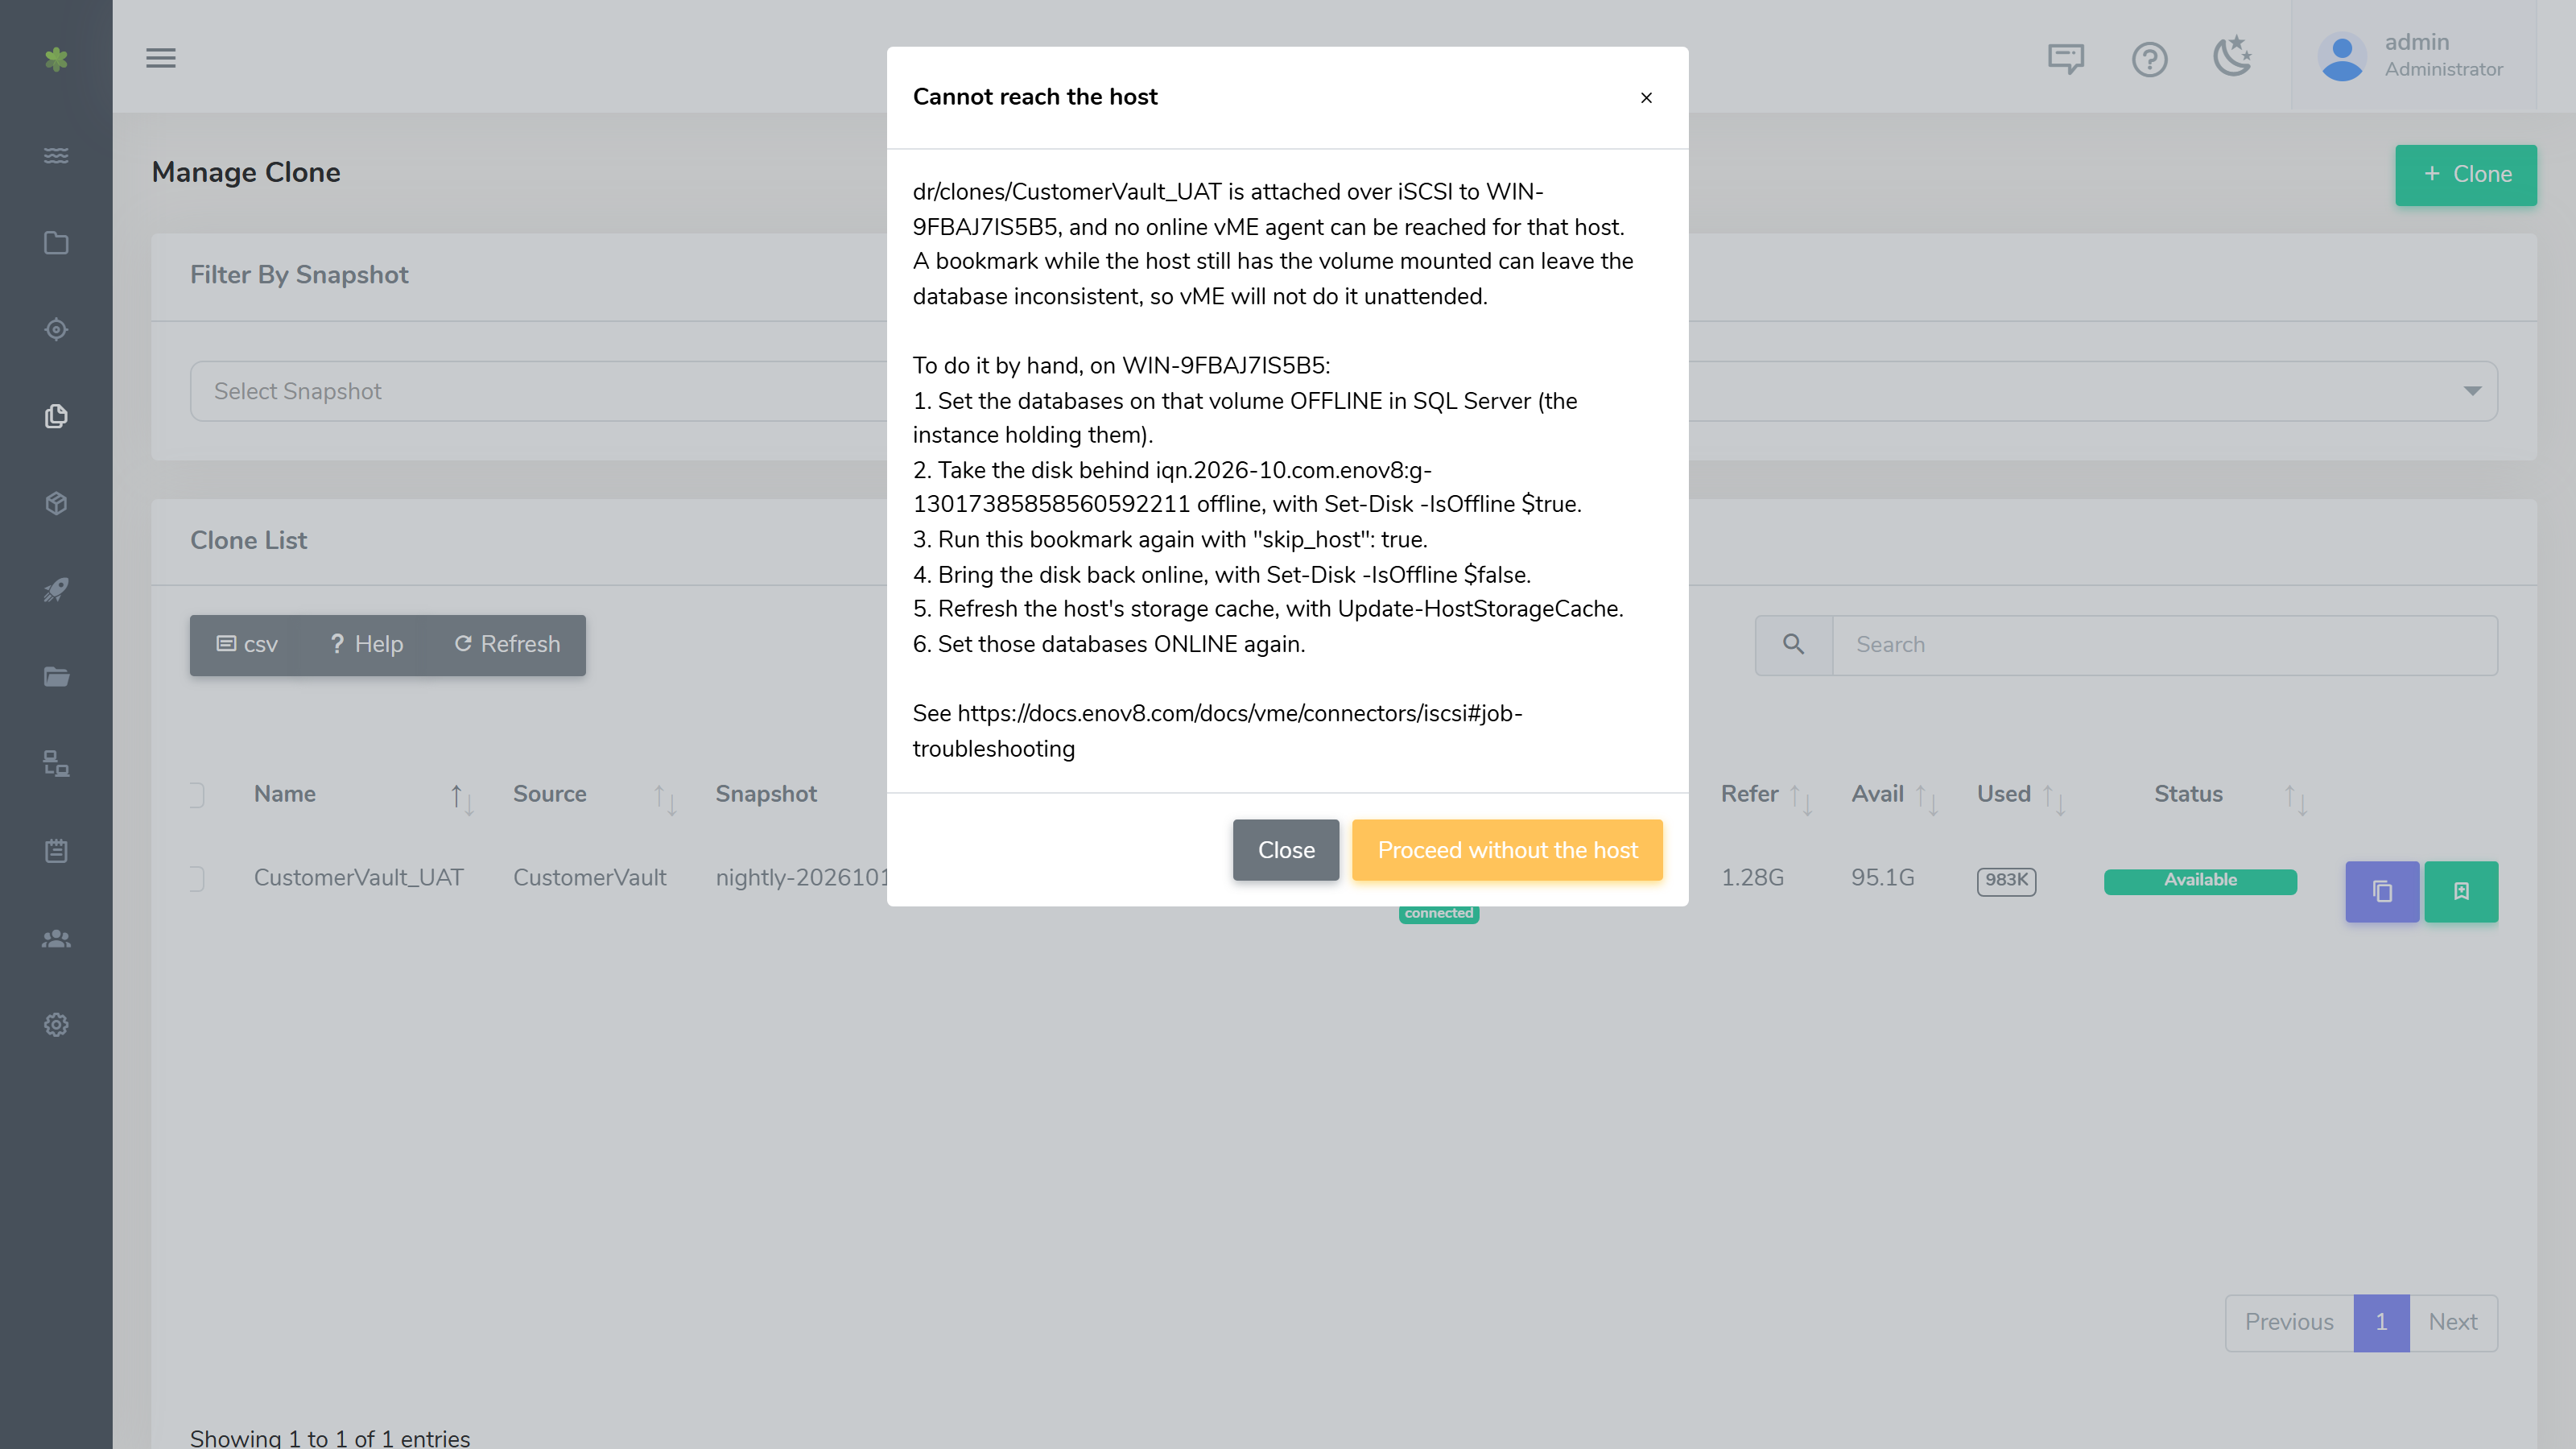
A bookmark or rollback is refused
A bookmark or rollback of a volume a host has mounted is refused, with nothing changed, when:
- No online agent can reach that host. The message says which host and volume, and lists how to do it by hand:
- Set the databases on that volume OFFLINE in SQL Server.
- Take the disk behind the volume's iSCSI target offline, with
Set-Disk -IsOffline $true. - Run the bookmark or rollback again without telling the host (in the web interface, Proceed without the host; through the API,
"skip_host": true). - Bring the disk back online, with
Set-Disk -IsOffline $false. - Refresh the host's storage cache, with
Update-HostStorageCache. - Set those databases ONLINE again.
- Another bookmark or rollback is already running on that host. Wait for it to finish, then try again.
- vME could not work out whether a host has the volume. Check the appliance log, or go ahead without the host once you have taken the databases offline yourself.
A host whose agent predates Quiesce and Resume answers that it does not support the phase: update the agent on that host, or go ahead without the host as above.
Operational Best Practices
Enrollment Token Management
- Set the token TTL to the minimum time needed to complete the installation. A 60-minute TTL is sufficient for most installs; increase it only if your process requires more time.
- Tokens are single-use - once an agent enrolls, the token is consumed. If the installation is interrupted before enrollment completes, create a new token before retrying.
- If you need to re-enroll an agent (for example, after moving it to a new vME instance), generate a fresh token in vME, paste it into Edit Settings on the agent, and save. Do not reuse old tokens.
Agent Key Rotation
- Rotate the agent key immediately if you suspect it has been exposed or if an administrator who held access to it leaves the team.
- For environments with formal key rotation policies, use the Rotate Agent Key procedure. The key is never shown again after generation, so copy it before closing the dialog.
- Keep a record of each agent's Agent ID (visible in the Status window) - you will need it every time you rotate the key.
TLS and Certificate Verification
- Always set Verify TLS to
truein production environments. Usingfalsedisables certificate validation and exposes the agent-to-vME connection to interception. - If your vME server uses a self-signed or internal CA certificate, provide the CA bundle path instead of disabling verification. This gives you encryption without bypassing trust checks.
- If you change TLS settings after installation, save them via Edit Settings and allow up to 60 seconds for the agent to reconnect with the new configuration.
Agent Health Monitoring
Agent health is monitored directly from the Windows system tray on each server. Right-click the tray icon and click Status to open the Status window, which shows:
| Field | What to check |
|---|---|
| Service | Should be Running. If Stopped, start it from the tray menu (Start Service) or via Windows Services. |
| Runtime | Should be online. A value of error means the agent has a configuration or connectivity problem. A value of running_job means a job is currently executing. |
| Message | Shows the current state detail - online when idle, or the active job ID when running. |
| Last heartbeat | Should be a recent timestamp. A stale or never value means the agent cannot reach the vME URL. |
| Last heartbeat error | Any error here points to a network or authentication problem - check the vME URL and TLS settings. |
| Last enroll success | Should be a recent timestamp. A stale value means the agent has not successfully enrolled - check the enrollment token or use Rotate Agent Key. |
| Last enroll error | If non-empty, this describes why the last enrollment attempt failed. |
- For deeper diagnosis, open the agent log files by right-clicking the tray icon and clicking Open Logs. This opens
C:\ProgramData\Enov8\VMEiSCSIAgent\which containsagent.log(service logs) andtray.log(tray UI logs). Logs rotate automatically at 2 MB with up to 5 backups. - Check each server independently - the source and clone SQL servers each have their own agent and must be checked on that machine's tray.
Server Reboots
- The agent service is configured to start automatically on boot. After a server reboot, verify the agent comes back online before dispatching any jobs - check the tray icon or the Status window.
- iSCSI connections are persistent and reconnect automatically after a reboot. A volume mounted under the vME folder comes back at the same folder. A volume that was given drive letters before vME 1.10 may come back with different letters if other volumes were added or removed; verify those letters before running a job against it after a reboot.
- If the server was rebooted after a full iSCSI reset, no iSCSI targets will auto-reconnect - this is expected. The next Clone Mount job will re-establish connections from scratch.
Network and Firewall
- The agent requires outbound HTTPS (port 443) to the vME URL. No inbound ports need to be opened on the Windows server.
- iSCSI traffic between the Windows server and vME storage requires port 3260 (TCP) to be open between the server and the vME appliance.
- If the Windows server is behind a proxy, ensure the agent service account can reach the vME URL through it, or add the vME URL to the proxy bypass list.
Dedicated vs Shared Servers
- The workflow is designed for dedicated servers where iSCSI is used exclusively for this workflow. On shared servers, the full iSCSI reset and disk offline steps in Clone Unmount can affect other iSCSI workloads. Scope the teardown to the active workflow - over the API that means sending
unmount.fullCleanup: false, since it defaults totrue. - When assigning jobs from vME, use the environment label on each agent to clearly distinguish source servers from clone servers and avoid dispatching a destructive job to the wrong target.