How to use the vME Microweb
Overview
For casual use that doesn't require automation, vME has a web frontend.
Pools
A pool is a combination of one or many disk drives. A pool can have one or more sources. Sources created within the pool see all the pool's capacity and can grow up to the available space for the whole pool.
Creating a Pool
Navigate to the Pool screen.
To create a new pool, click on the “+ Pool” button.
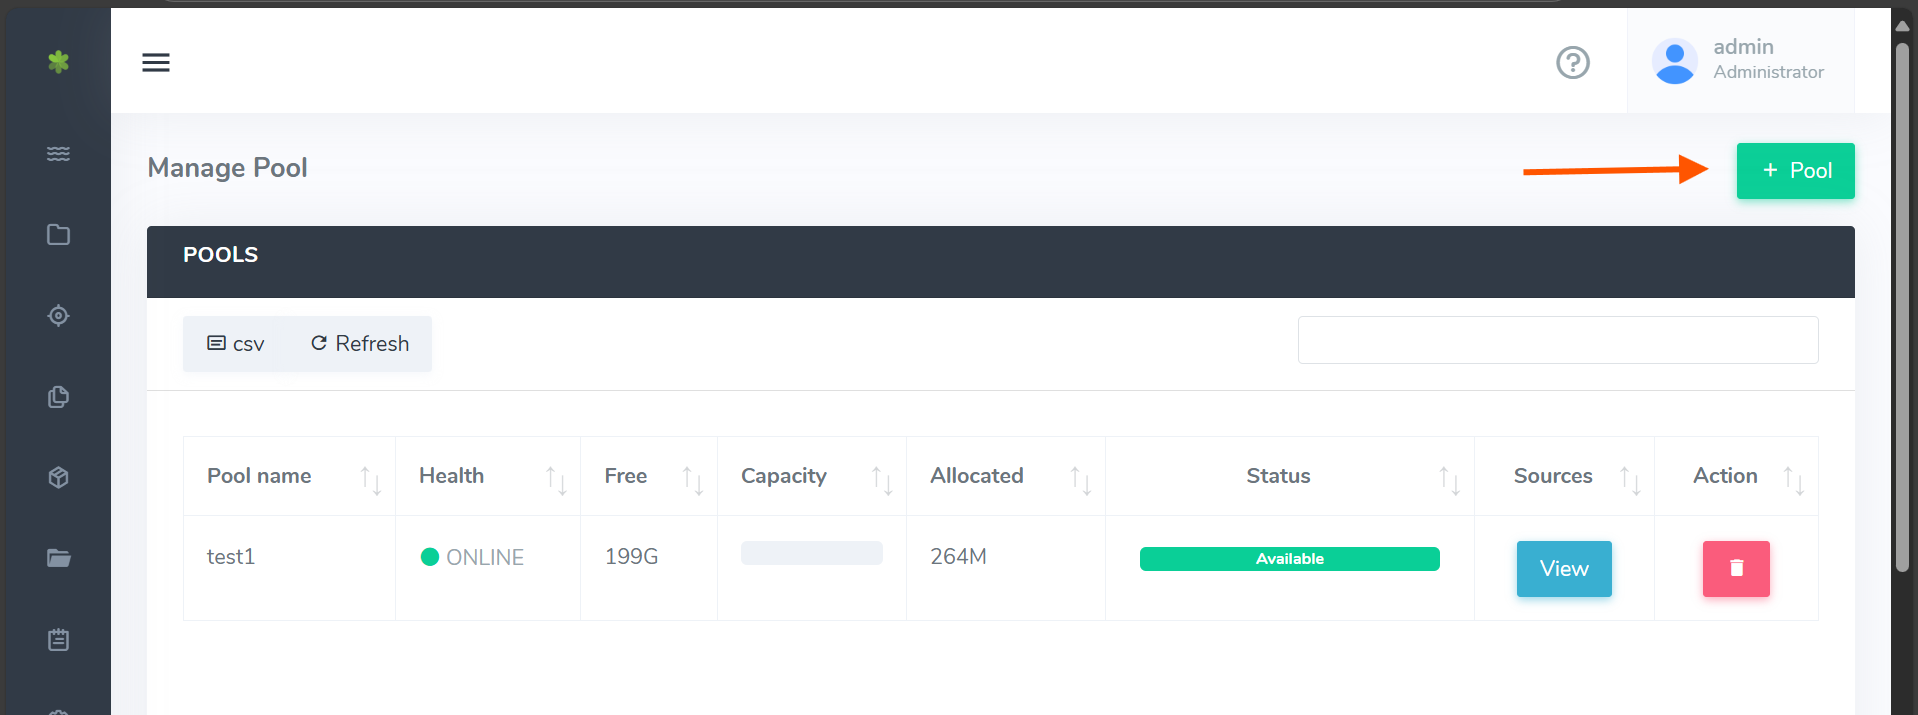
On click a new popup form will be shown which has the following inputs.
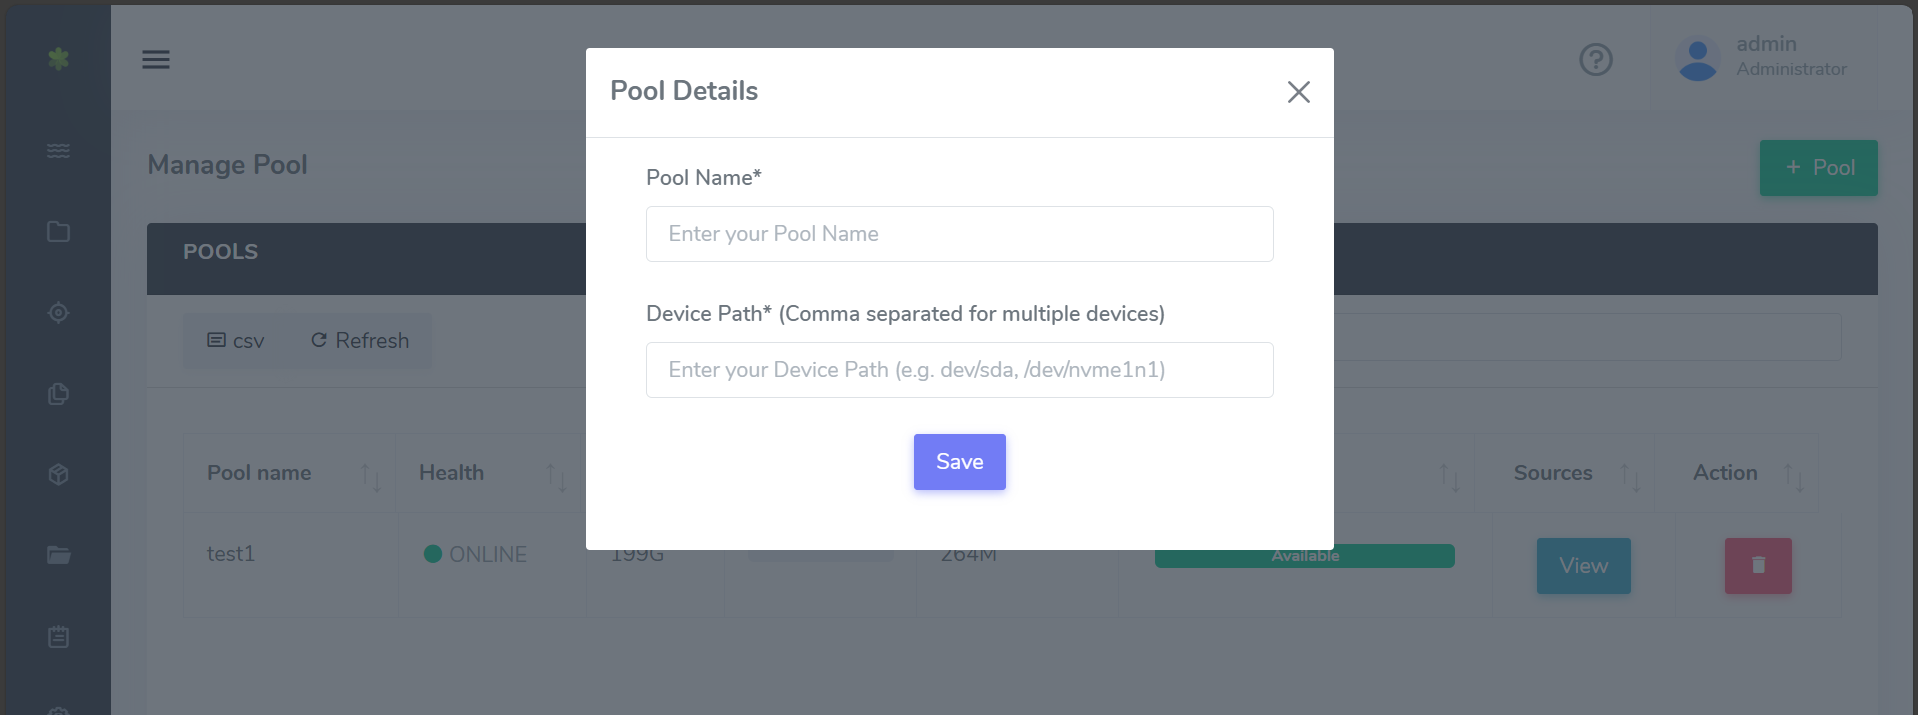
| Field Name | Description |
|---|---|
| Pool Name | Name of the pool. |
| Pool Size | Size of the pool drive to be allocated (In MBs). |
| Device Path | The volume path of the disk(s) to be utilised by the pool. |
Disk Details
Navigate to the Pool screen and below the Manage Pool table, the details of the disks listed on the vME server are present.

Sources
A source is created in the boundaries of a pool. A source file can only belong to one pool, but pool can contain more than one source.
The Sources list
Navigate to the Source screen. The list shows every source; Filter By Pool narrows it to one pool.
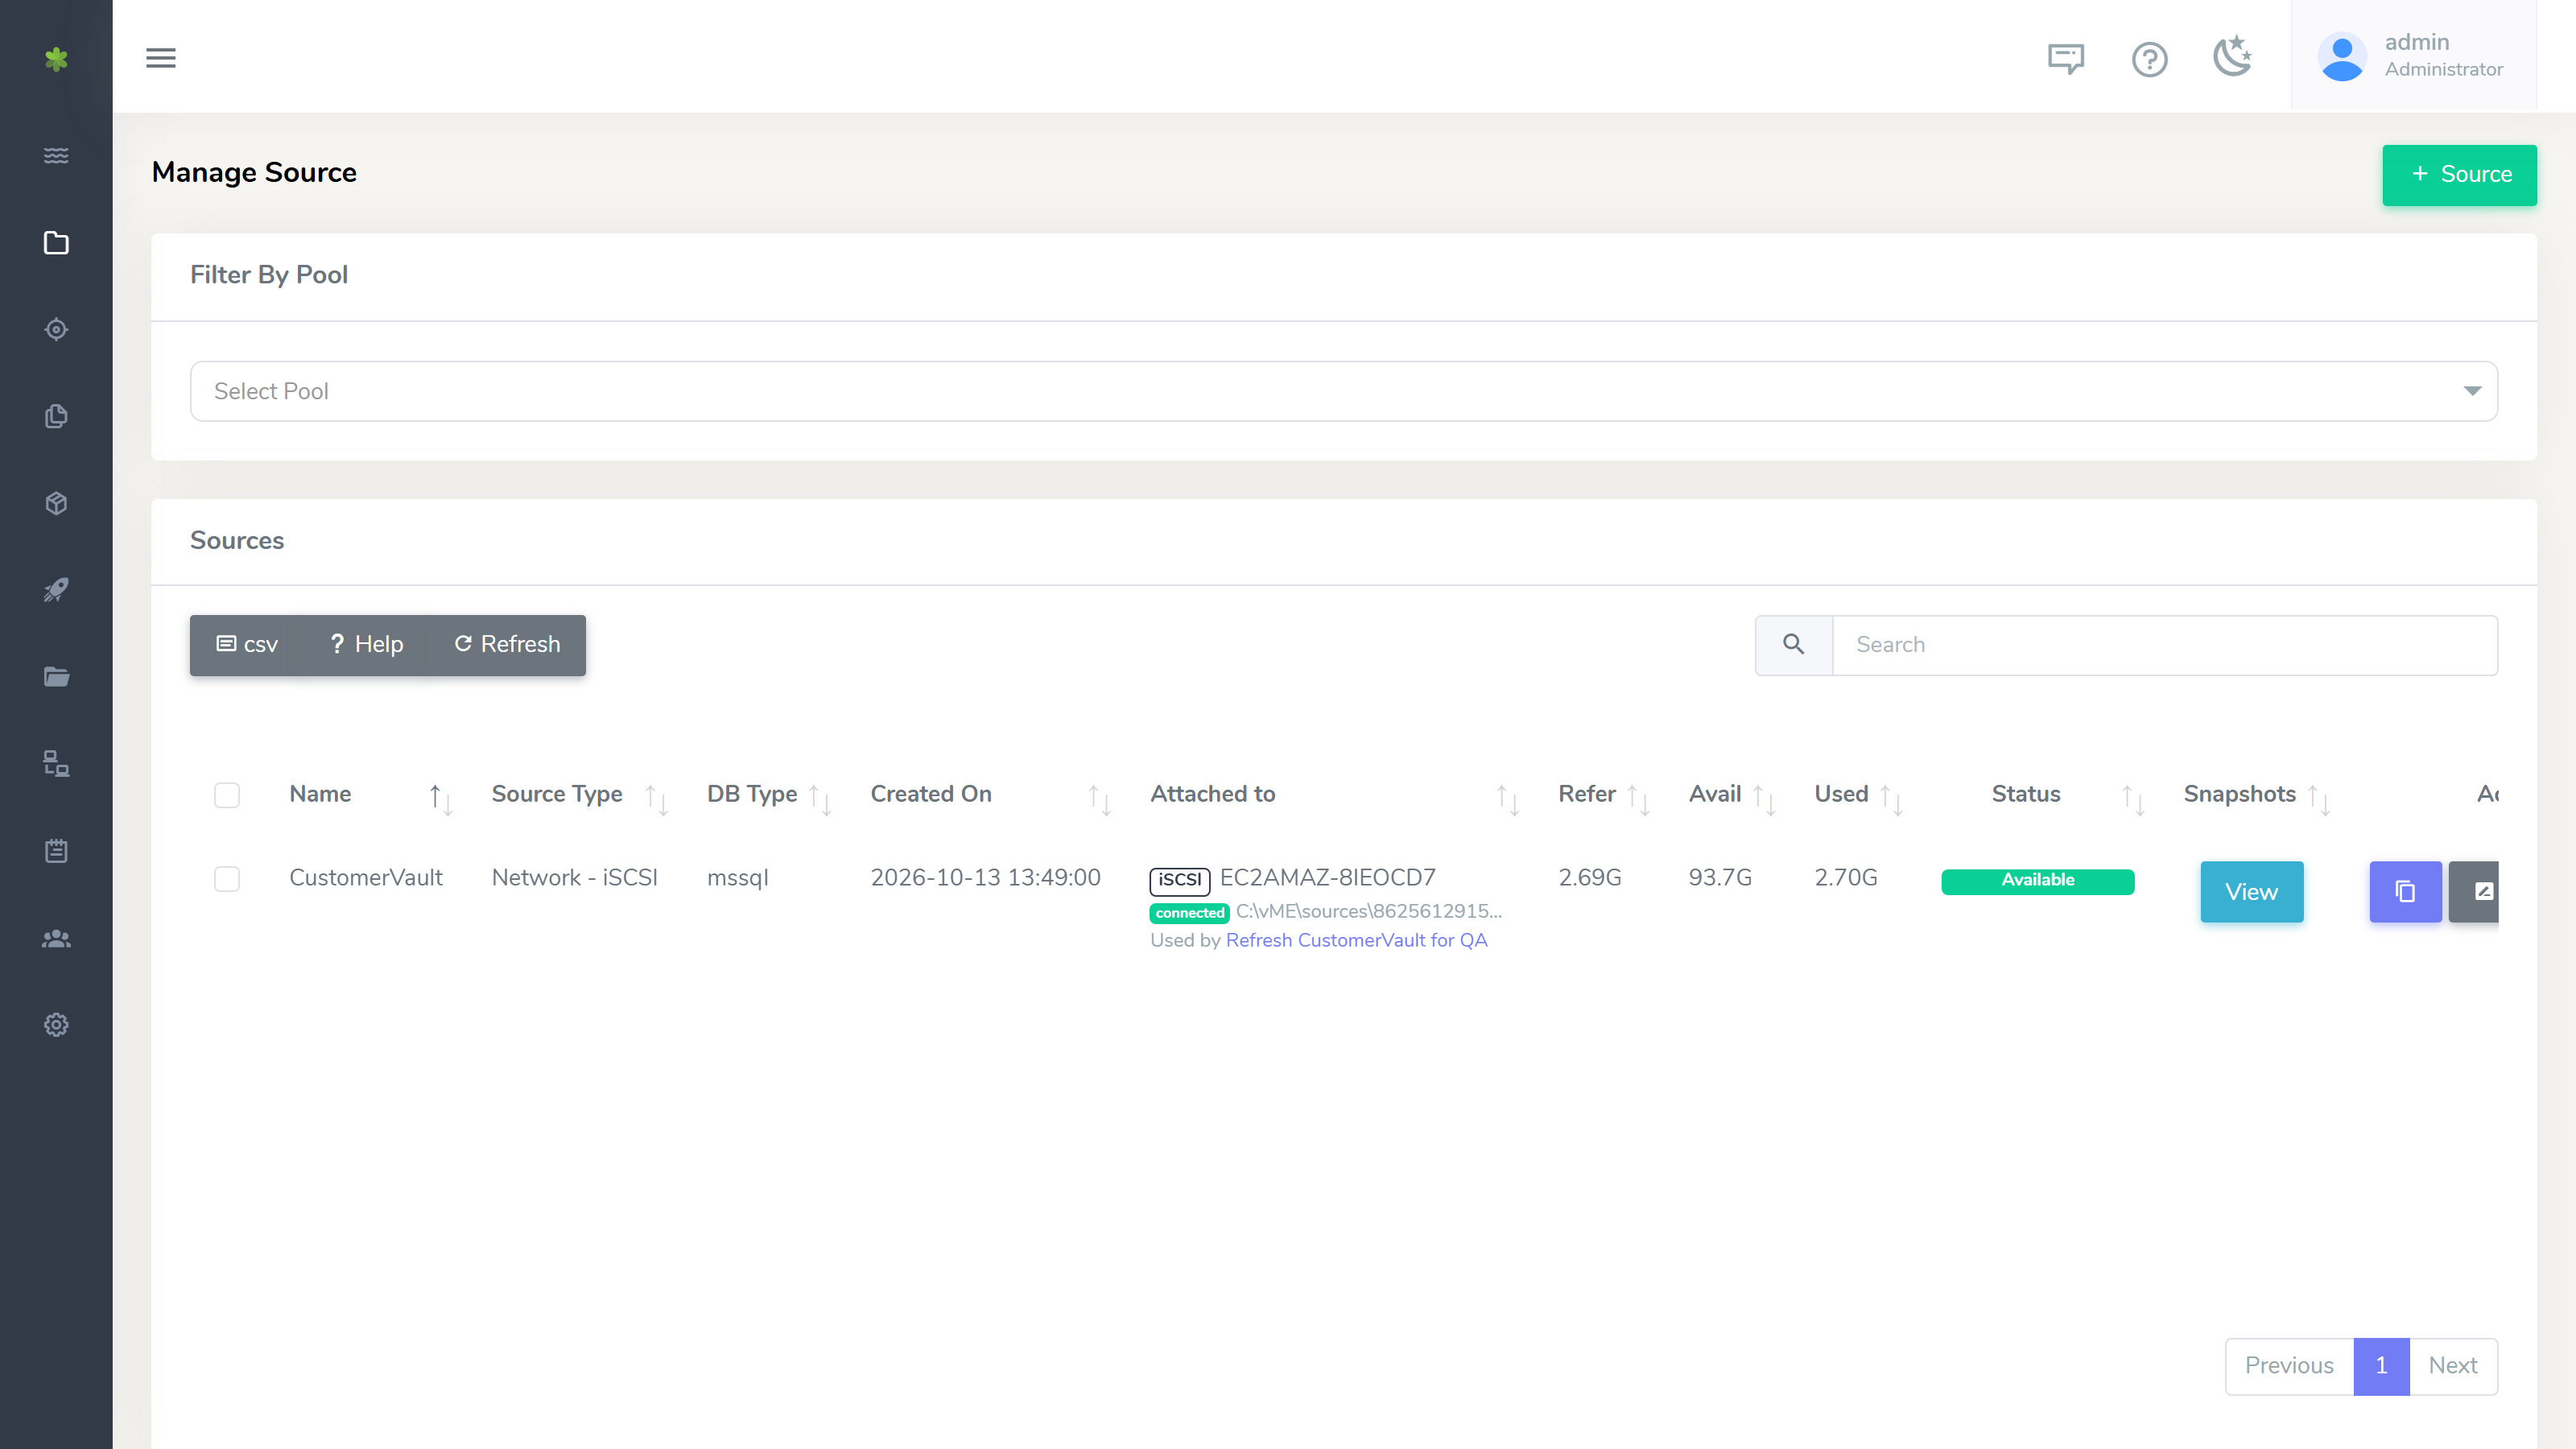
| Column | Description |
|---|---|
| Tick box | Picks the row for Delete selected. The box in the header picks every row that matches the search. See Deleting sources, snapshots and clones. |
| Name | Name of the source. |
| Source Type | How the source is served, for example Container or Network - iSCSI. |
| DB Type | Database type of the source. |
| Created On | When the source was created. |
| Attached to | Where the source is in use, and which unfinished workflows use it. See Attached to and Used by. |
| Refer | The amount of data the source holds. |
| Avail | The space the source can still grow into. |
| Used | The space the source takes up in the pool, its snapshots included. |
| Status | Whether the source is available. |
| Snapshots | View opens the Snapshots screen filtered to this source. |
| Action | Copy the source's mountpoint, rename the source, or delete it. Network sources also have their network settings here. |
Attached to and Used by
The Attached to column on the Sources and Clones lists says who has each object and where:
- A badge for the transport (iSCSI, Container or NFS), then the host or container that has the object.
- Its state, then where it is mounted on that host. A source or clone that the onboarding wizard mounted on a SQL Server host shows its folder under the host's vME folder, for example
C:\vME\sources\<id>. - Used by, then the unfinished onboarding workflows that use the object. Each name links to its workflow. Two are named, followed by "and N more" when there are others.
| Transport | State | Meaning |
|---|---|---|
| iSCSI | connected | A host is connected to the object's iSCSI target at this moment. |
| iSCSI | not connected | A workflow put the object on a host, but no host is connected to its target at this moment. |
| iSCSI | not attached | No host has the object. |
| Container | running | A running container mounts the object. |
| Container | stopped | A stopped container mounts the object. |
| Container | not attached | No container mounts the object. |
| NFS | exported | The object is exported to the clients named. |
| NFS | not attached | The object is not exported. |
A dash means nothing has the object and no workflow is using it.
A workflow counts as unfinished until it is completed or cancelled. An object that an unfinished workflow uses is not deleted from the lists; see Deleting sources, snapshots and clones.
Creating a Source
Navigate to the Source screen.
To create a new source, click on the “+ Source” button at the top right of the screen.
On click a new popup form will be shown which has the following inputs.
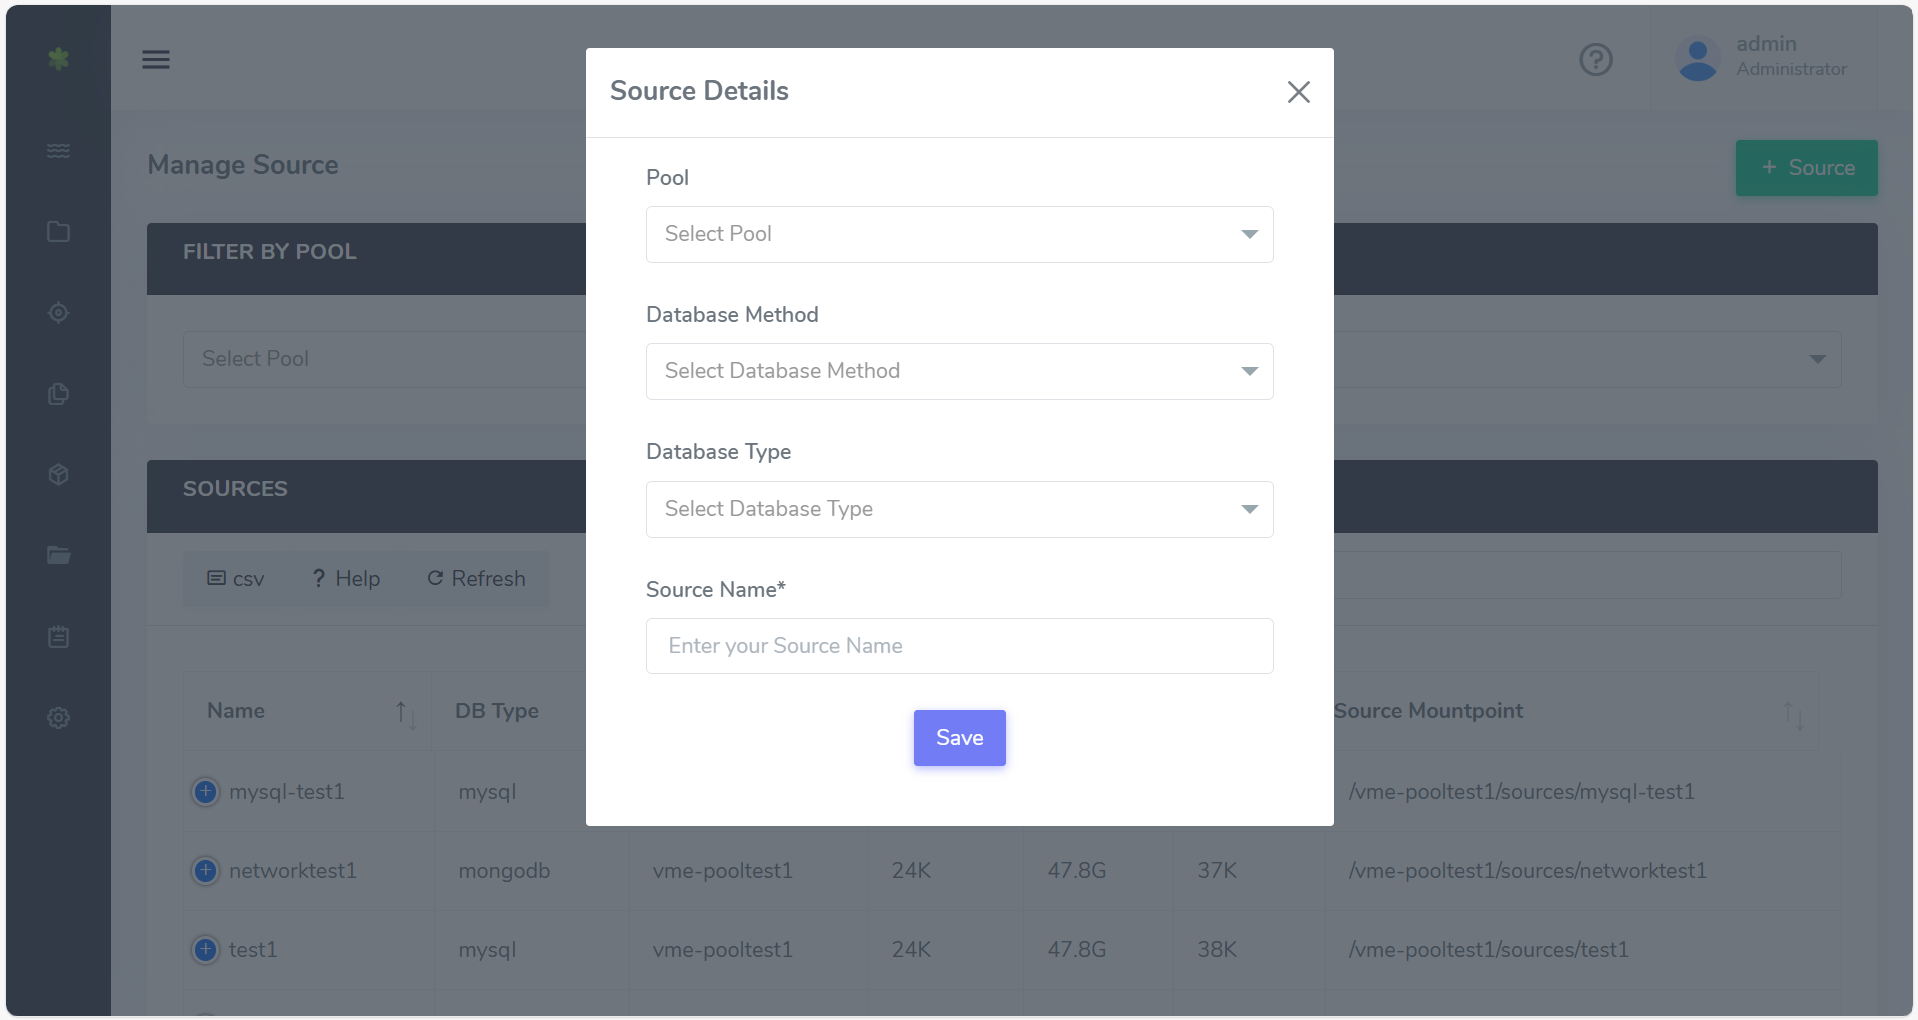
| Field Name | Description |
|---|---|
| Pool Name | Name of the pool. |
| Database Method | Choose container (default), network_iscsi (Network - iSCSI), or network_nfs (NFS). |
| Database Type | Database type, select from dropdown. For iSCSI sources, Database Type is set to Microsoft SQL automatically. |
| Source Name* | Enter your Source Name. |
When selecting the iSCSI method for source creation, the below fields will have to be configured.
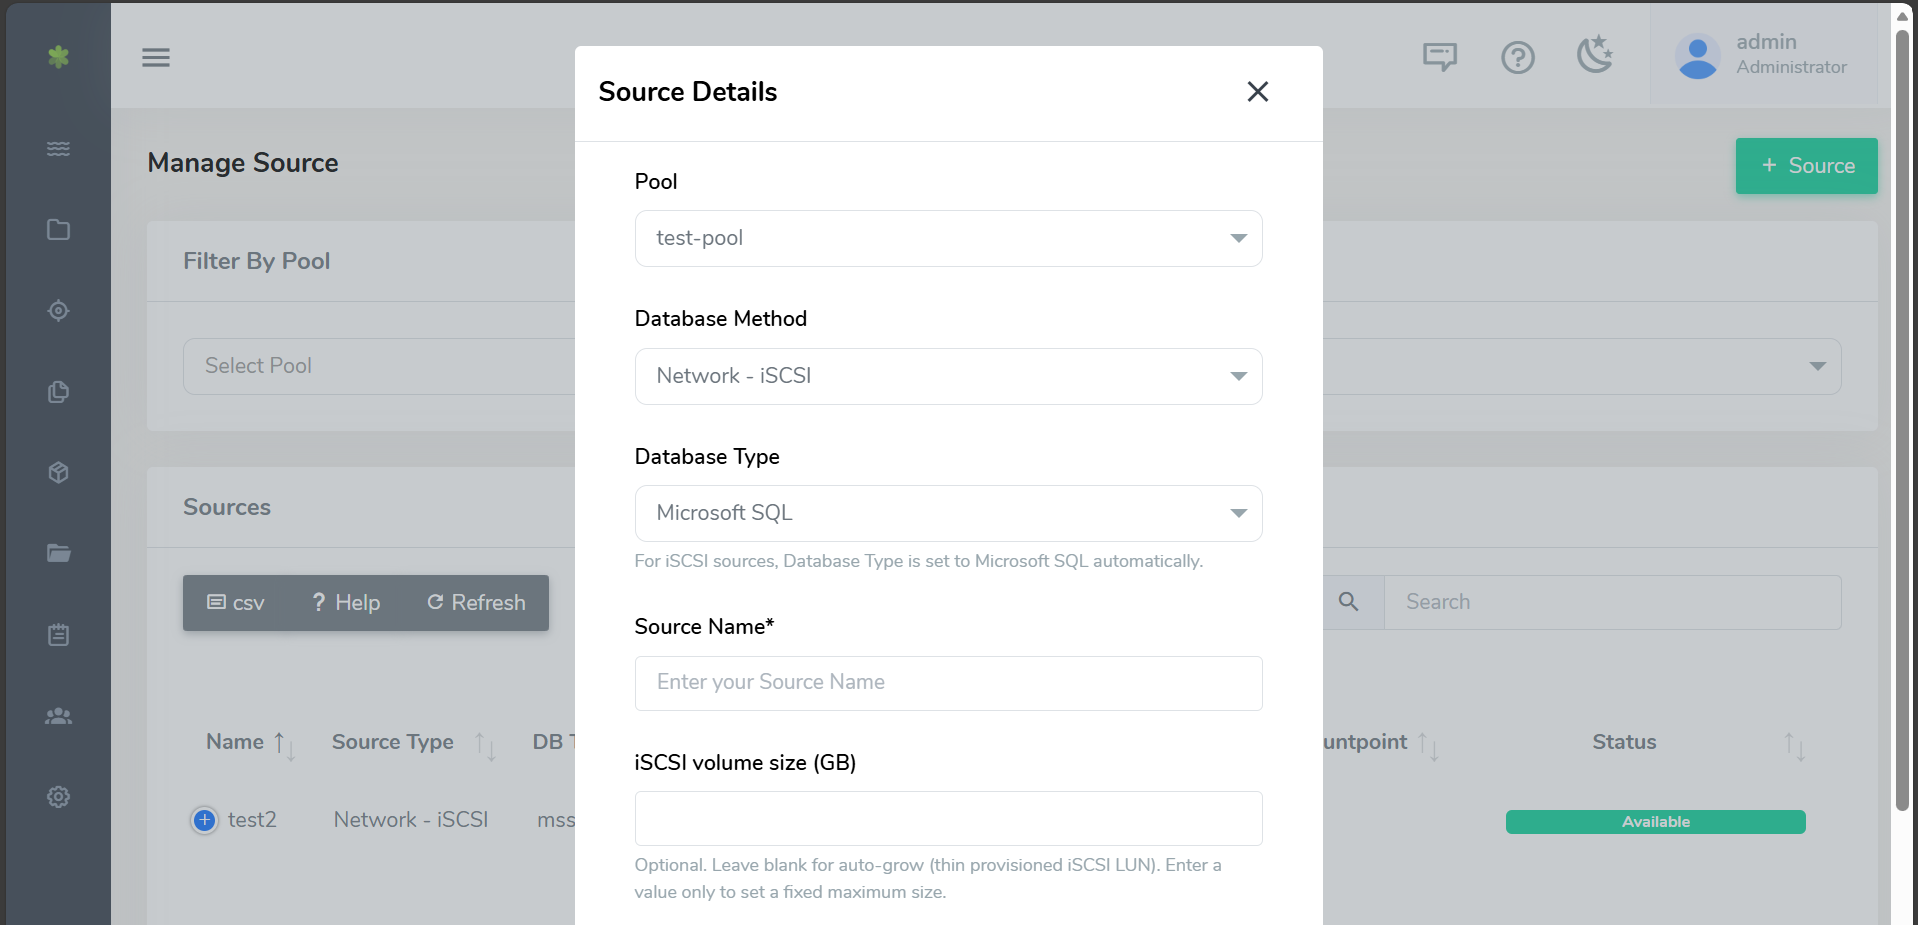
| Field Name | Description |
|---|---|
| iSCSI volume size (GB) | Optional. Leave blank for auto-grow (thin provisioned iSCSI LUN). Enter a value only to set a fixed maximum size. |
By default, the database type is set to "Microsoft SQL". An iSCSI source asks for no network settings: on Save, vME exports it as an iSCSI target on the appliance's iSCSI portal, which listens on all vME interfaces.
Network Settings
Each network source and clone in the list has a Network Settings (cog) button. What the dialog shows depends on how the source or clone is exported.
For an iSCSI export, the dialog shows the export's Target: the iSCSI target name (IQN) a host connects to. There is no client address, anonuid or anongid to set. Delete removes the iSCSI target, and a host connected to it loses the volume.
For an NFS export, the dialog holds the three fields that decide who may mount it:
| Field Name | Default | Description |
|---|---|---|
| Client Address* | 0.0.0.0 | The IPv4 address(es) allowed to mount the export, separated by commas. Use 0.0.0.0 to allow any host. |
| anonuid* | 65534 | The user ID that anonymous NFS access is mapped to. |
| anongid* | 65534 | The group ID that anonymous NFS access is mapped to. |
Load Default fills in the defaults shown above. Saved settings open read-only; click Edit to change them.
iSCSI Source Form Instructions
When creating an iSCSI source from the Source form, fill the fields as follows:
- Set
Database Methodtonetwork_iscsi. - Select
Pool Name,Database Type, and enterSource Name. - In
iSCSI volume size (GB), leave blank for auto-grow (thin provisioning), or enter a fixed GB value for a hard cap. - Click
Saveto create the source and export it as an iSCSI target. - To see the target name, open
Network Settings(cog icon) on the source's row.
Auto-Grow Behavior
When vsize is blank, vME creates thin-provisioned iSCSI storage:
- Logical capacity is capped by platform policy.
- Physical usage grows only as data is written.
- Pool free space must still be monitored.
For network_iscsi sources, continue with the iSCSI connector workflow:
iSCSI (SQL Server) Connector.
For network_nfs sources, ensure your NFS client access is configured for the vME export before use.
Snapshots
Snapshots are point-in-time snaps of the source's state. Creating a snapshot means recording source vnodes and keeping track of them. Once the data on that inode is updated, the old block of data is retained. You can access the old data view by using said snapshot, and only use as much space as has been changed between the snapshot time and the current time.
For network_iscsi sources, you still create snapshots in vME, but you will export clones as iSCSI
targets and mount them on a SQL Server via the connector workflow.
For network_nfs sources, snapshots and clones are consumed via NFS mounts.
The Snapshots list
Navigate to the Snapshots screen. The list shows every snapshot; Filter By Source narrows it to the snapshots of one source.
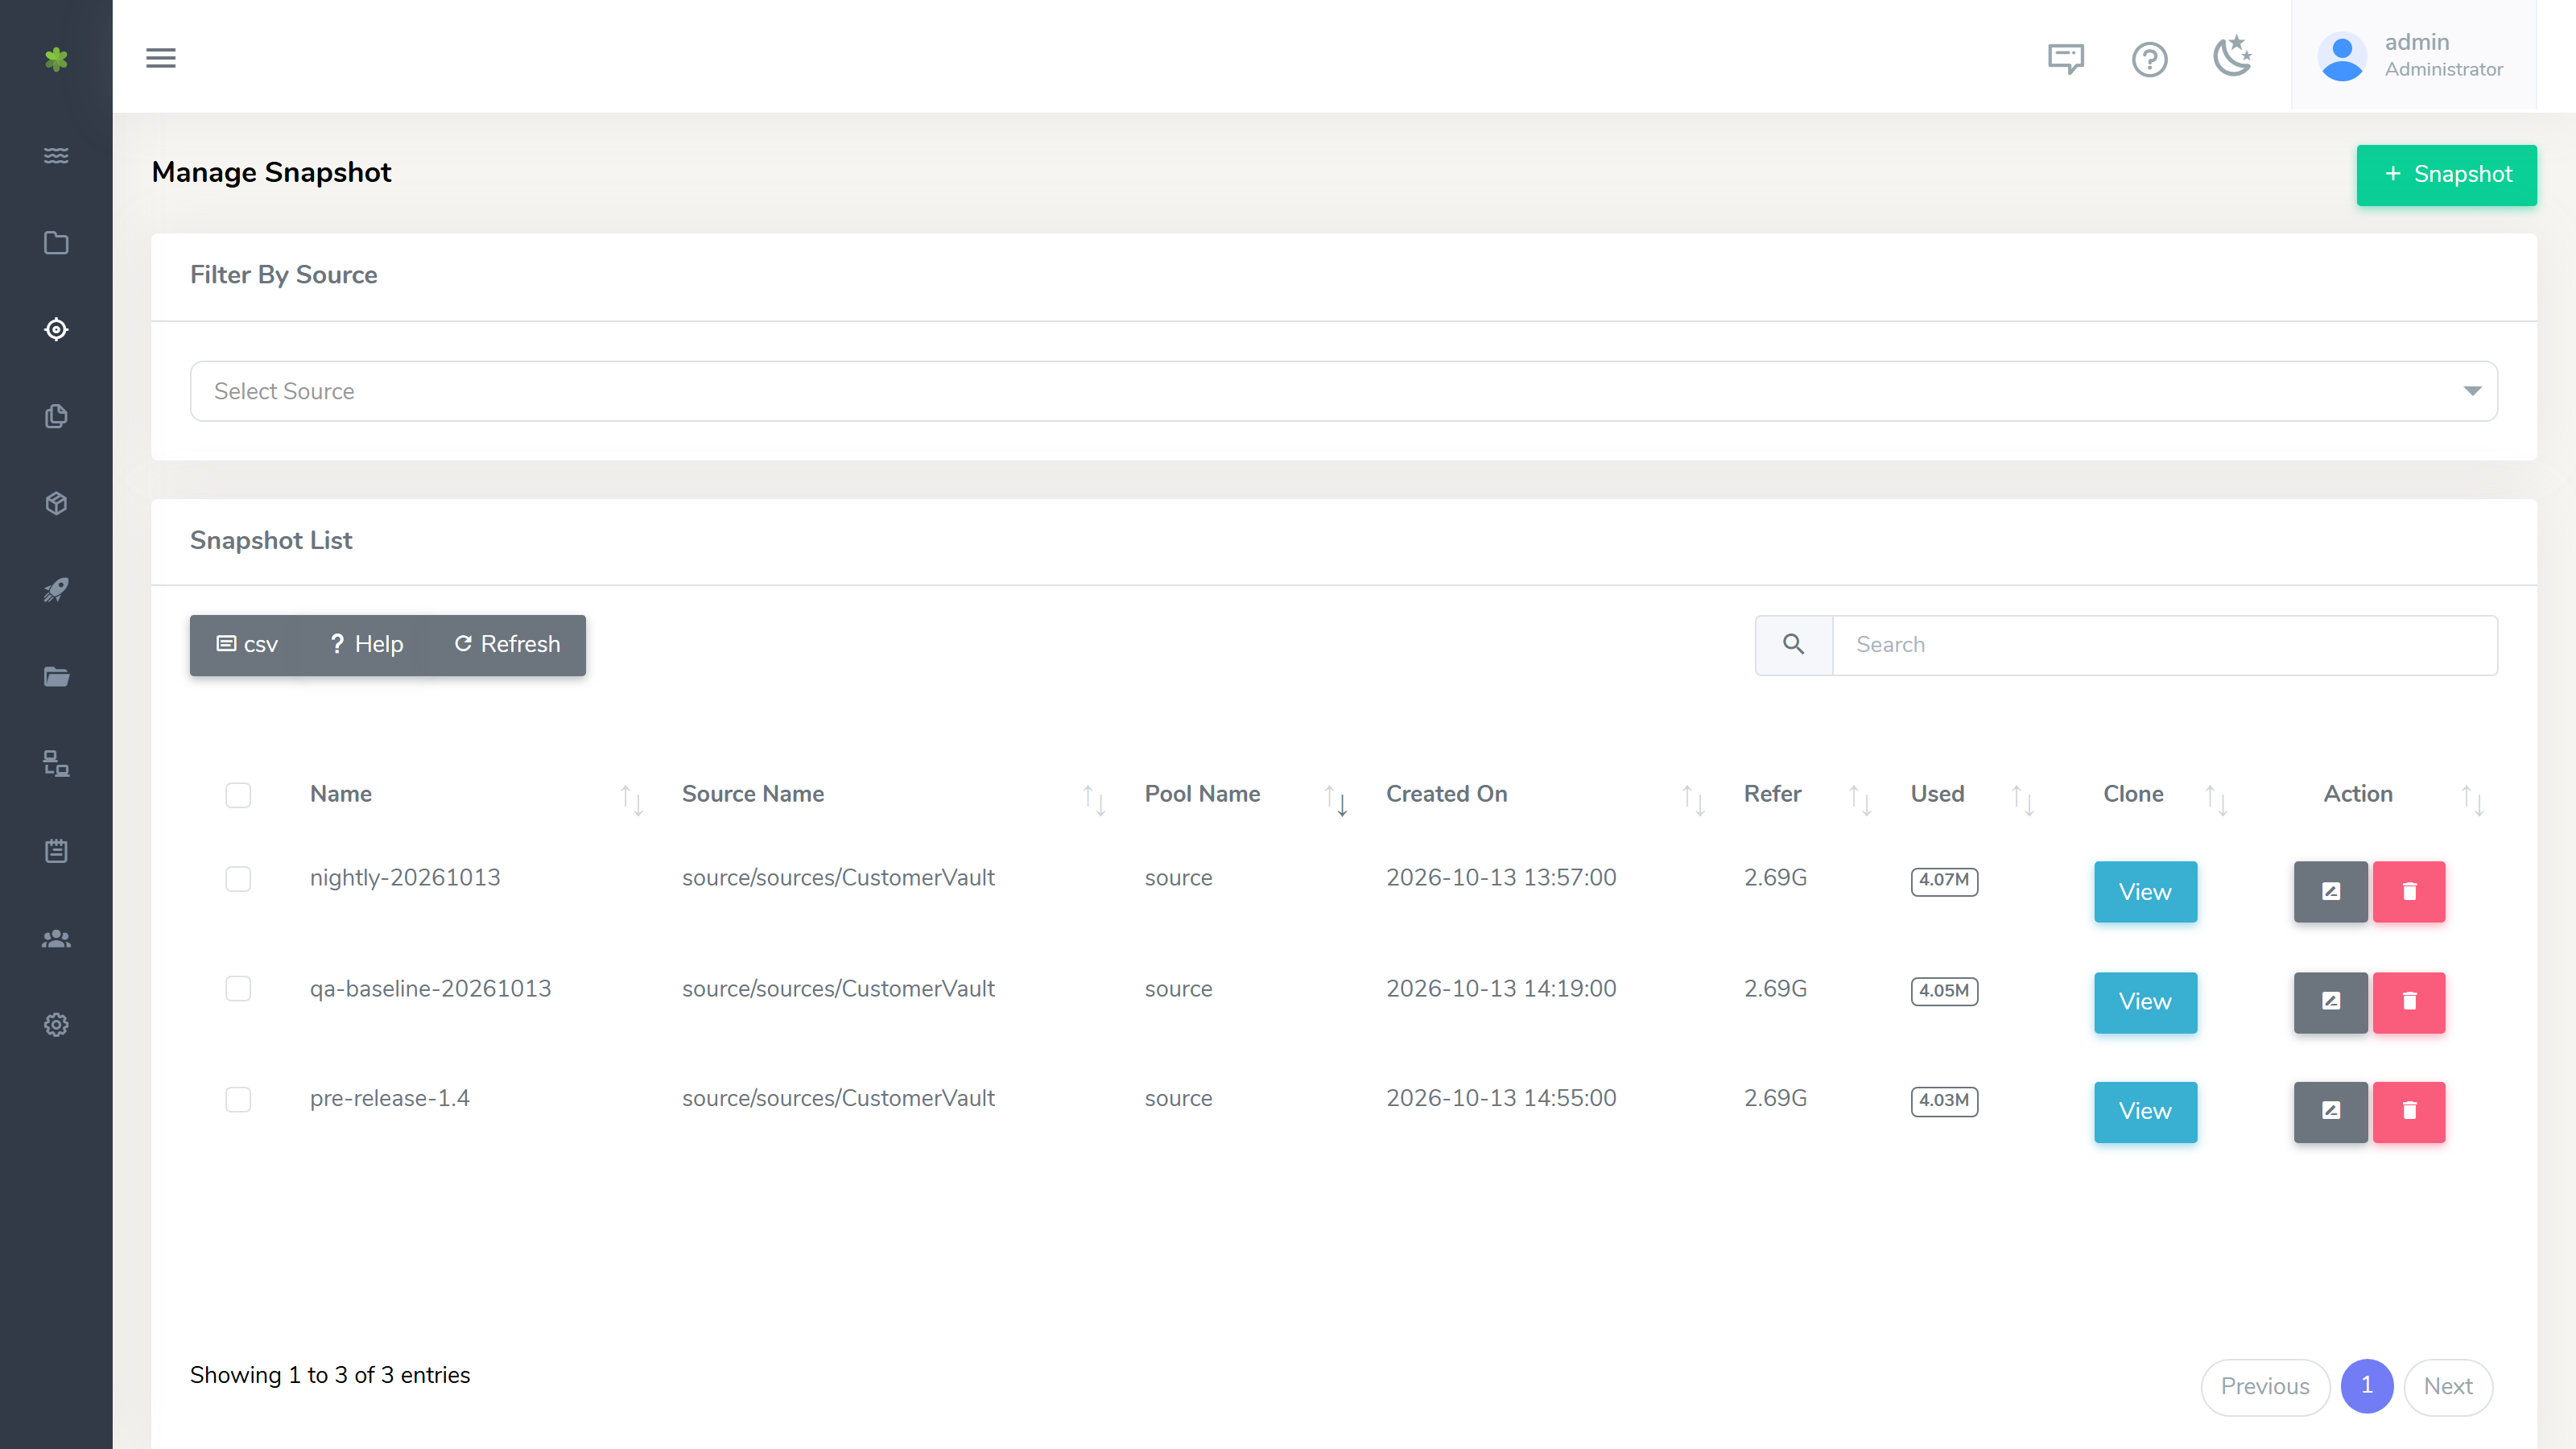
| Column | Description |
|---|---|
| Tick box | Picks the row for Delete selected. The box in the header picks every row that matches the search. See Deleting sources, snapshots and clones. |
| Name | Name of the snapshot. |
| Source Name | The source the snapshot was taken of. |
| Pool Name | The pool the source is in. |
| Created On | When the snapshot was taken. |
| Refer | The amount of data the snapshot holds. |
| Used | The space the snapshot takes up: the data that has changed on the source since it was taken. |
| Clone | View opens the Clones screen filtered to the clones of this snapshot. |
| Action | Rename the snapshot, or delete it. |
Creating a Snapshot
Navigate to the Snapshots screen.
To create a new snapshot, click on the “+ Snapshot" button at the top right of the screen.
On click a new popup form will be shown which has the following inputs.
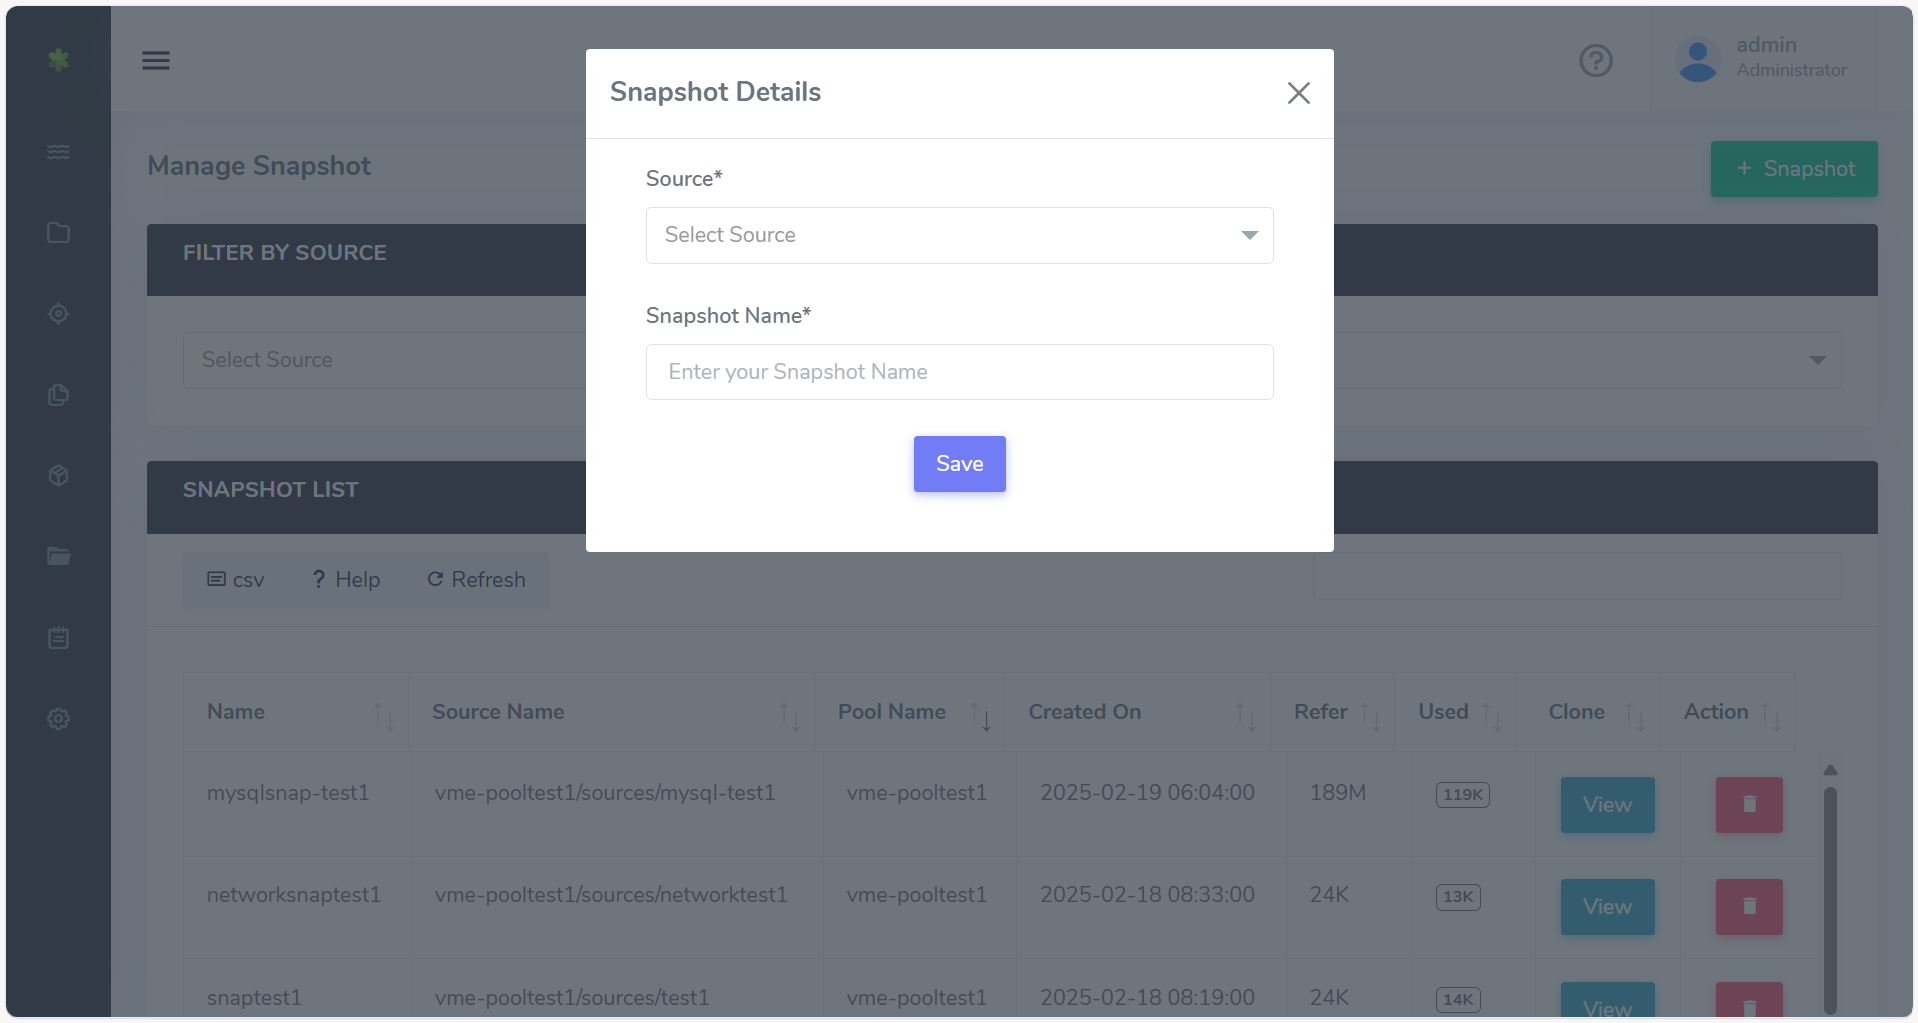
| Field Name | Description |
|---|---|
| Source | Source to create snapshot from. |
| Snapshot Name | Name of snapshot to be created. |
Bookmarks and rollback of a mounted source or clone
Taking a snapshot of a source, or bookmarking or rolling back a clone, that a SQL Server host has mounted is done through that host: its agent takes the databases on the volume offline, the snapshot or rollback is made, and the databases come back online. A dialog shows each of the three steps as the host reports it. See Bookmark or roll back an attached volume.
If the host cannot be reached, the dialog Cannot reach the host explains what to do by hand and offers Proceed without the host, which asks you to confirm that you have taken the databases offline yourself.
Clones
Snapshots are read-only. If you want to mount a snapshot and make changes to it, you'll need to create a clone.
Each clone works just like a normal database, but takes only a few seconds to create.
For network_iscsi sources, clones are consumed via iSCSI targets rather than container mounts.
See the connector workflow: iSCSI (SQL Server) Connector.
For network_nfs sources, clones are consumed via NFS mounts rather than container mounts.
The Clones list
Navigate to the Clones screen. The list shows every clone; Filter By Snapshot narrows it to the clones of one snapshot.
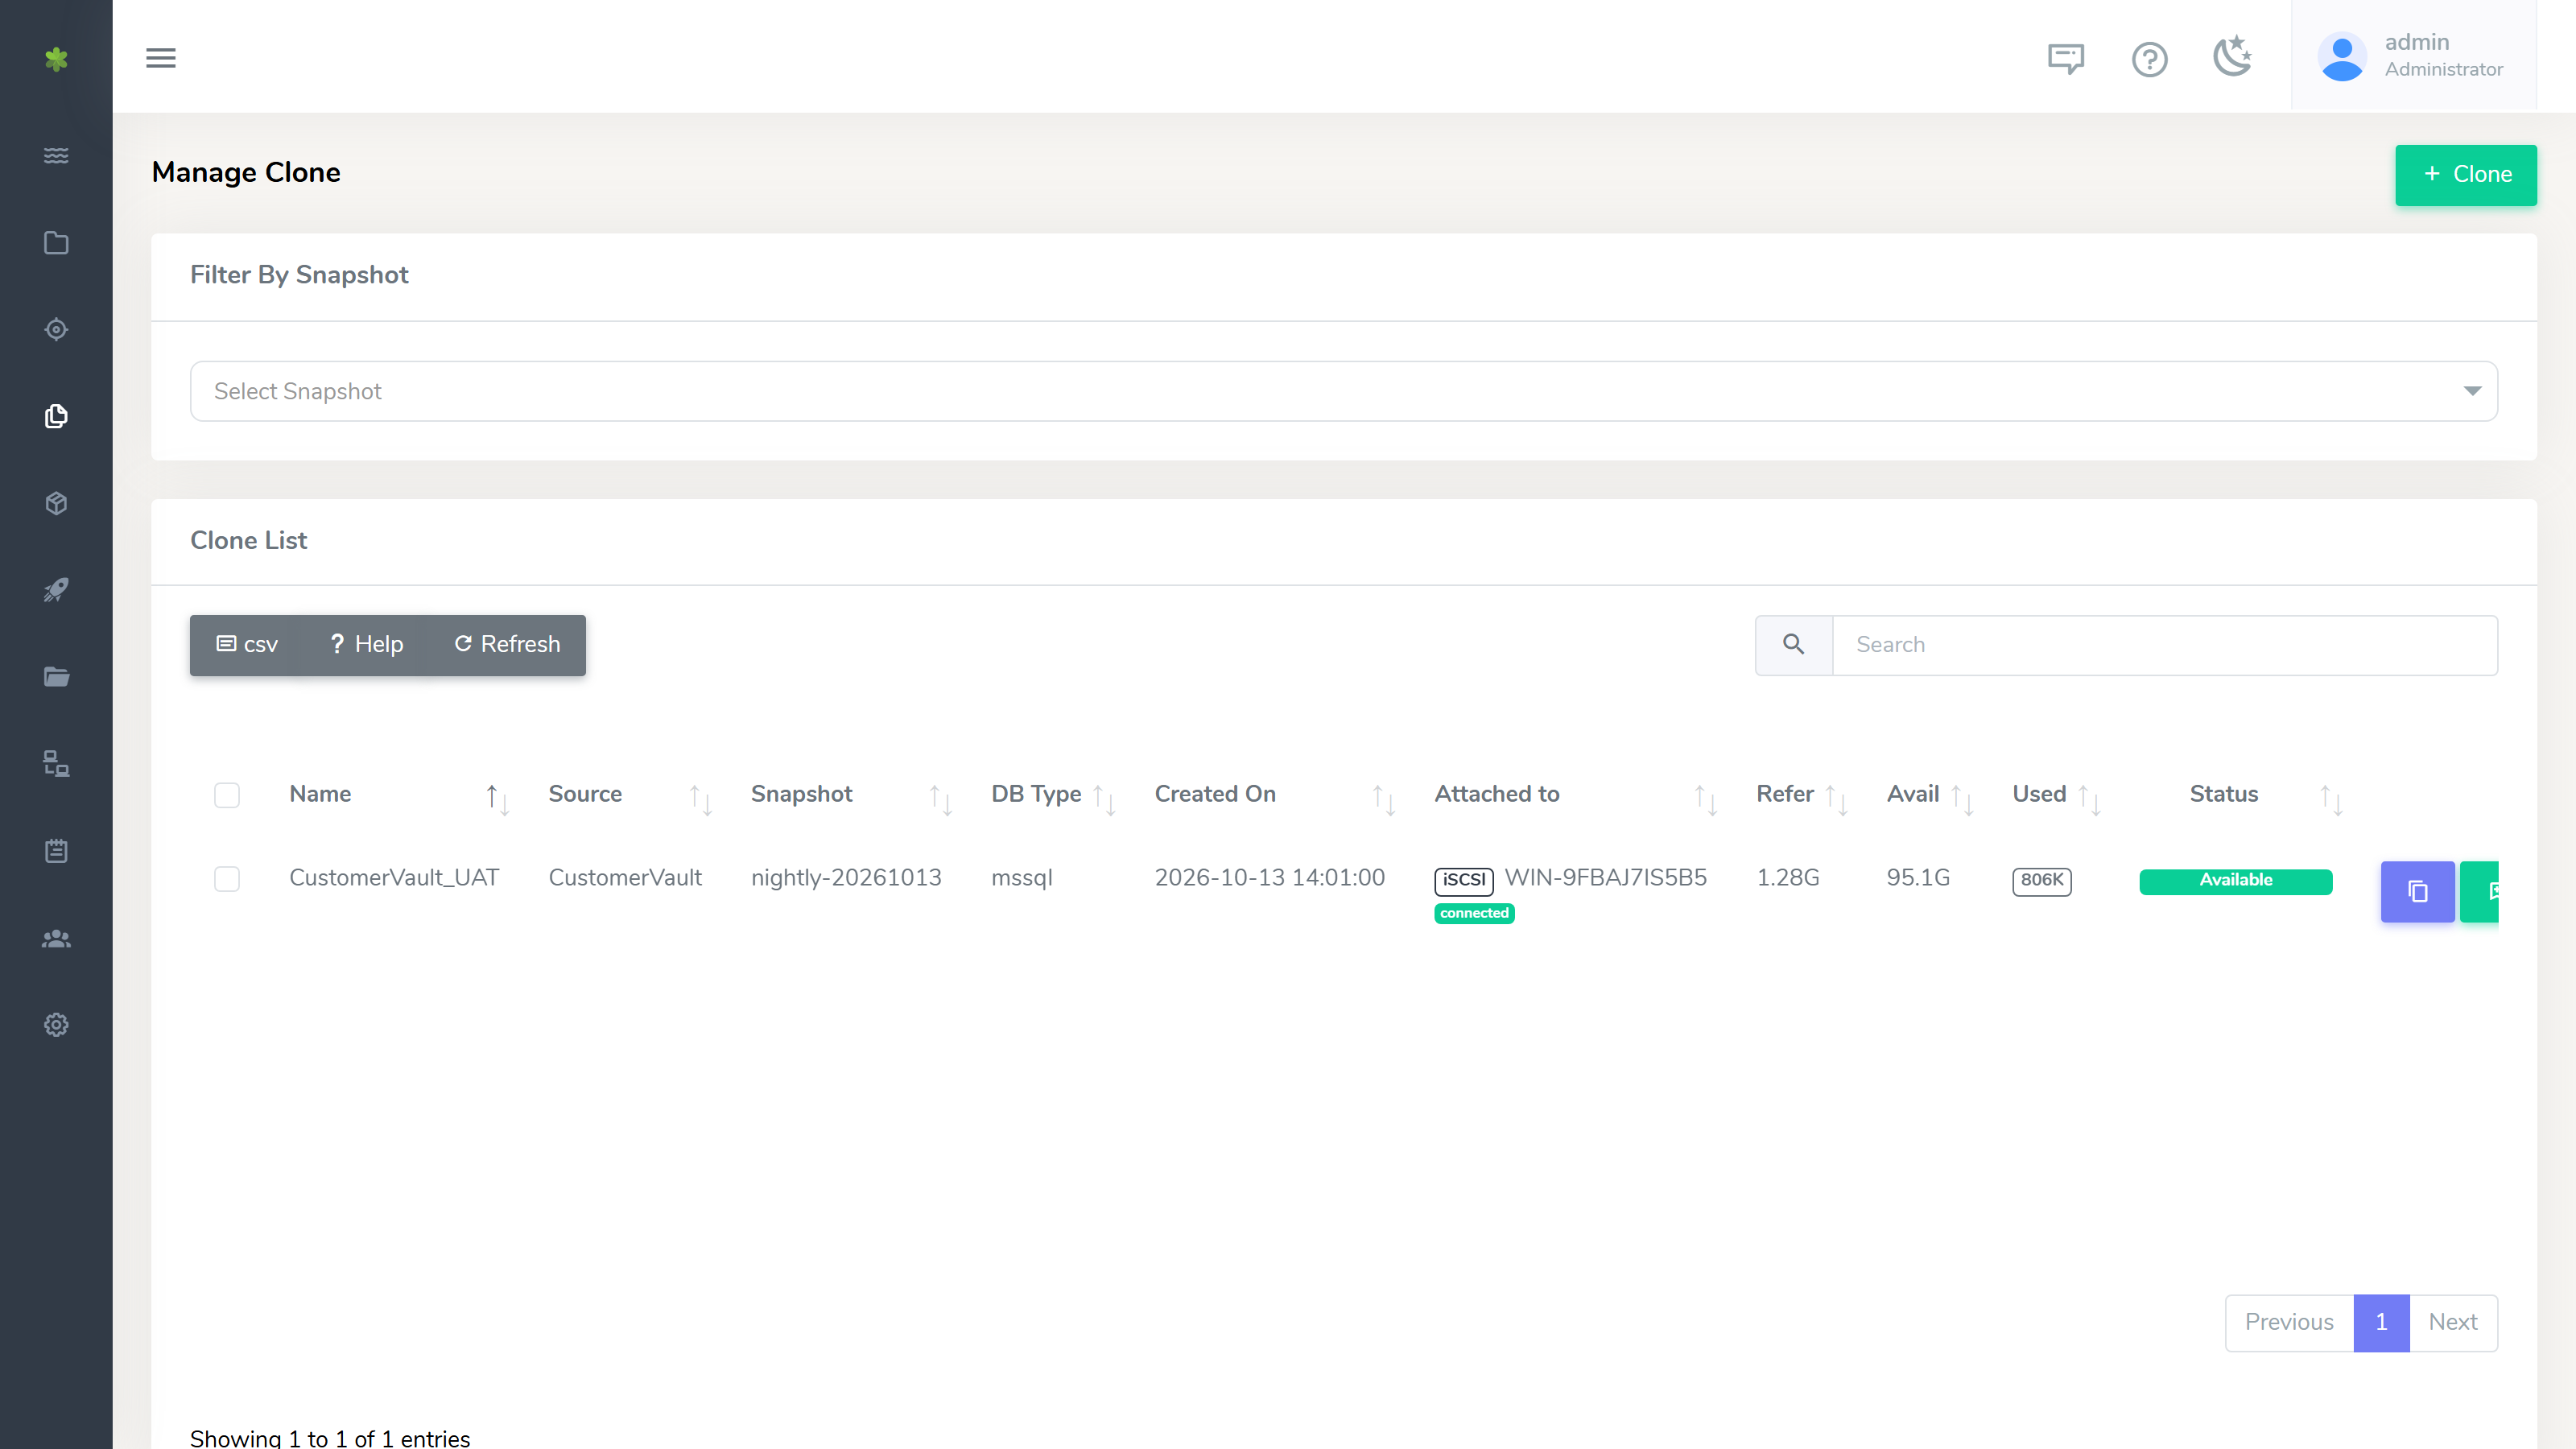
| Column | Description |
|---|---|
| Tick box | Picks the row for Delete selected. The box in the header picks every row that matches the search. See Deleting sources, snapshots and clones. |
| Name | Name of the clone. |
| Source | The source the clone's snapshot was taken of. Hover for the full name. |
| Snapshot | The snapshot the clone was made from. Hover for the full name. |
| DB Type | Database type of the clone. |
| Created On | When the clone was created. |
| Attached to | Where the clone is in use, and which unfinished workflows use it. See Attached to and Used by. |
| Refer | The amount of data the clone holds. |
| Avail | The space the clone can still grow into. |
| Used | The space the clone takes up: the data written to it since it was made. |
| Status | Whether the clone is available. |
| Action | Copy the clone's mountpoint, create a bookmark, roll back to a bookmark, rename the clone, or delete it. Network clones also have their network settings here. |
Creating a Clone
Navigate to the Clones screen.
To create a new clone, click on the “+ Clone" button at the top right of the screen.
On click a new popup form will be shown which has the following inputs.
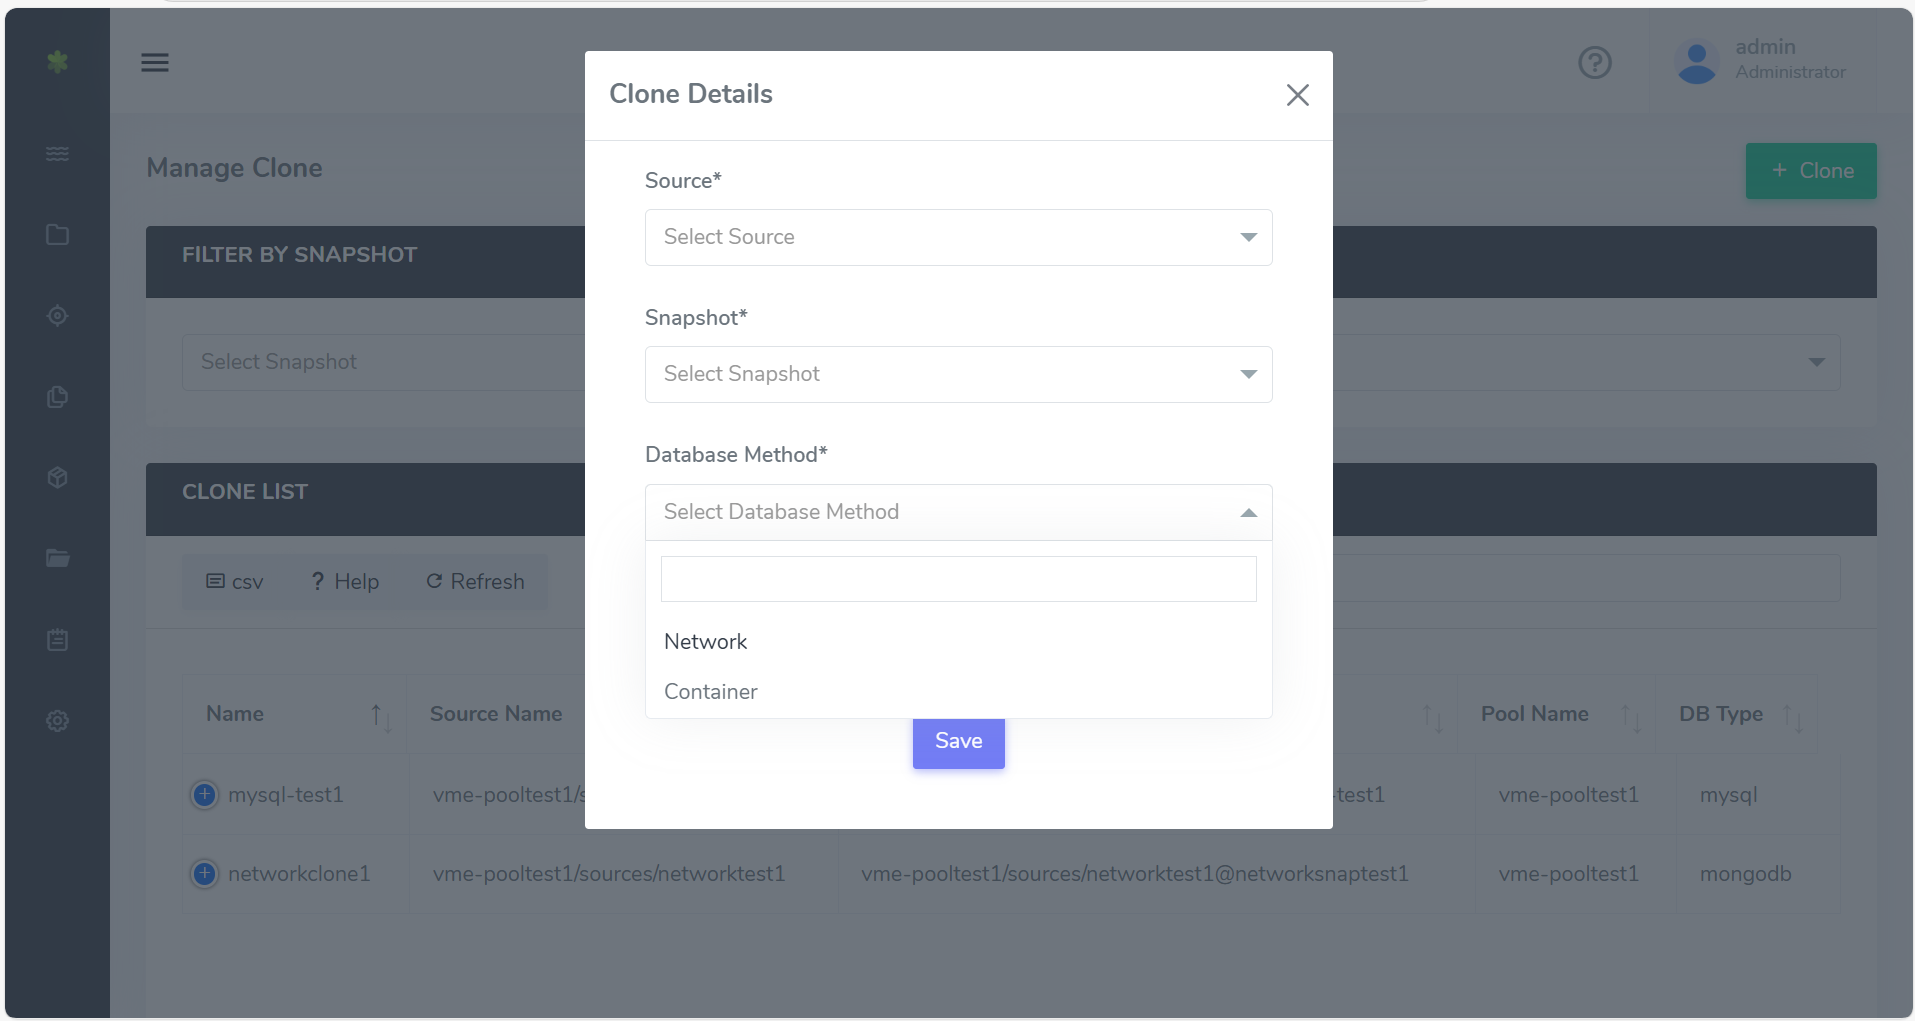
| Field Name | Description |
|---|---|
| Source | Source to create clone from. |
| Snapshot | Snapshot to create clone from. |
| Clone Name | Name of clone to be created. |
Deleting sources, snapshots and clones
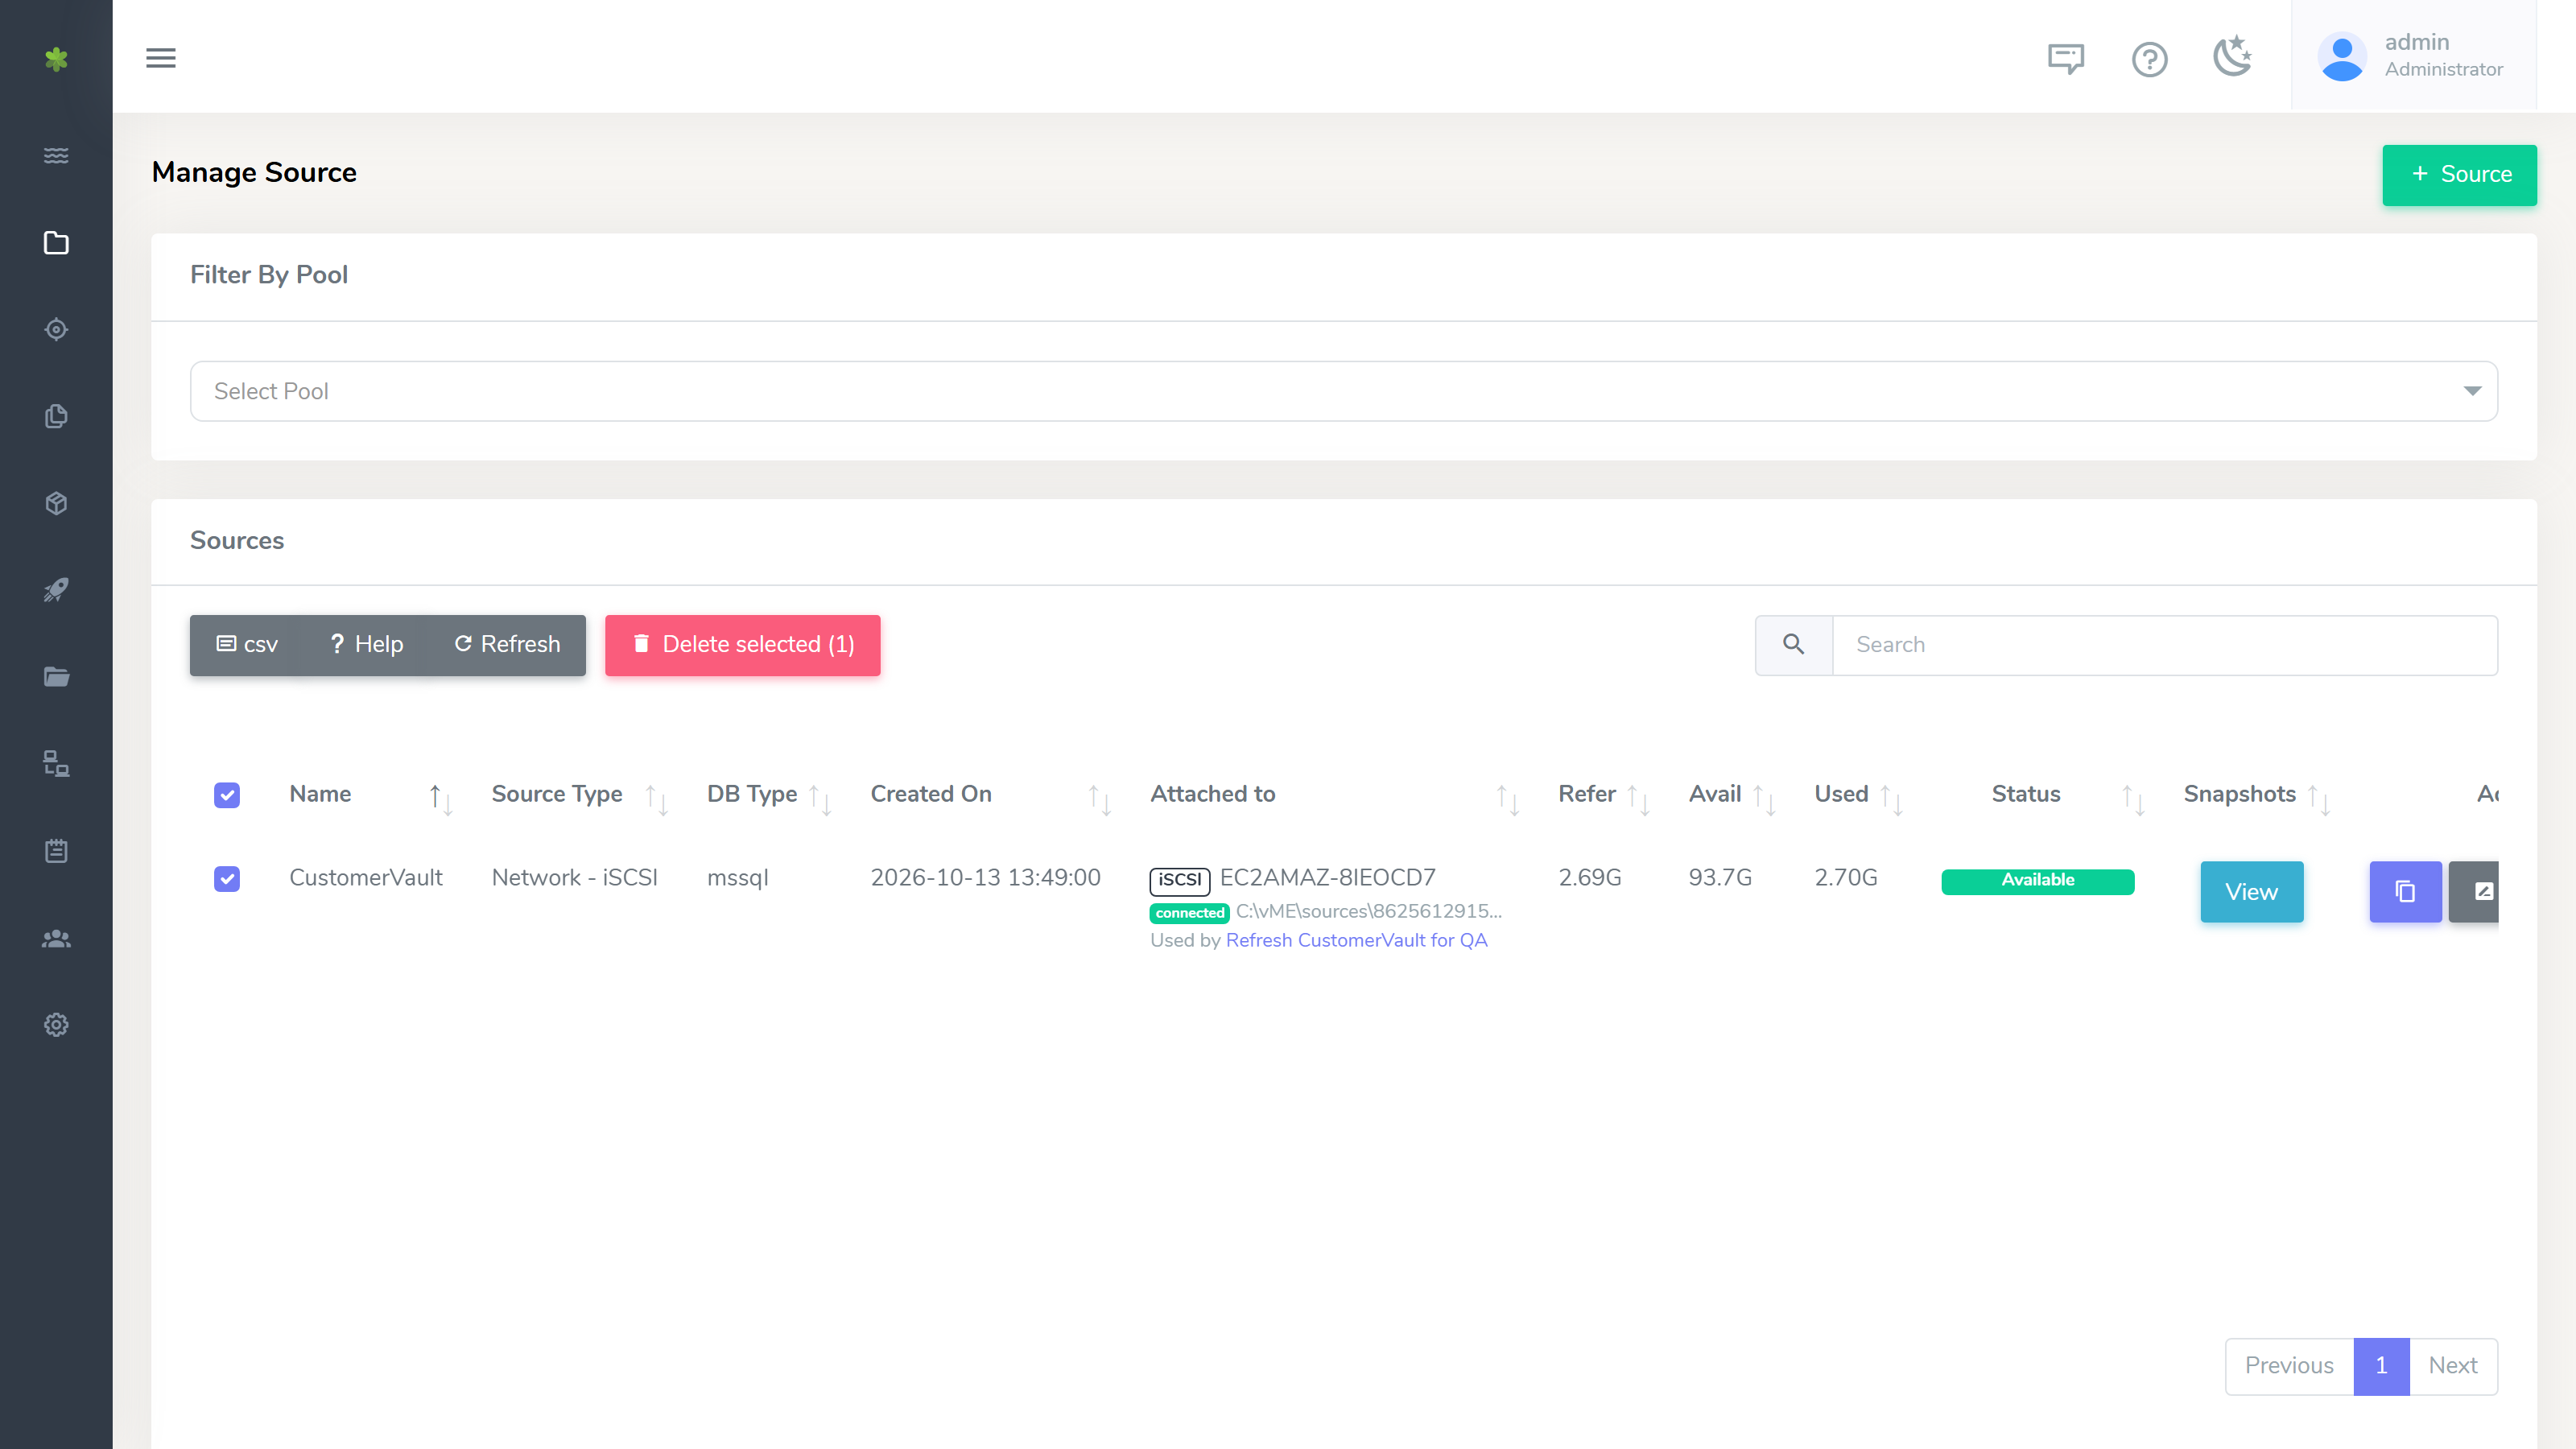
The bin button in a row's Action column deletes that one object. To delete several at once:
- Tick the rows to delete on the Sources, Snapshots or Clones list. The tick box in the header picks every row that matches the search, on every page of the list.
- Click Delete selected, beside the csv and Refresh buttons. It shows how many rows are ticked.
- Check the objects listed in the confirmation, and click Yes.
vME deletes the objects in a selection in a fixed order: clones first, then snapshots, then sources. A snapshot that still has clones, or a source that still has snapshots, is not deleted, so to remove a source and everything made from it, delete its clones on the Clones screen, then its snapshots, then the source.
When every object is deleted, a message says how many were. Deleting a source or clone can take a few moments to finish; one that is still going is counted as "still being removed".
When an object is not deleted
When anything in the selection is not deleted, a report opens titled Deleted N of M, with one line per object and the reason in plain words. The rest of the selection is still deleted. A single delete from the bin button is reported the same way.
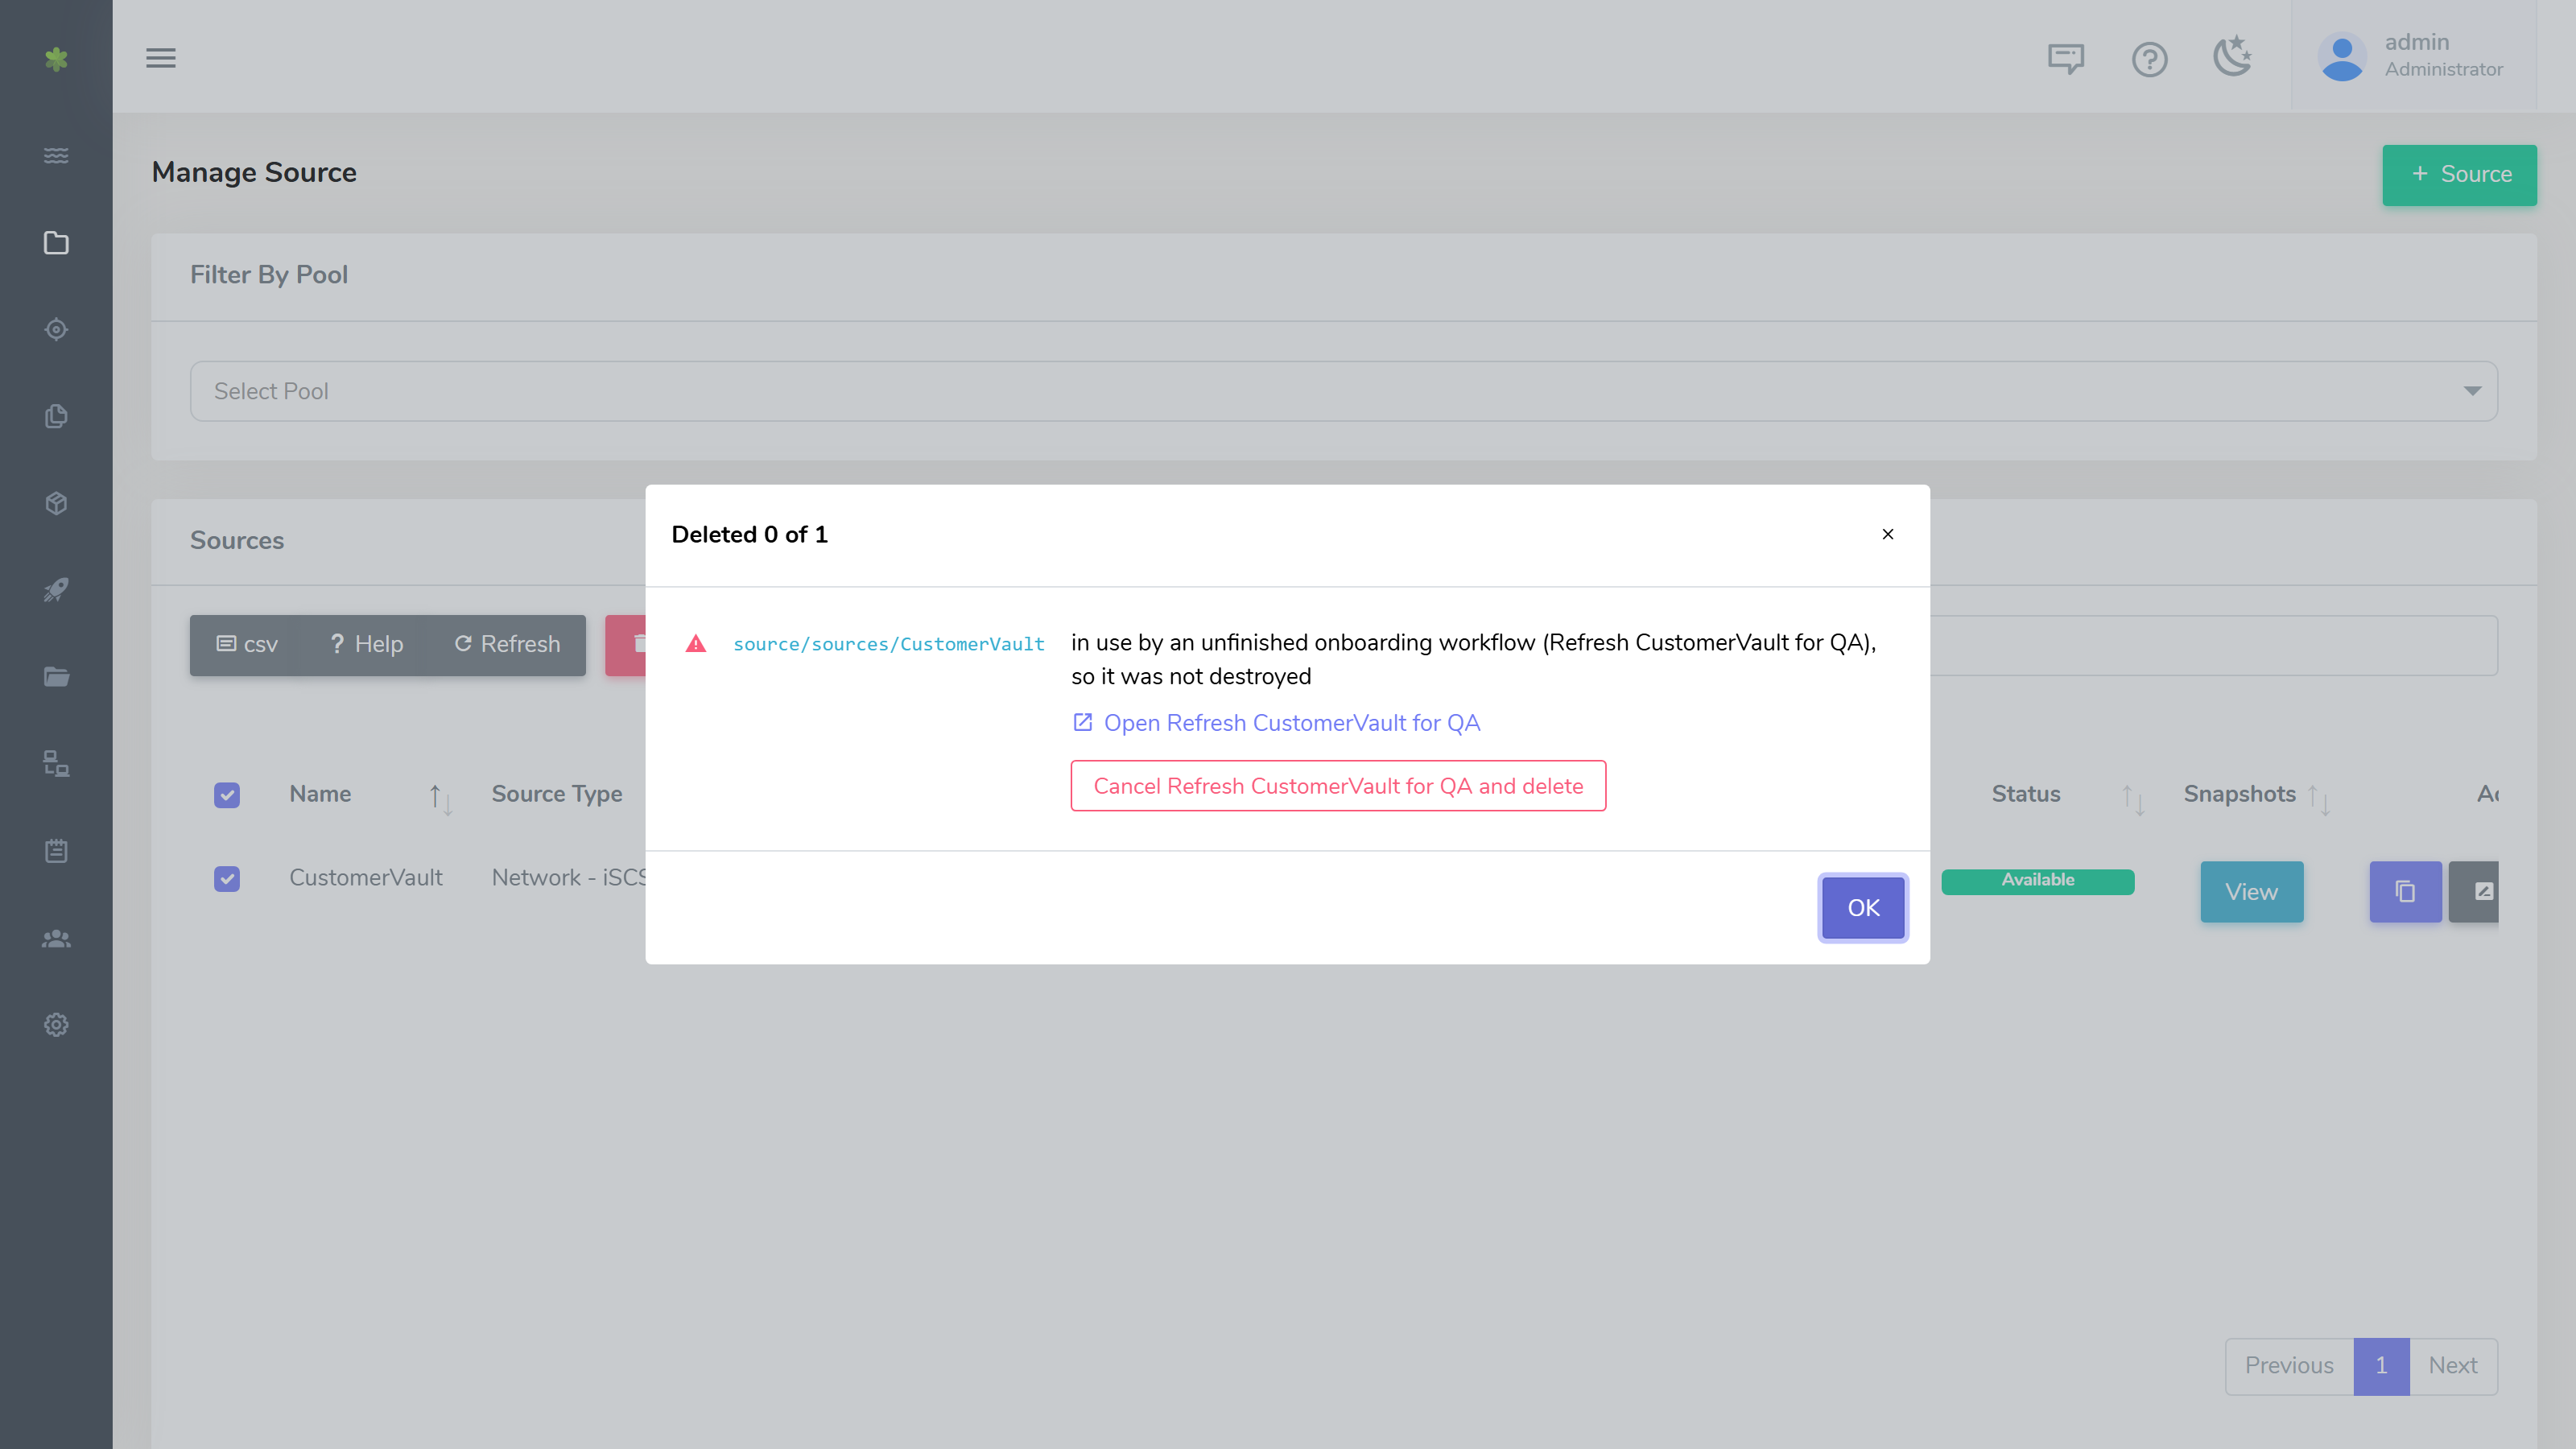
| Reason shown | What to do |
|---|---|
| in use by an unfinished onboarding workflow (name), so it was not destroyed | The line offers two buttons. Open name opens the workflow, so you can finish it. Cancel name and delete cancels the workflow and deletes the object: the workflow stops where it is and keeps everything else it made. |
| has N snapshot(s) (names); delete them first, or select them with it | Delete the source's snapshots on the Snapshots screen, then delete the source. |
| has N clone(s) (names); delete them first, or select them with it | Delete the snapshot's clones on the Clones screen, then delete the snapshot. |
| ... (the clone(s) in this selection are still being destroyed; run it again once they have gone) | Objects deleted earlier in the same selection had not finished going. Wait a moment and delete this one again. |
A snapshot counts as in use only when a workflow uses that snapshot itself. A workflow that uses a source does not hold the source's other snapshots.
A SQL Server host that had a deleted source or clone mounted can still know its iSCSI target. Clear such targets from the host with Host maintenance in Agent Manager.
Deleting a workflow
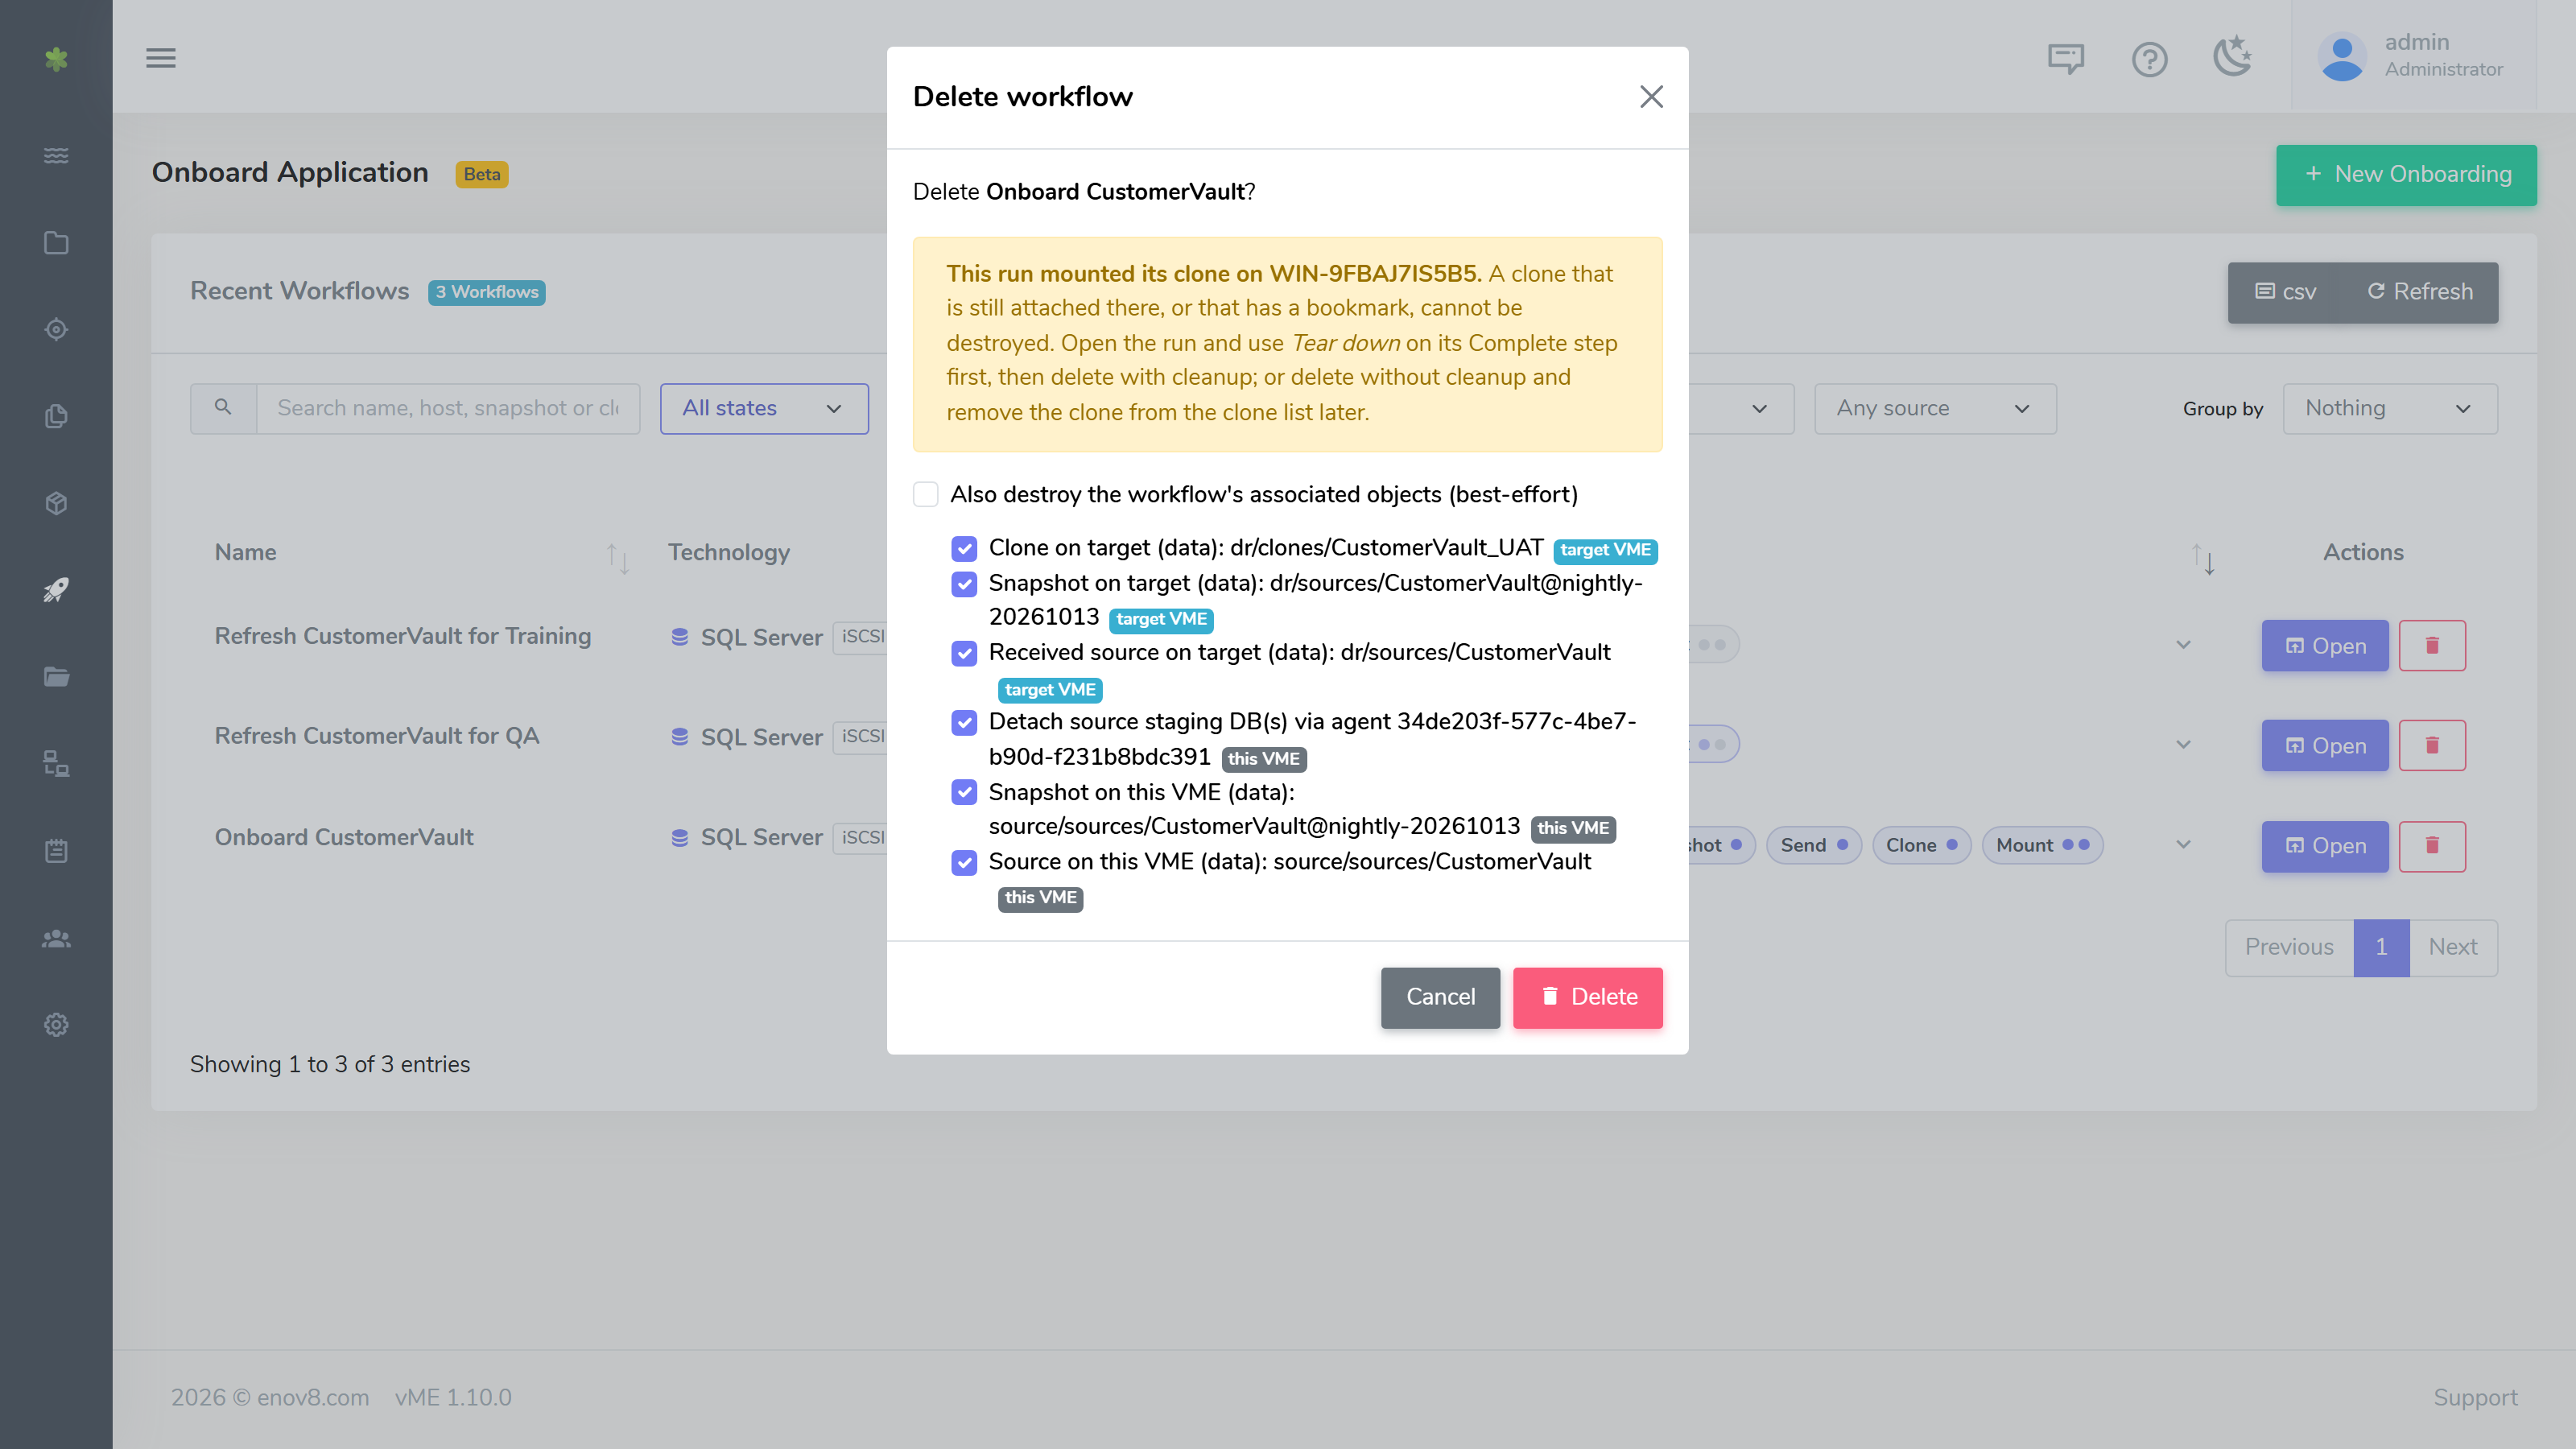
Workflows are deleted from the Recent Workflows list on the Onboard Application screen. The Delete workflow dialog lists the objects that workflow made, each marked with the appliance it is on (this VME or target VME). Tick Also destroy the workflow's associated objects (best-effort) to delete the ticked objects with the workflow. Only objects that workflow made are listed: a source or snapshot it started from is left alone.
If the workflow mounted its clone on a SQL Server host, the dialog says so in a warning. A clone that is still attached to a host, or that has a bookmark, cannot be destroyed. Either:
- open the workflow and use Tear down on its Complete step first, then delete the workflow with its objects; or
- delete the workflow without its objects, and delete the clone from the Clones list later.
Container Images
Container Images are the docker database images for serving the source or clone databases.
Pull Image
Navigate to the Containers screen.
To pull a new container image, click on the “+ Pull Image" button.
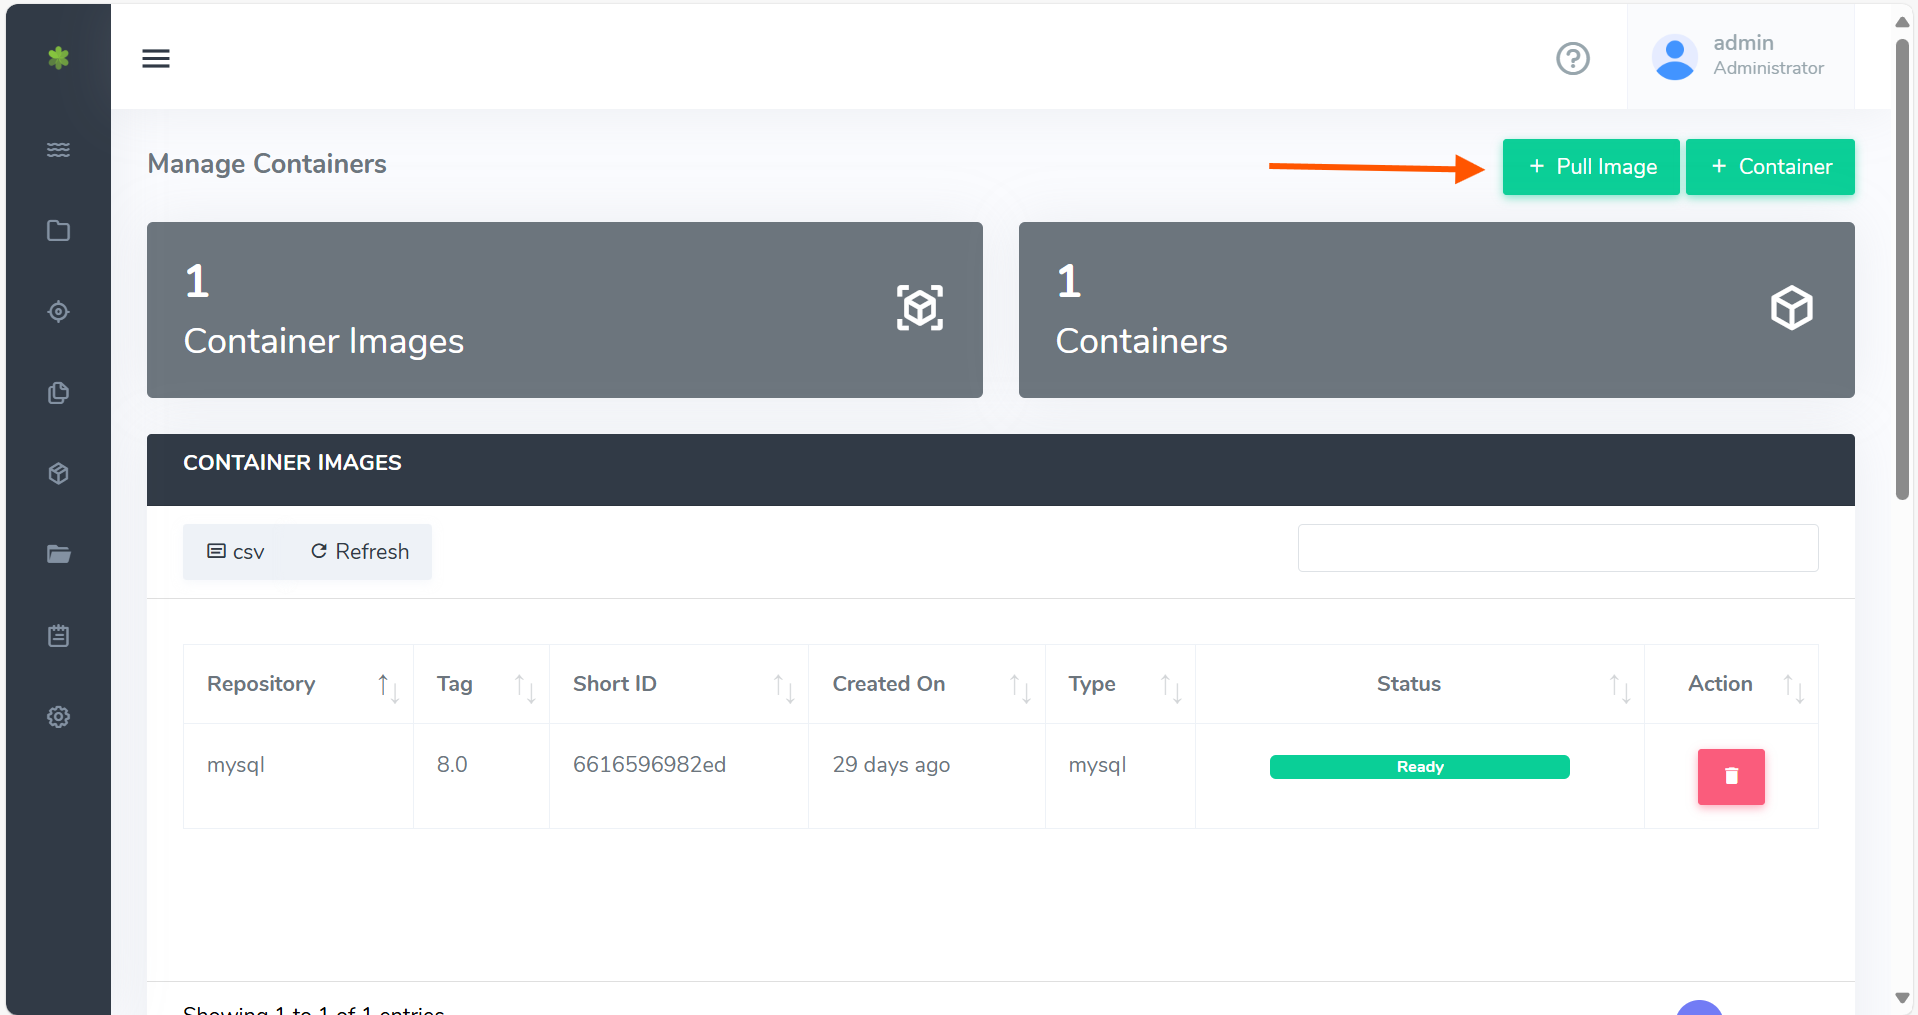
On click a new popup form will be shown which has the following inputs.
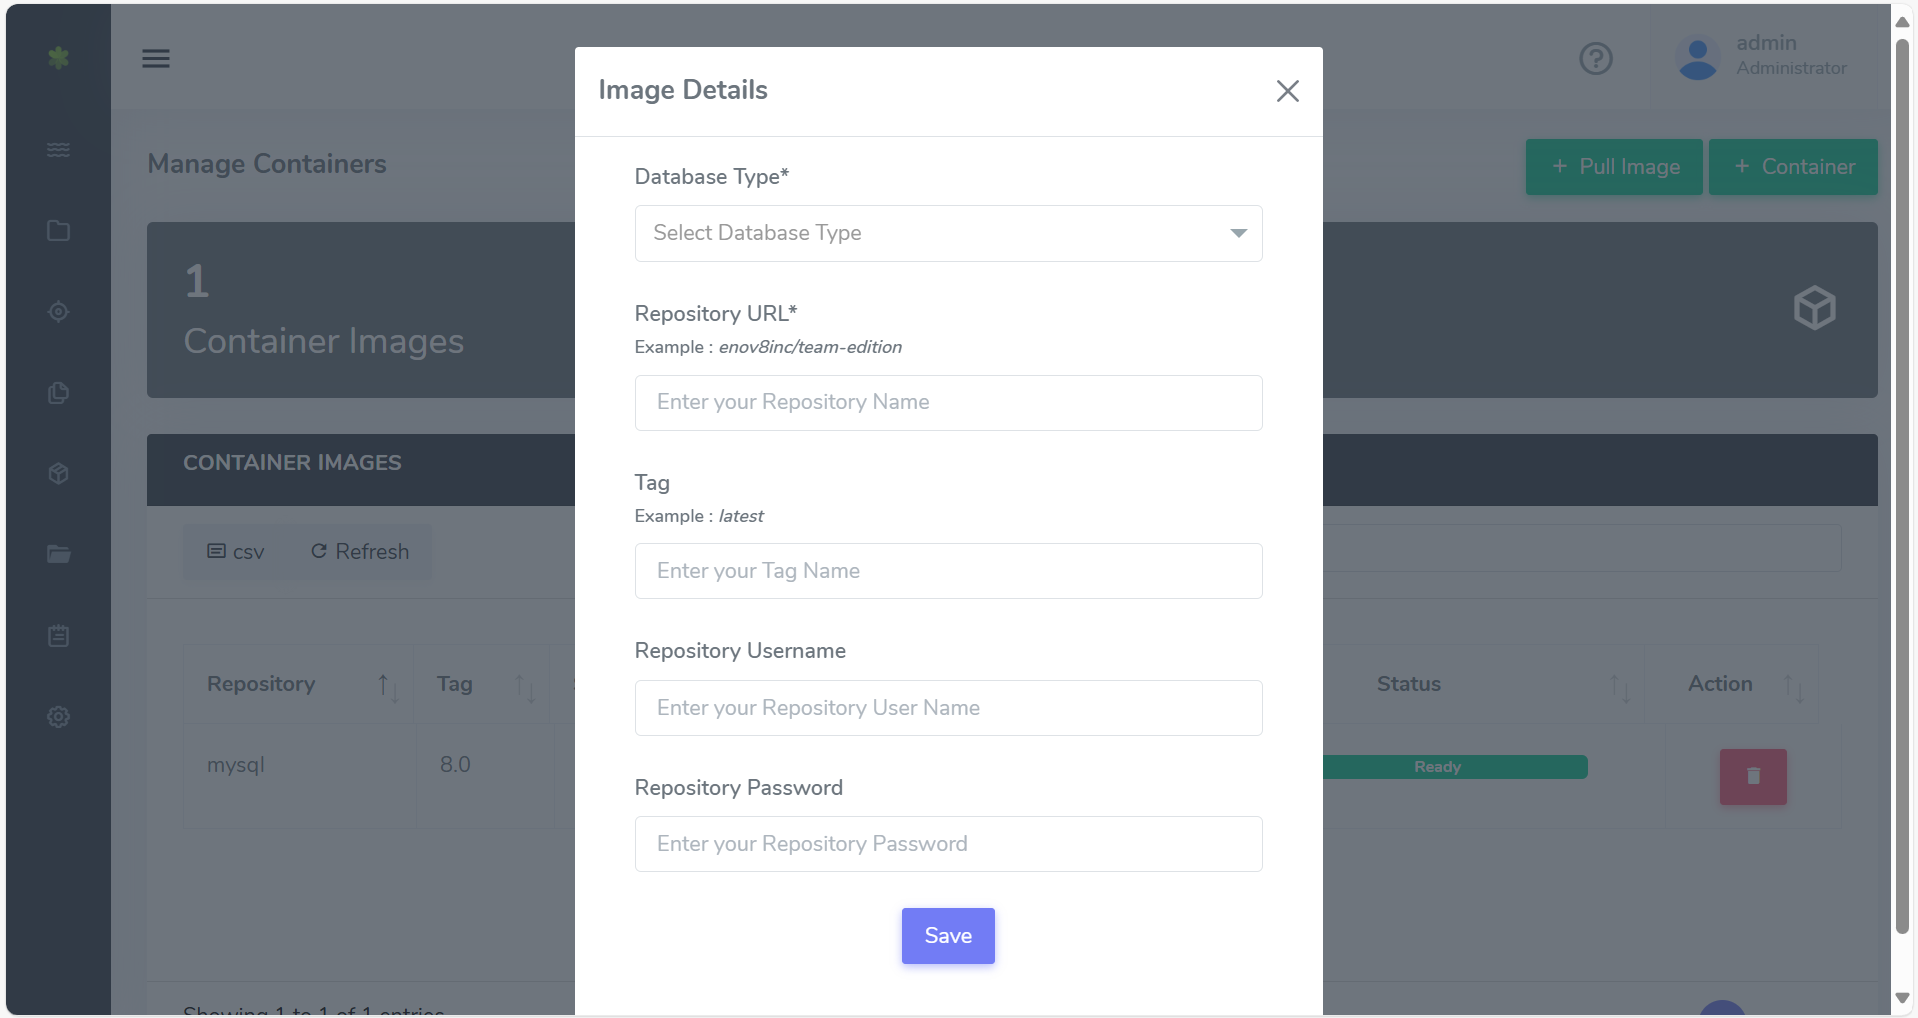
| Field Name | Description |
|---|---|
| Database Type | Type of database, image is for. |
| Repository URL | Repository URL to pull image from. Note: URL must be accessible from the VME Server. |
| Tag | Image Tag. Default is latest. |
| Repository Username | Username for repository to authenticate if required. |
| Repository Password | Password for repository to authenticate if required. |
Container
Run a container
Navigate to the Containers screen.
To run a new container, click on the “+ Container" button.
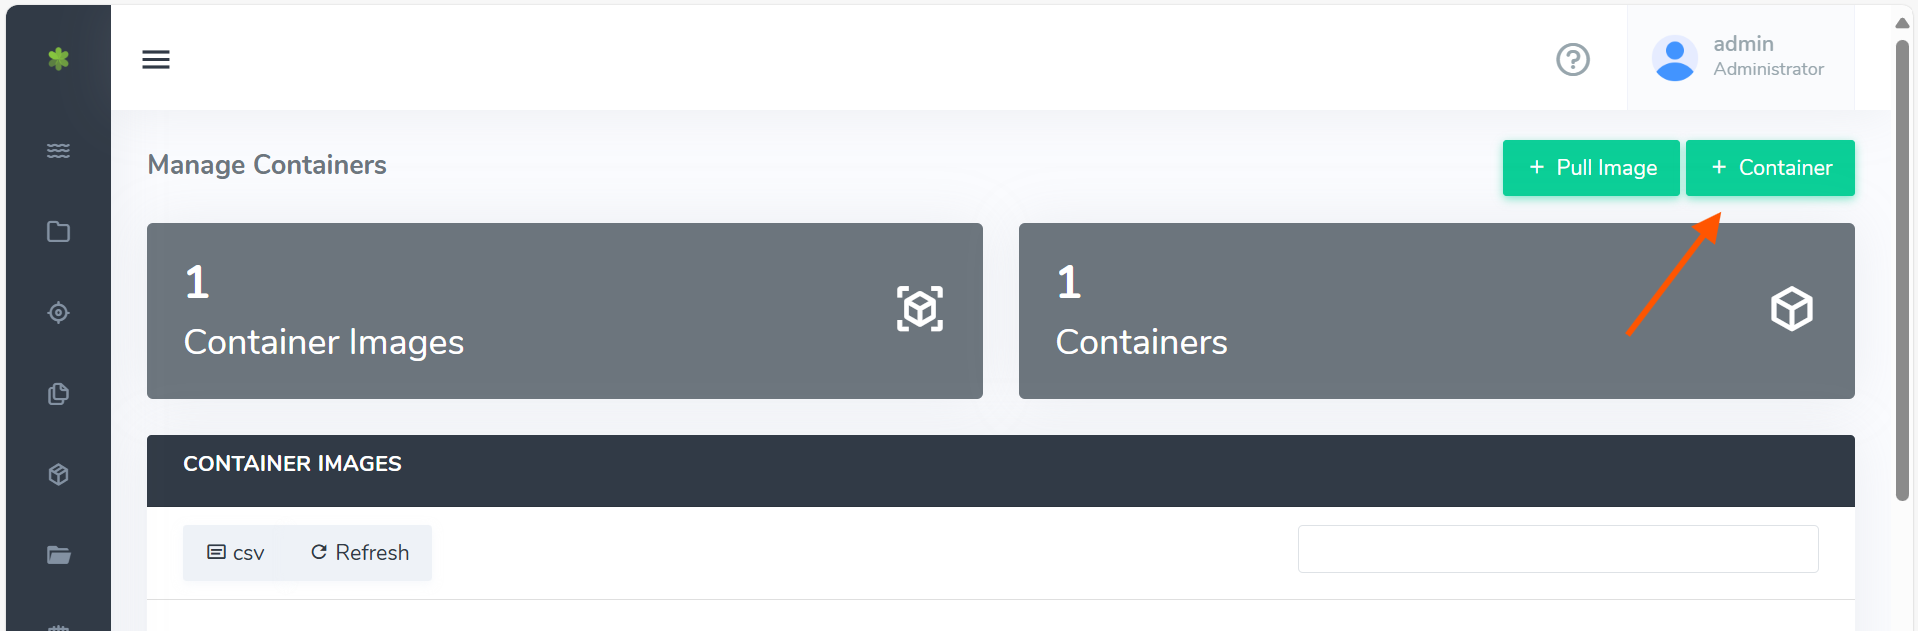
On click a new popup form will be shown which has the following inputs.
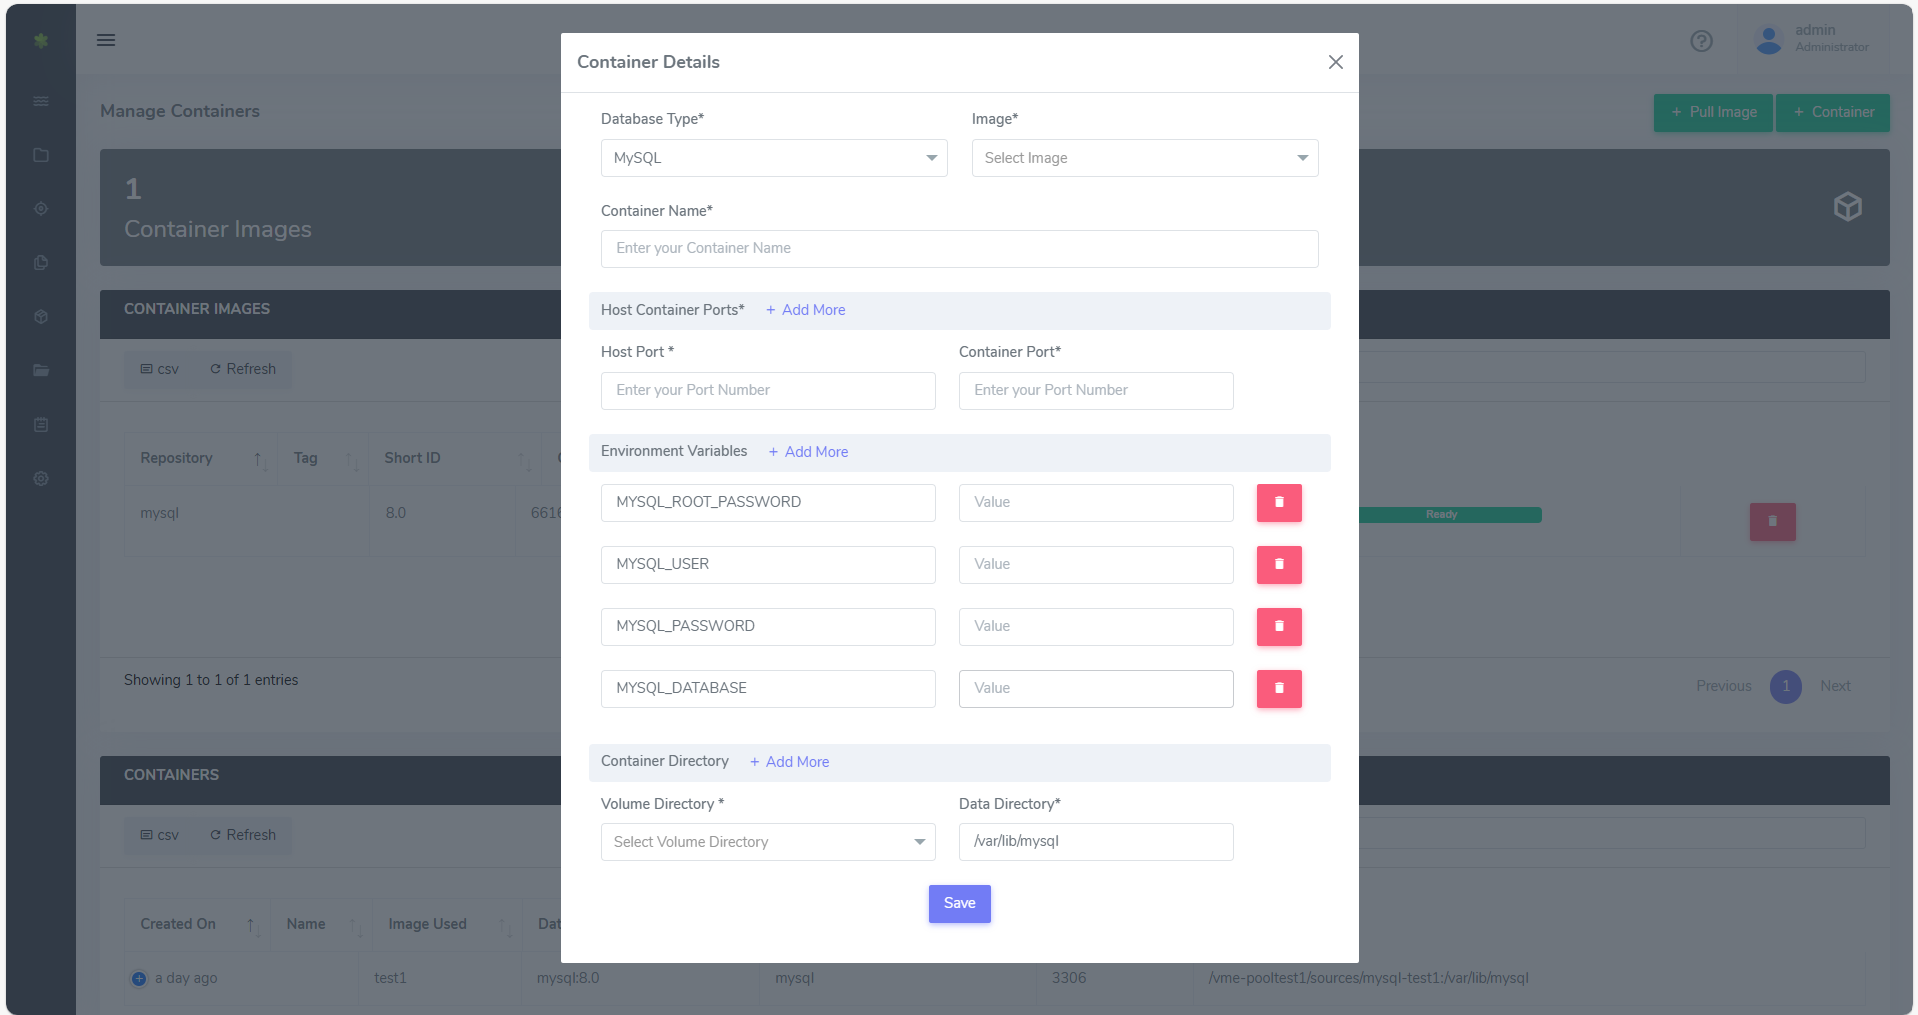
| Field Name | Description |
|---|---|
| Database Type | Type of database container to create. |
| Container Name | Name of the container to create. |
| HostPort:ContainerPort | Ports to bind inside the container. It is a string in the format "host_port:container_port" where the container port is an exposed port. For example: "12345:3306" for MySQL. Several host and container port pairs can be assigned by seperateing with a comma. |
| Image | Container Image to use. |
| Source Directory | Source or Clone volume which will be mounted on the container. |
| Environment Variables | Environment variables to be used for the database inside the container. |
| Data Directory | Path of the data directory. |
Onboard Application (Beta)
The Onboard Application wizard puts a copy of a SQL Server database onto a SQL Server host. It runs the same iSCSI snapshot, clone, and attach steps as the iSCSI connector, sequenced for you and driven through the Windows iSCSI agents.
You choose how much of that work each run does, so the same wizard covers a first-time onboarding and a routine "give me another copy of last night's snapshot on this other server".
This wizard is Beta.
What a workflow does
A workflow is a chain of five stages, and each one uses what the stage before it produced:
Ingest → Snapshot → Send → Clone → Mount
| Stage | What it does |
|---|---|
| Ingest | Creates the source on this appliance and loads the database into it. |
| Snapshot | Takes a point-in-time snapshot of the source. |
| Send | Replicates the snapshot to a second appliance. |
| Clone | Creates a writable clone from the snapshot. |
| Mount | Attaches the clone to a SQL Server host. |
All five are ticked by default, which is the full onboarding: ingest a database here, snapshot it, send it to a second appliance, clone it there and attach it to a host, in ten steps across two appliances.
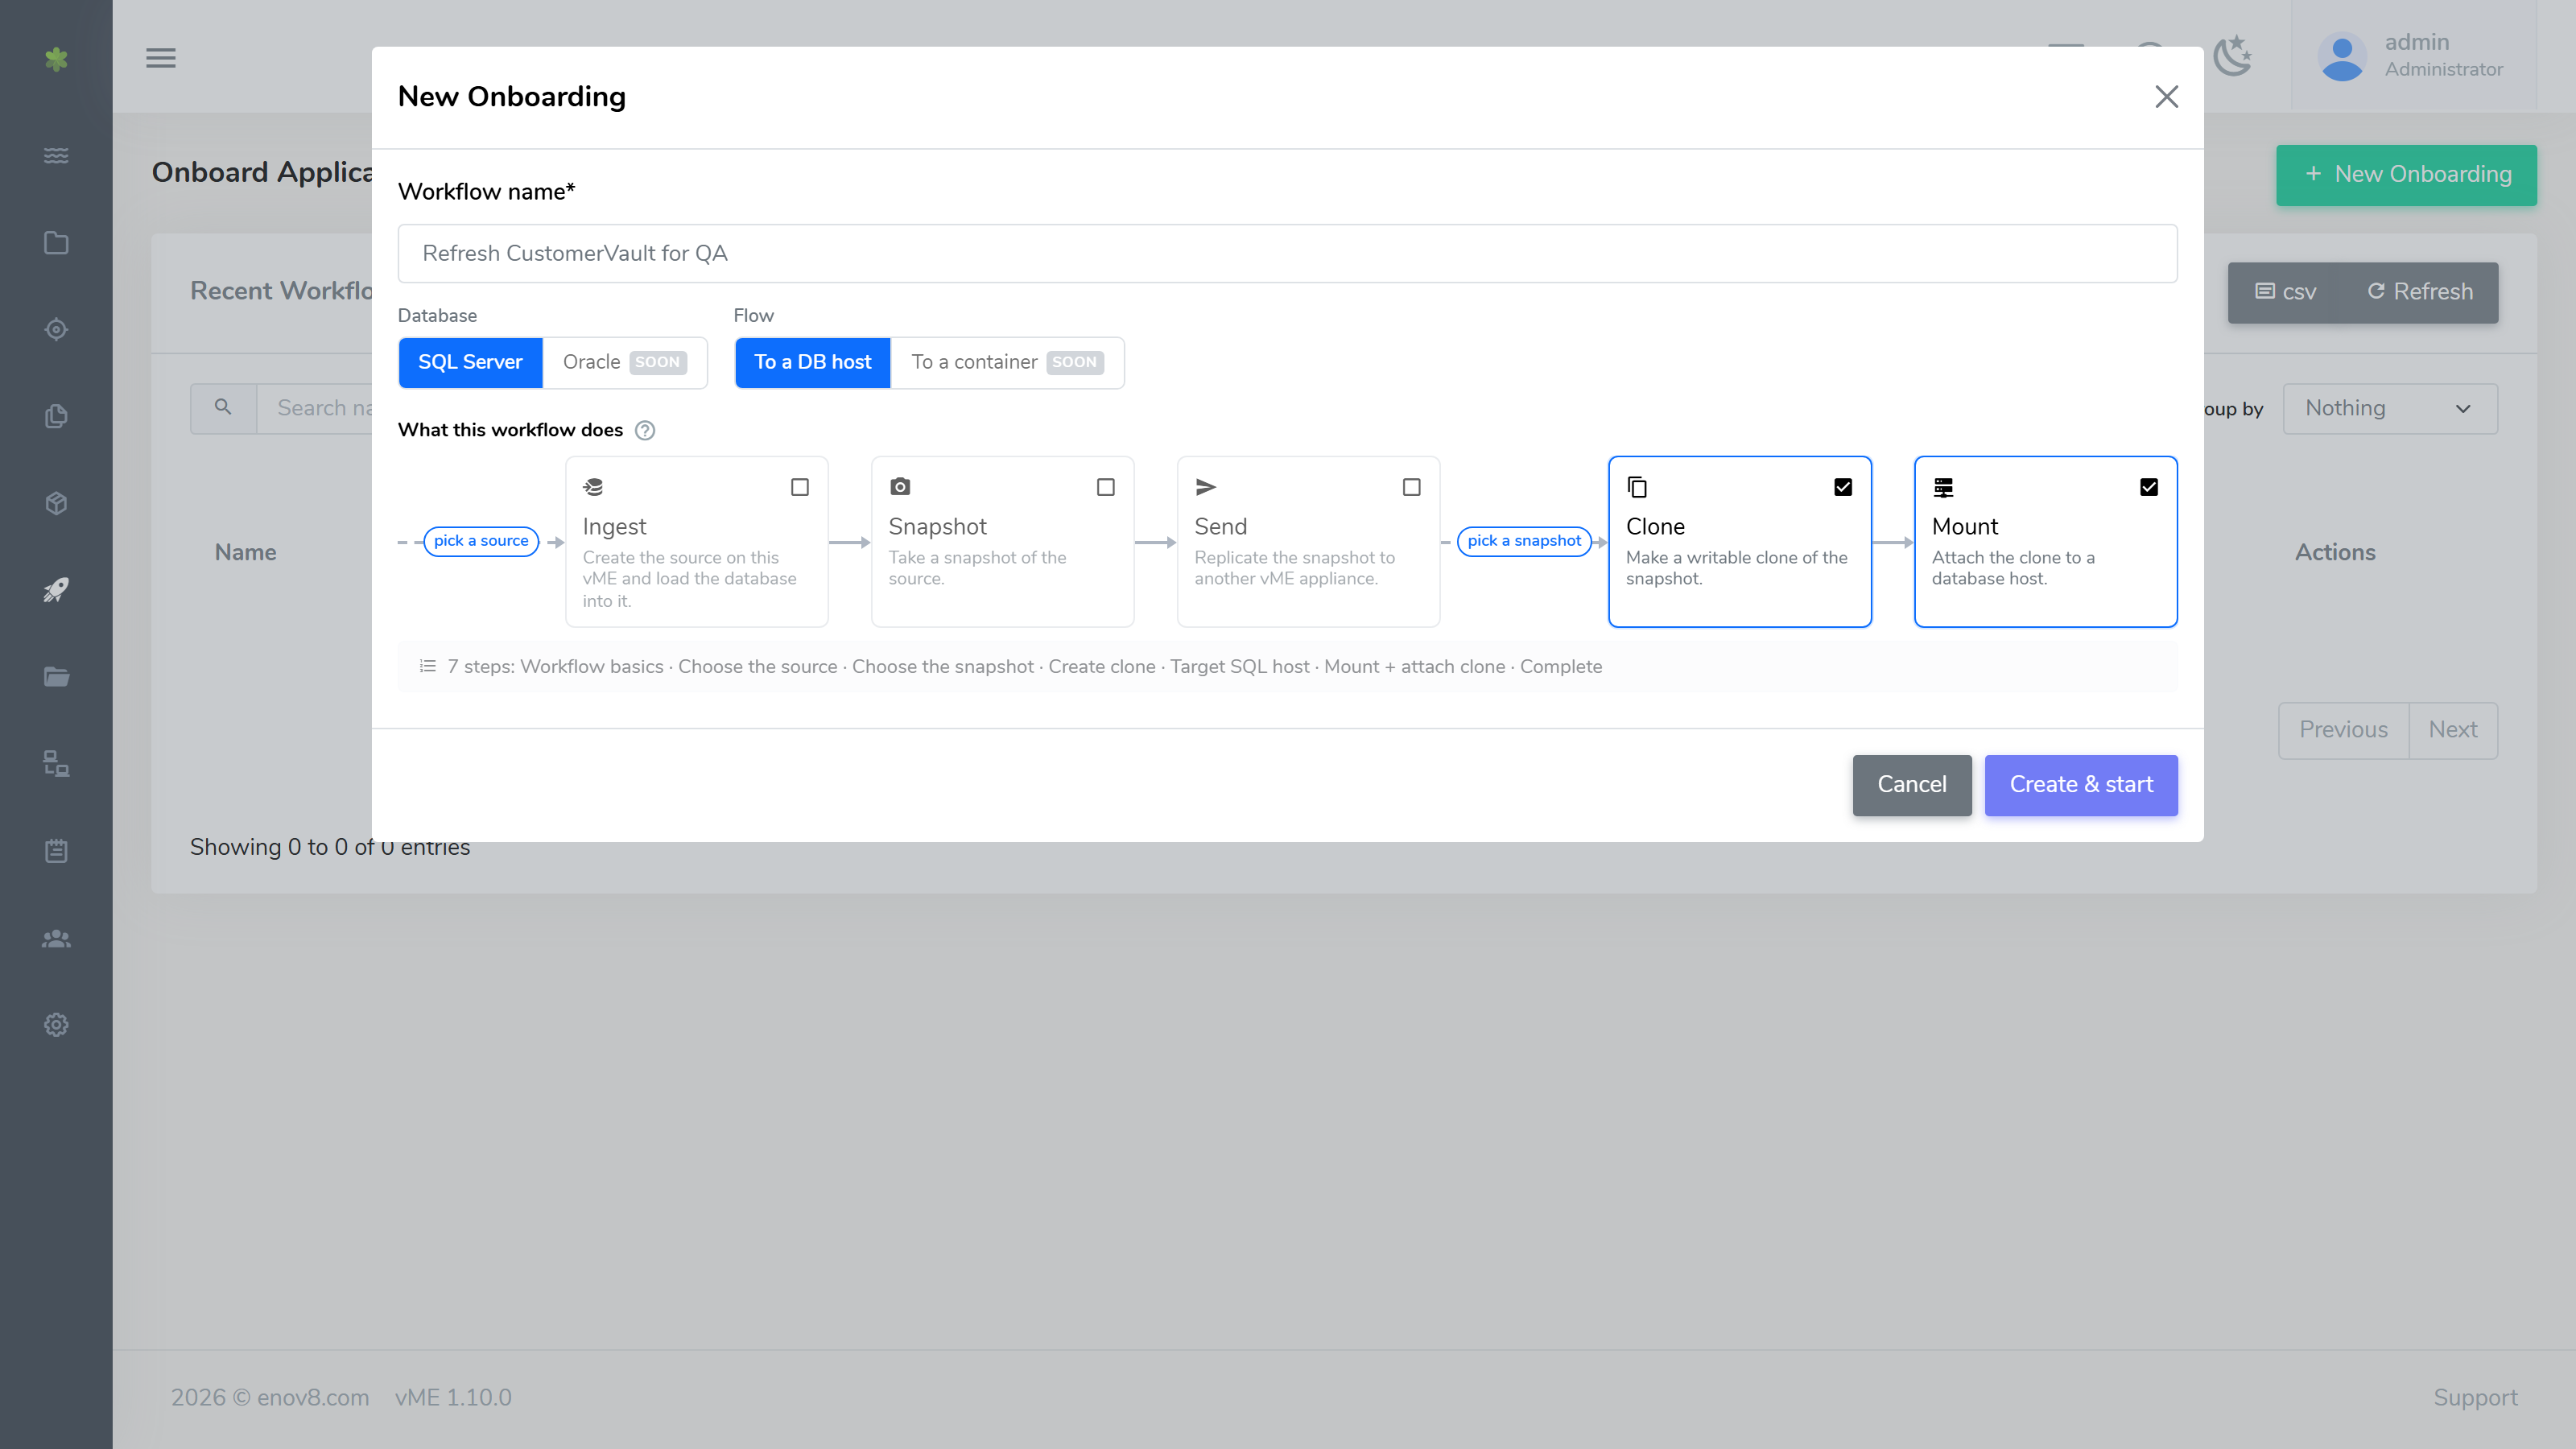
Untick a stage and the run starts from something that already exists. The chain shows the gap and names what fills it, and the steps that stage would have taken drop out of the wizard. So:
- Untick Ingest and the run starts from a source already on this appliance; you choose which.
- Untick Snapshot as well and it starts from a snapshot that already exists; you choose which, or take one there and then.
- Untick Send and the clone is made on this appliance, with no transfer and no second appliance needed.
- Untick Mount and the run finishes once the clone exists.
The most common short run is Clone + Mount: seven steps, no ingest, no transfer. Repeat it for each server you want a copy on.
Some combinations cannot run, and the wizard says so before you start, with Create & start held until the ticks make sense:
- Nothing ticked: Tick at least one thing for this workflow to do.
- Mount without Clone: Mount needs a clone. Tick Clone as well, or untick Mount.
- Clone or Send with Ingest but without Snapshot: the source does not exist yet, so there is no snapshot to start from either. Tick Snapshot, or untick Ingest and start from a snapshot that already exists.
Before you start
- A pool on this appliance.
- An enrolled Windows iSCSI agent on each SQL host the run touches: the source host if you are ingesting, the host you are mounting on if you are mounting. See the iSCSI connector guide to install and enroll agents.
- A vME folder set on each of those hosts, in the agent's tray Settings. Every volume the wizard mounts goes into a folder of its own under it; see Edit Agent Settings in the iSCSI connector guide.
- If the run sends to a second appliance: that appliance registered under vME Appliances, with a pool on it to receive into.
Start a workflow
Navigate to the Onboard Application screen and click New Onboarding. Name the run, choose the Database (SQL Server) and the Flow (To a DB host), then tick the stages you want in What this workflow does. The line underneath tells you how many steps the run will have and what they are.
Oracle is shown under Database but is not yet available: it is tagged soon and cannot be picked. The same goes for To a container under Flow.
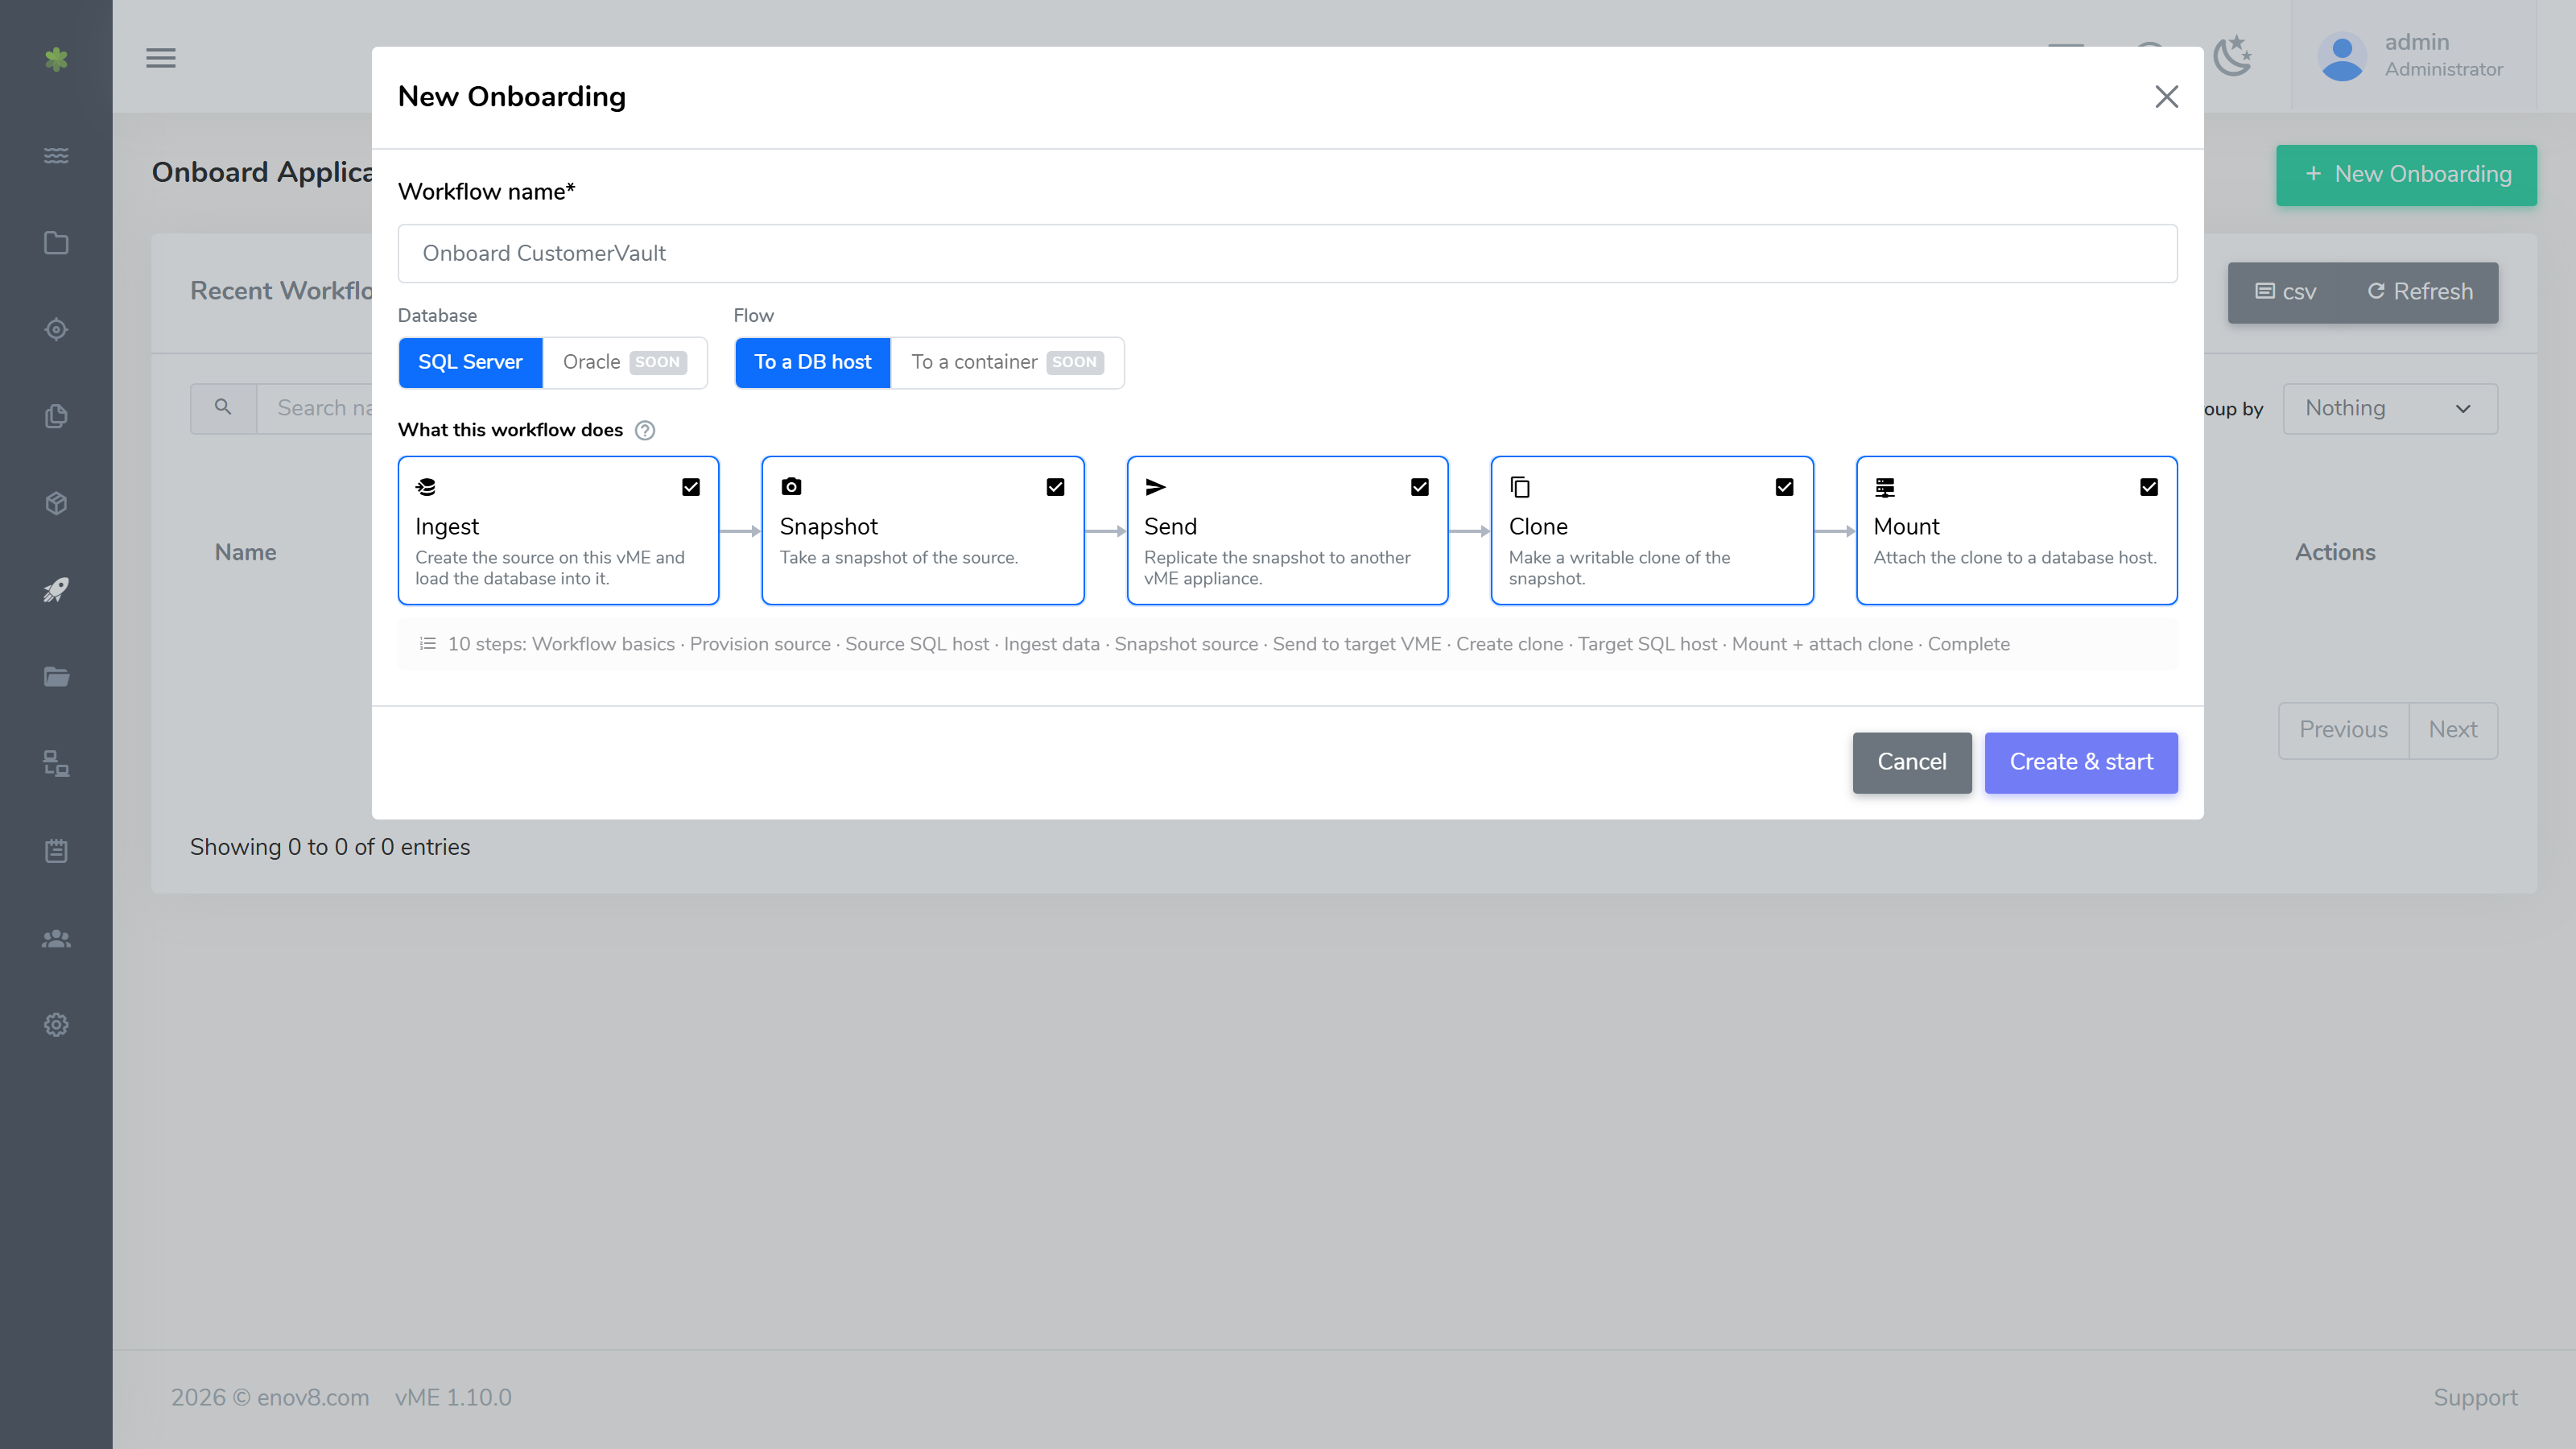
Untick a stage and the chain marks what the run starts from. Here only Clone and Mount are ticked, so the chain asks you to pick a source and pick a snapshot, and the run has seven steps:
Click Create & start.
Work through the steps
The stepper down the left lists only the steps this run has, numbered from one, each showing its own status. Any step is clickable, and you can leave at any point and resume later from the Recent Workflows list.
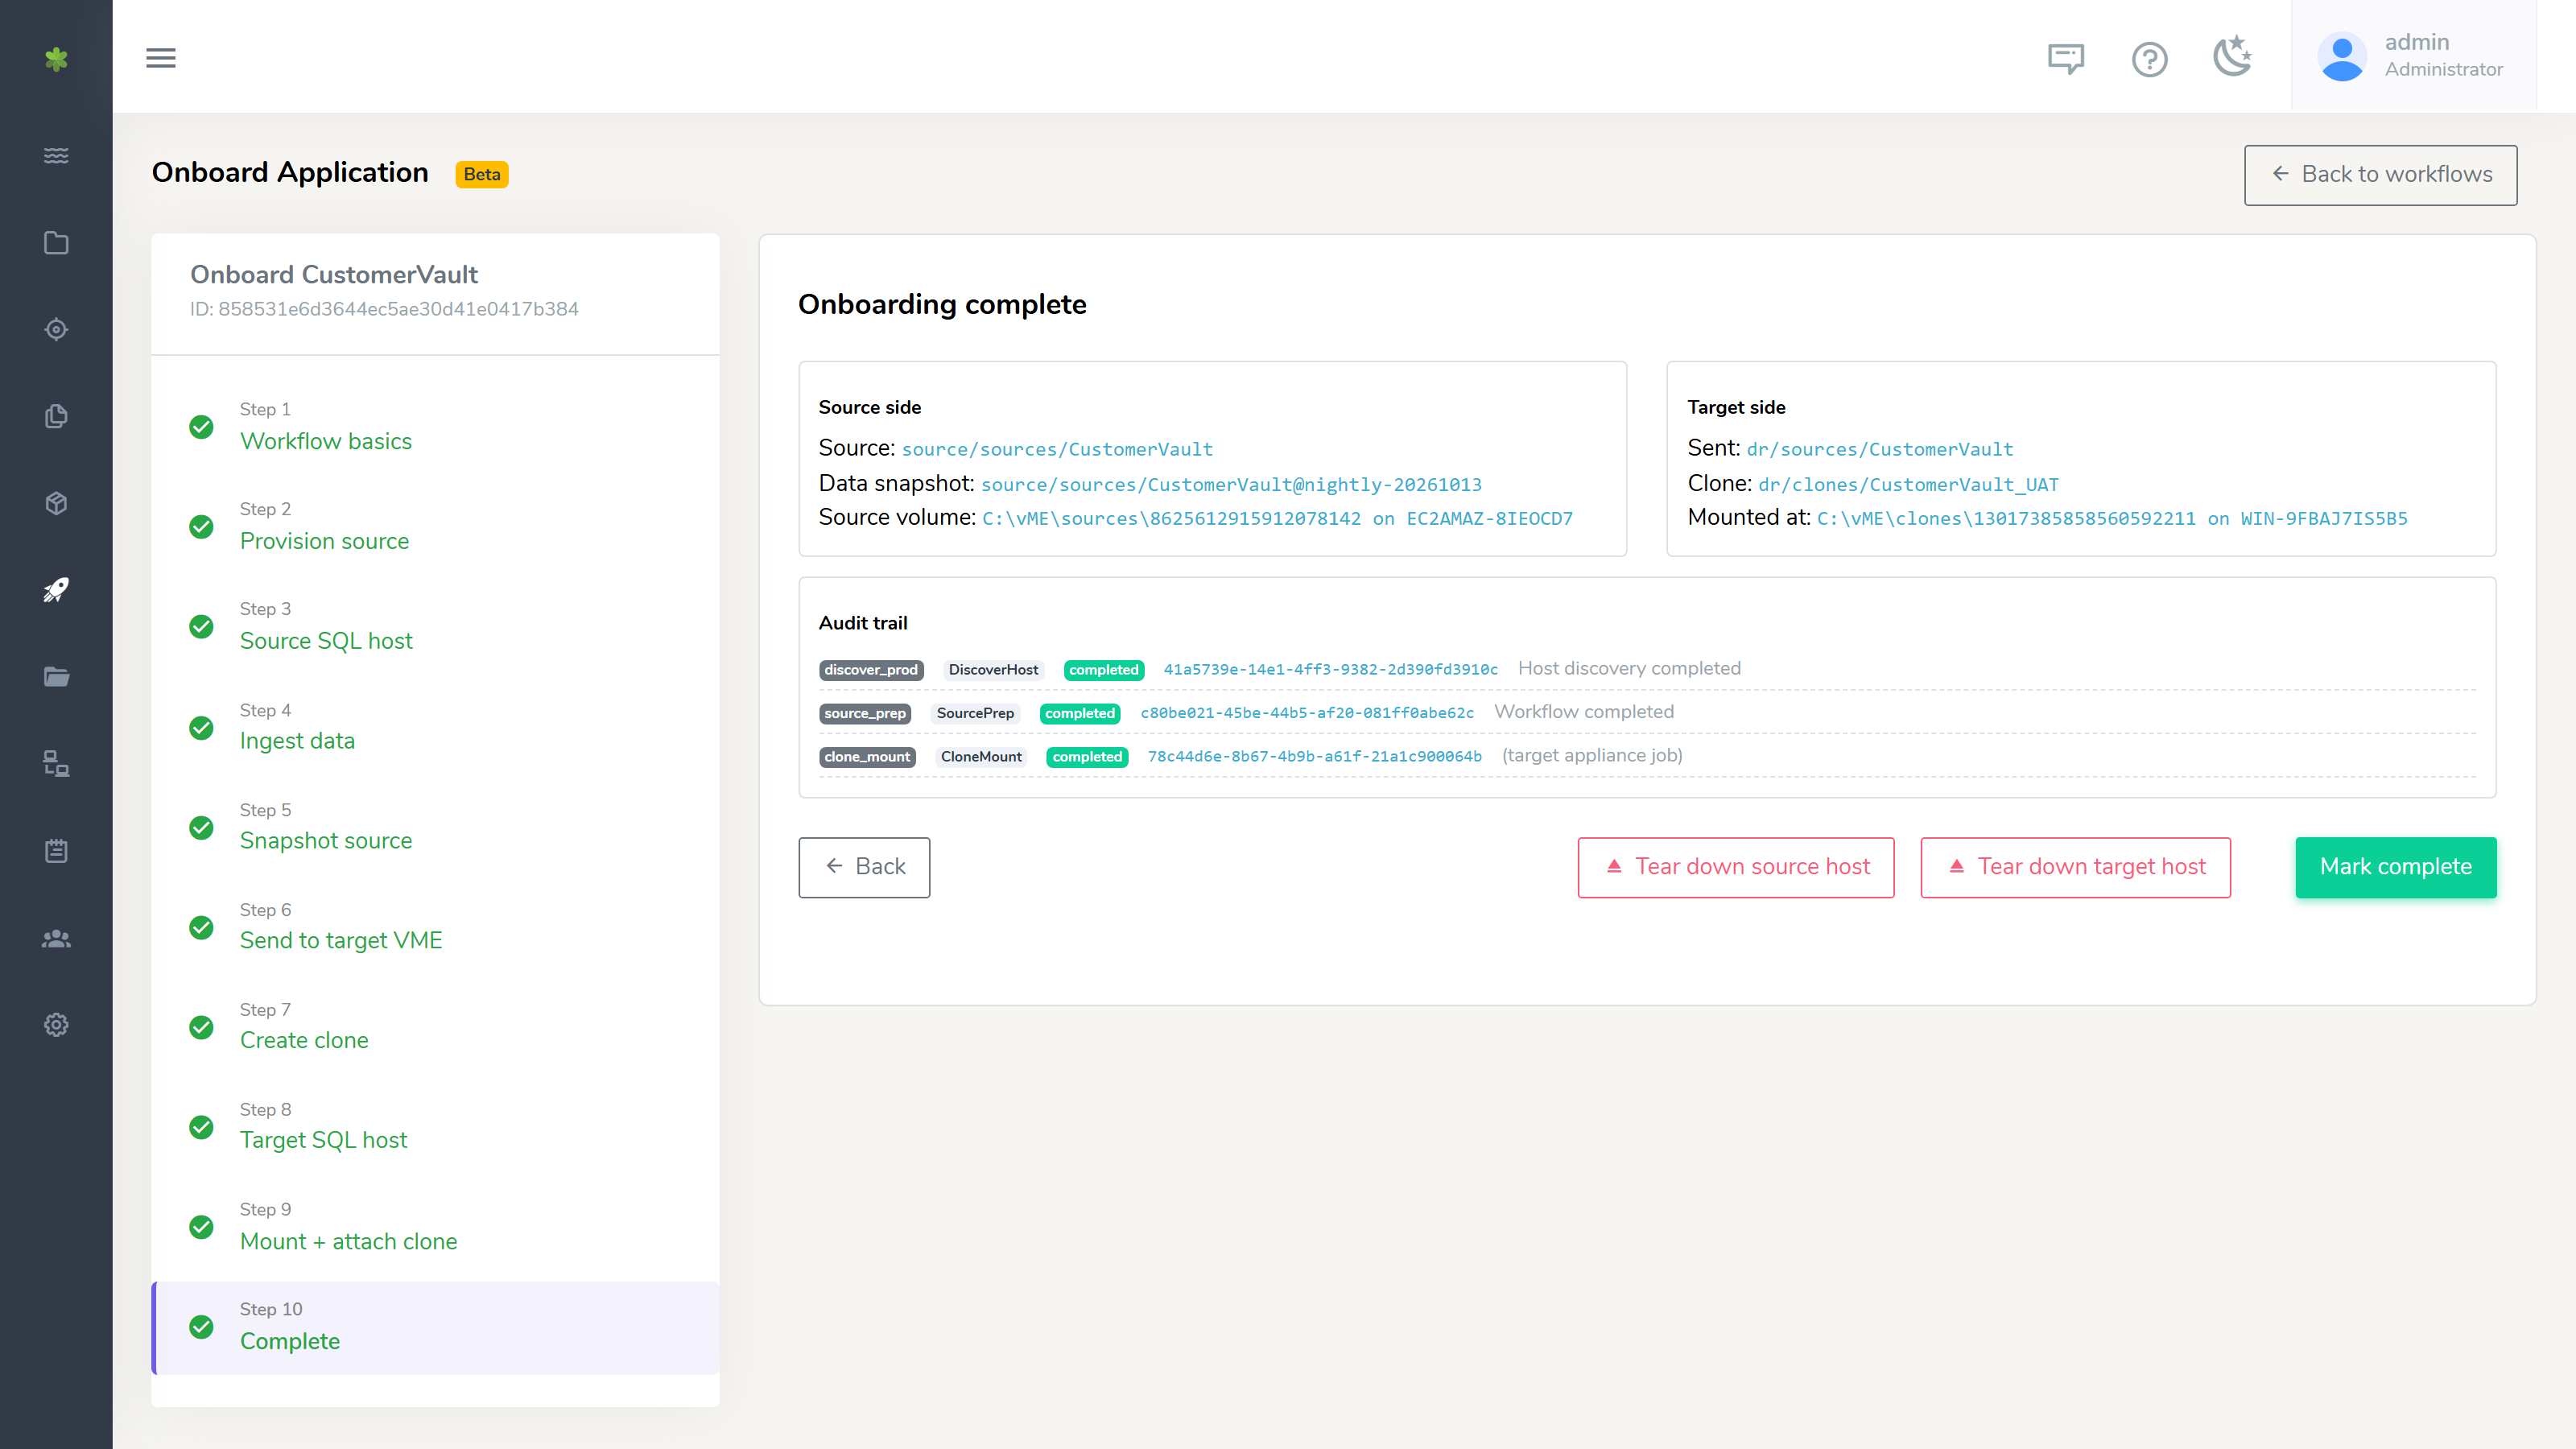
Every step has a green button that does its work and a blue Continue. Continue on a step that has not finished asks you to confirm. While a step's job is running its button is held, with a spinner, until the job answers.
| Step | Appears when | What happens |
|---|---|---|
| Workflow basics | Always | Name the run, review the stages, add optional notes. |
| Choose the source | Ingest is off | Pick a source already on this appliance. |
| Provision source | Ingest is on | Create the source in a pool, exported over iSCSI. |
| Source SQL host | Ingest is on | Select the agent on the source SQL host, or enroll one, then Discover this host. The agent reports its SQL instances, databases, vME folder and iSCSI state. |
| Ingest data | Ingest is on | The agent mounts the source at <vME folder>\sources\<id> and loads the data onto it: backup and restore, restore from existing .bak files, or a raw copy of .mdf/.ldf files. |
| Choose the snapshot | Snapshot is off | Pick an existing snapshot of that source, or take one on the spot. |
| Snapshot source | Snapshot is on | Take a snapshot of the source. See Snapshots of a mounted source. |
| Send to target VME | Send is on | Choose a registered appliance, a pool on it and a name, then send. |
| Create clone | Clone is on | Create a writable clone, on the target appliance if the run sends, otherwise on this one. |
| Target SQL host | Mount is on | Select the agent on the host you are mounting onto, then Discover this host. |
| Mount + attach clone | Mount is on | Queue a CloneMount job: the agent connects to the clone's iSCSI target, mounts it at <vME folder>\clones\<id>, and attaches the databases it finds. |
| Complete | Always | Review what the run created, where it is mounted, and its audit trail, then mark the run complete. Tear-down buttons are offered for the hosts this run mounted something on. |
Choosing a source or a snapshot
Both picker steps are searchable, sortable and paged, so they stay usable on an appliance holding hundreds of sources. Each row has its own Use this source / Use this snapshot button.
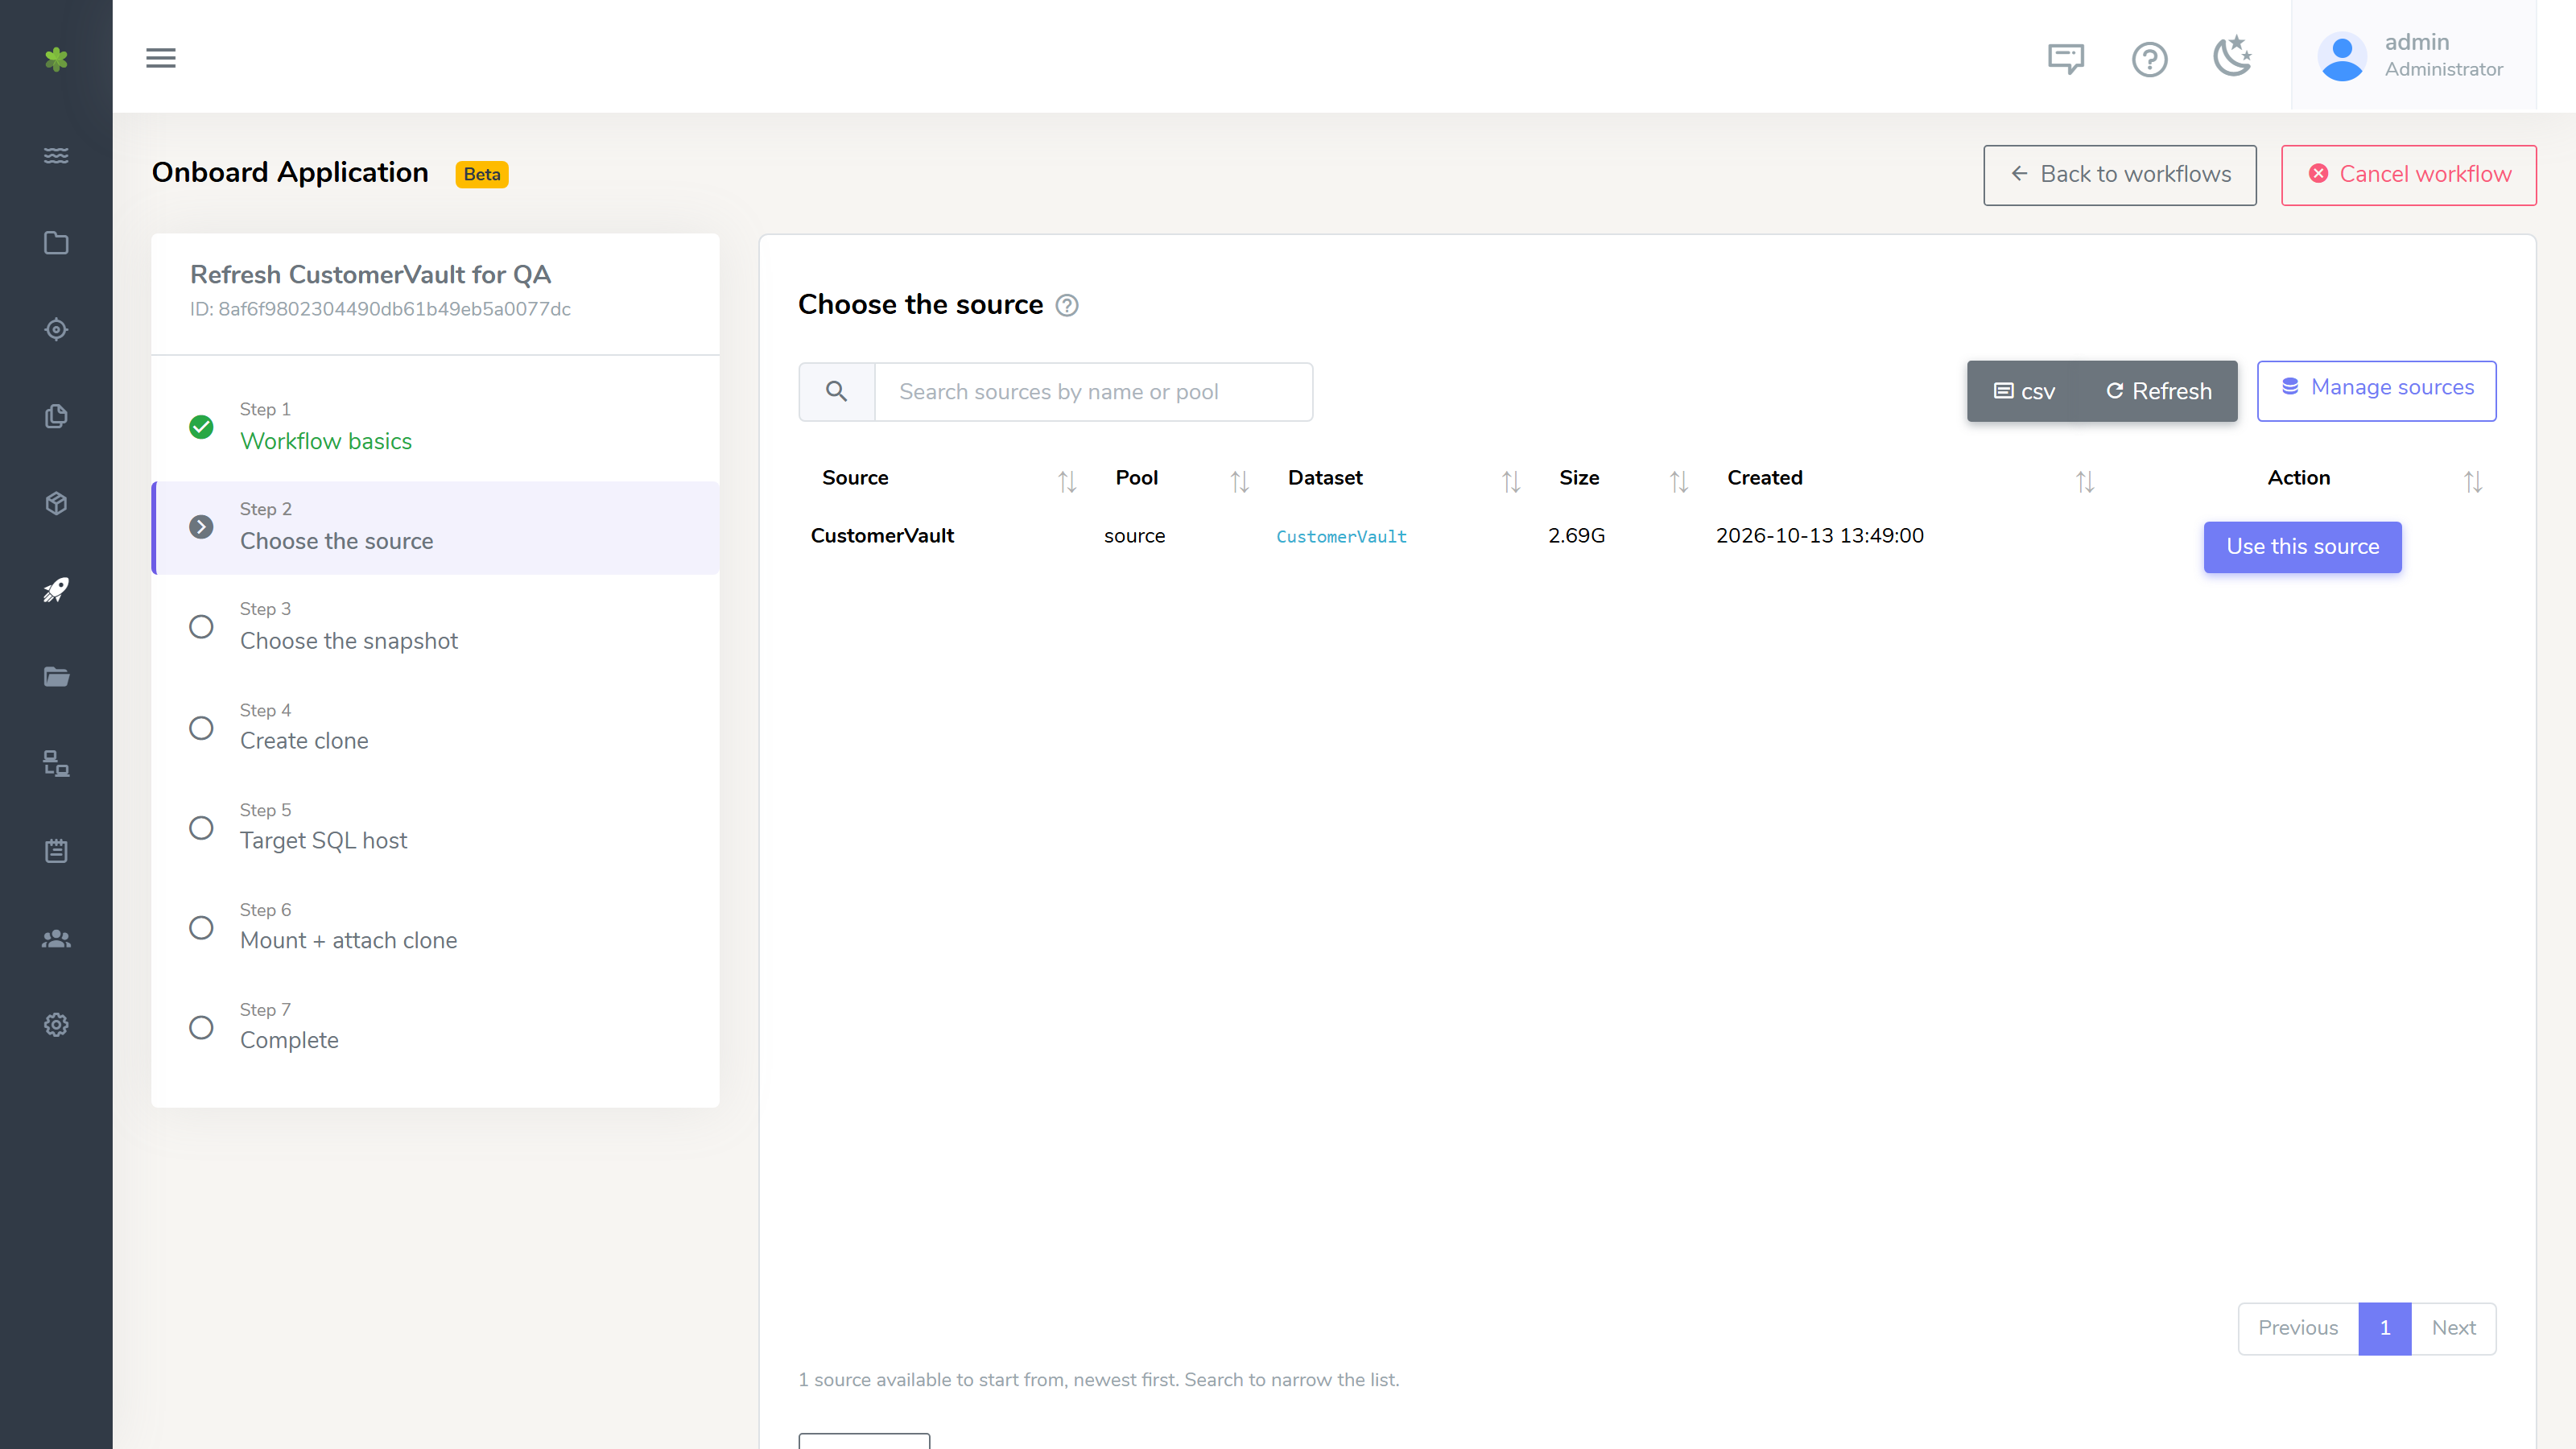
The snapshot step then lists that source's snapshots, newest first. The newest is tagged latest, and the one this run uses is tagged chosen. If none of them is recent enough, give a name under Take a snapshot now and click Take a snapshot: the source is snapshotted there and then, and that snapshot is used for this run. See Snapshots of a mounted source for Don't stop/start the host databases.
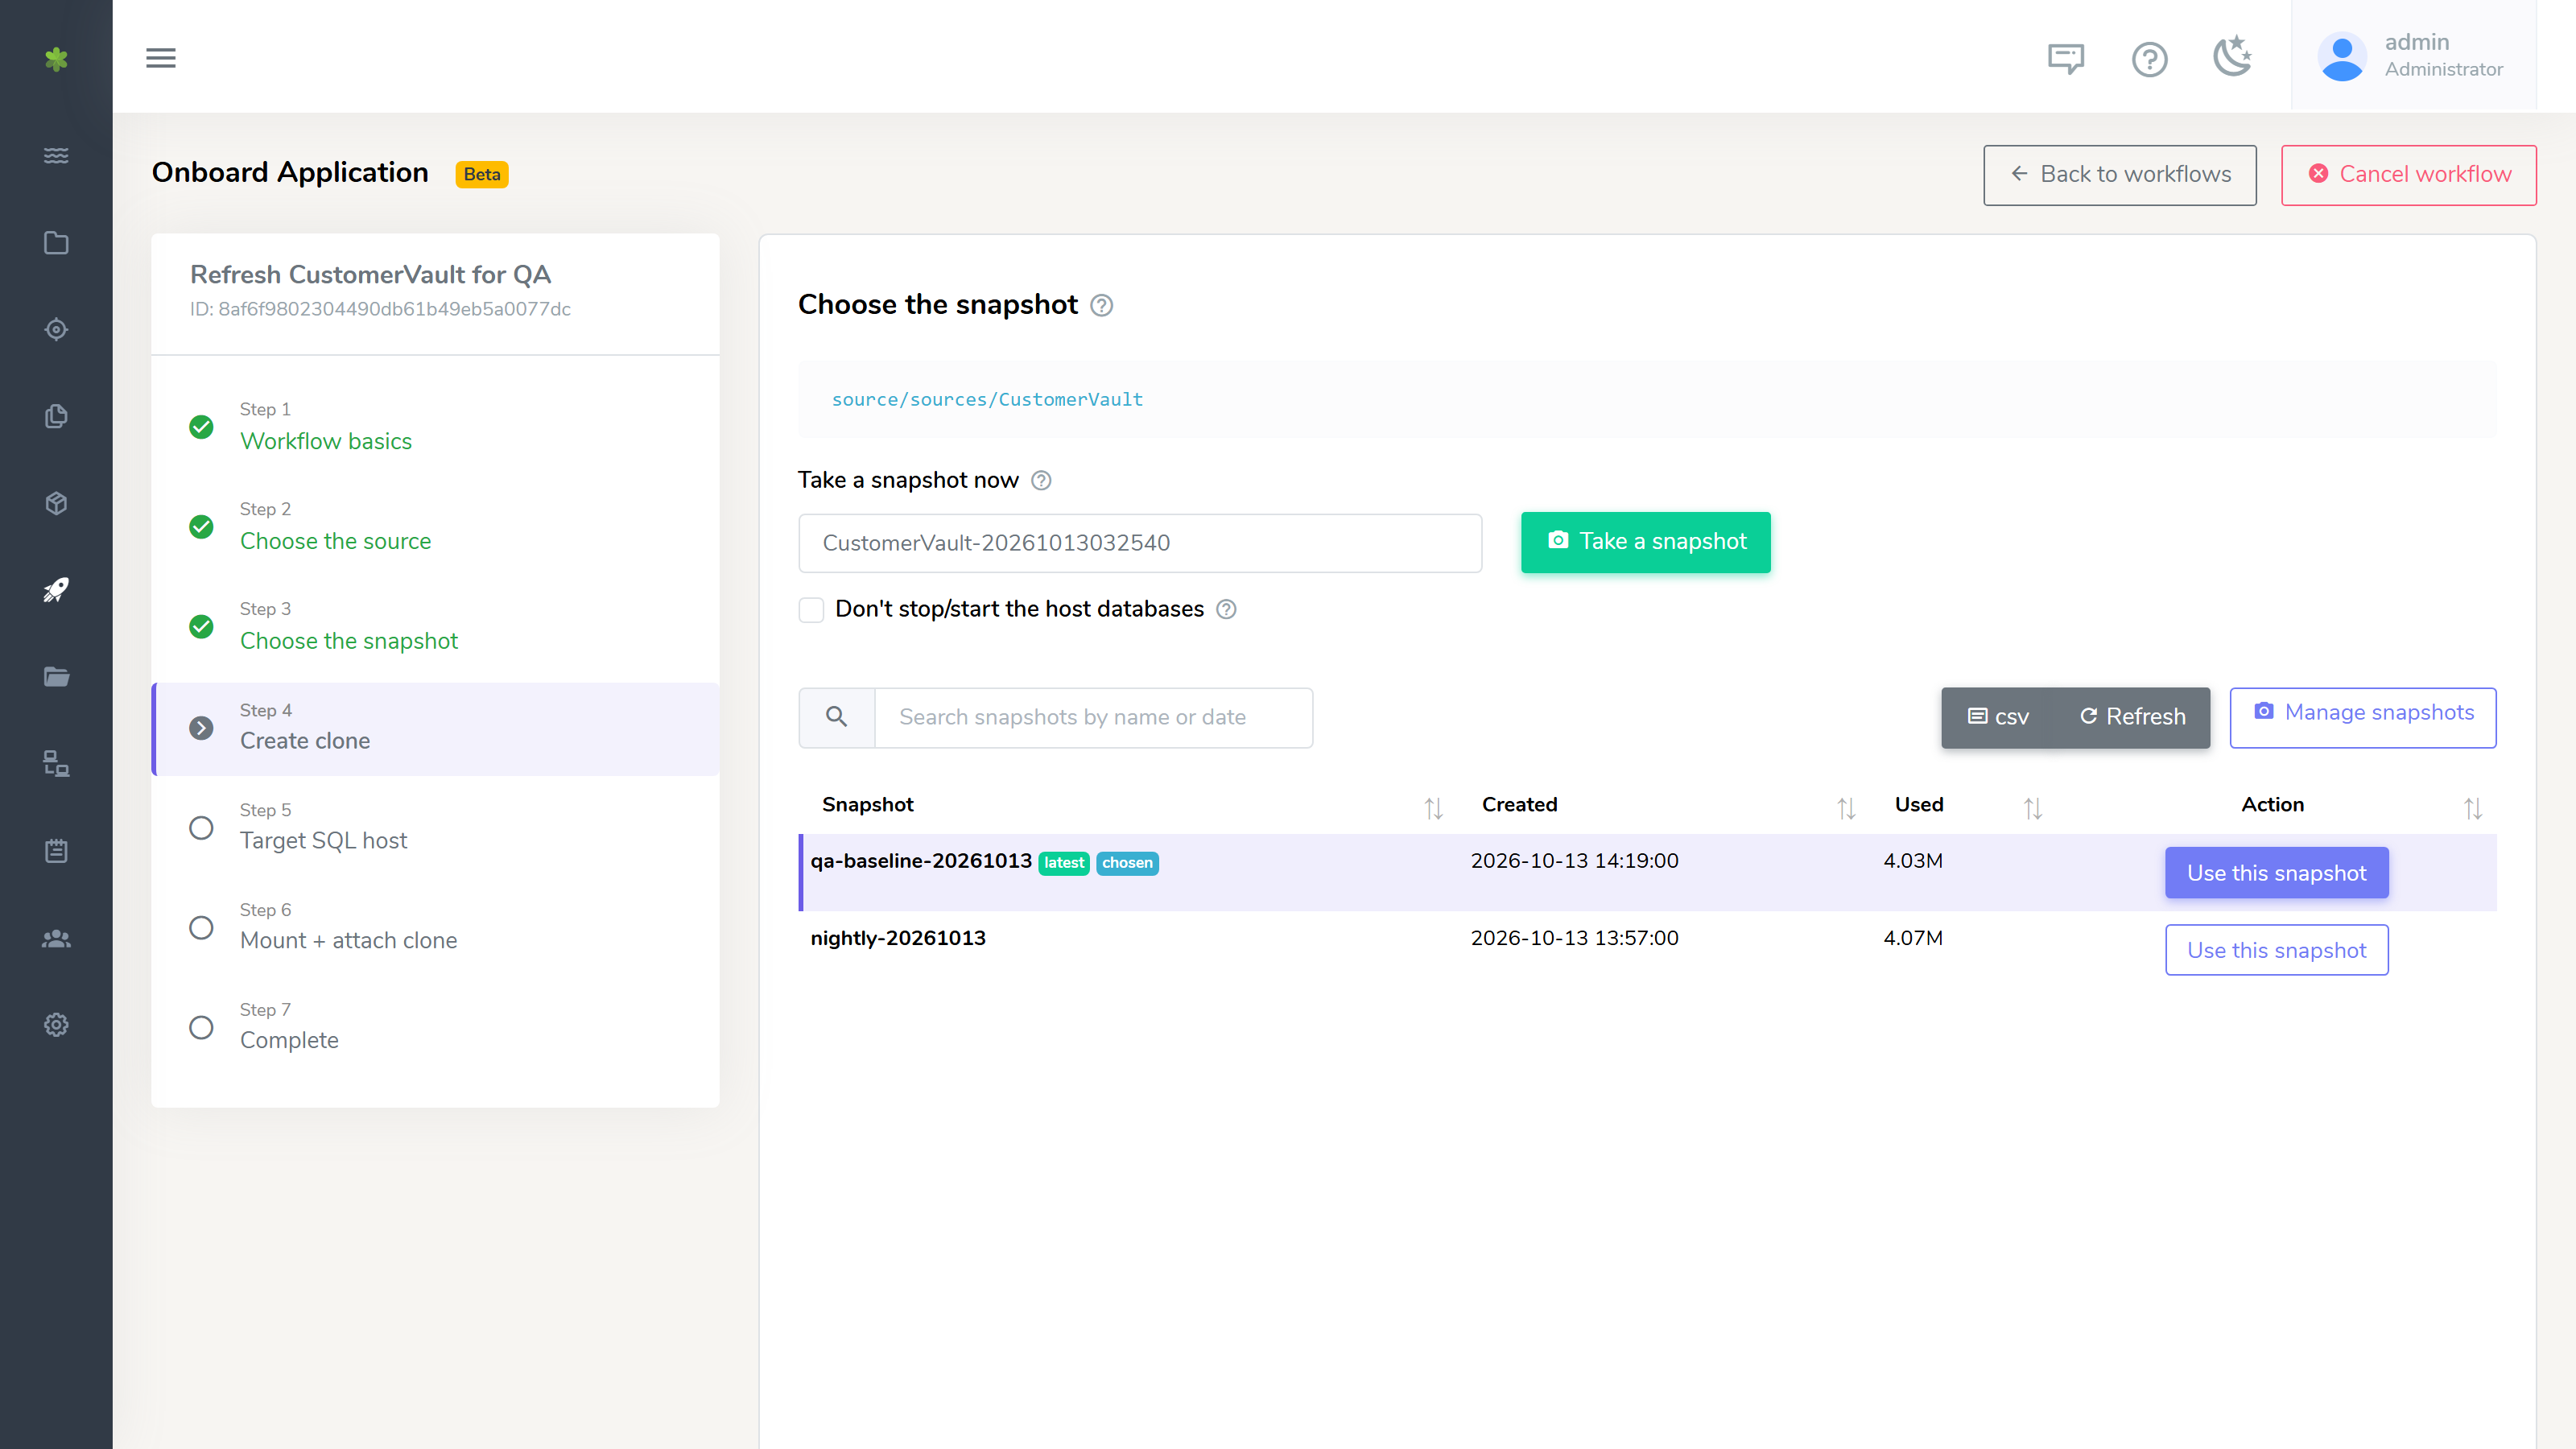
A source or snapshot you chose is not something the run created, so deleting the workflow afterwards leaves it alone.
Snapshots of a mounted source
A source that a SQL host has mounted is snapshotted through that host, so the snapshot catches the databases in a consistent state. The step shows each part as the host reports it:
- Quiesce databases on the host: the databases with files on that volume are taken offline and the volume is flushed.
- Snapshot: the snapshot is taken.
- Resume databases on the host: the databases come back online.
A source that no host has mounted is snapshotted directly, with no host steps.
If the host cannot be told (its agent is offline, or another coordinated operation is already running on it), the snapshot is not taken and the step says why, with Retry without stopping the host databases. Tick Don't stop/start the host databases yourself only when you have already taken those databases offline: the snapshot then goes ahead without them being taken offline first.
Sending to a second appliance
The Send step asks only for the appliance, a pool on it and the name the source will have there. It uses the address and credentials stored when the appliance was registered. The transfer's progress is shown on the step until it completes.
- Overwrite if it already exists replaces a source of the same name on the target. If that source has clones on the target, the send is refused and names them, and nothing on the target is changed; delete the clones there first, or choose another name.
- Keep temporary snapshot after send keeps the snapshot a send takes for itself on this appliance once the transfer is done.
Mounting on the host
The mount step shows where the clone will go before you run it: the clone, its iSCSI target, the folder it will be mounted at, and the host. It waits, with the button held, while a clone that was only just created finishes exporting. If the clone did not export, or has been deleted, the step says so and points you back to the clone step.
Databases is ALL, or a comma-separated list of the databases on the clone to attach. They attach under the prefix the ingest used (ISCSI_ unless you chose another).
A host whose last discovery reported no vME folder is not offered a mount: set the folder in the agent's tray Settings, or update the agent, then discover the host again.
Recent Workflows
The Recent Workflows list shows every run with its technology, state, who started it and its stages. It is searchable (by name, host, snapshot or clone) and sortable. The state filter beside the search box starts on In flight (the runs still waiting on you), with All states, Finished, Failed and Cancelled a click away. You can also narrow the list by date, snapshot, host or source, and group it by any of those, by technology or by day created. The count reads "8 of 35 Workflows" while a filter is narrowing the list.
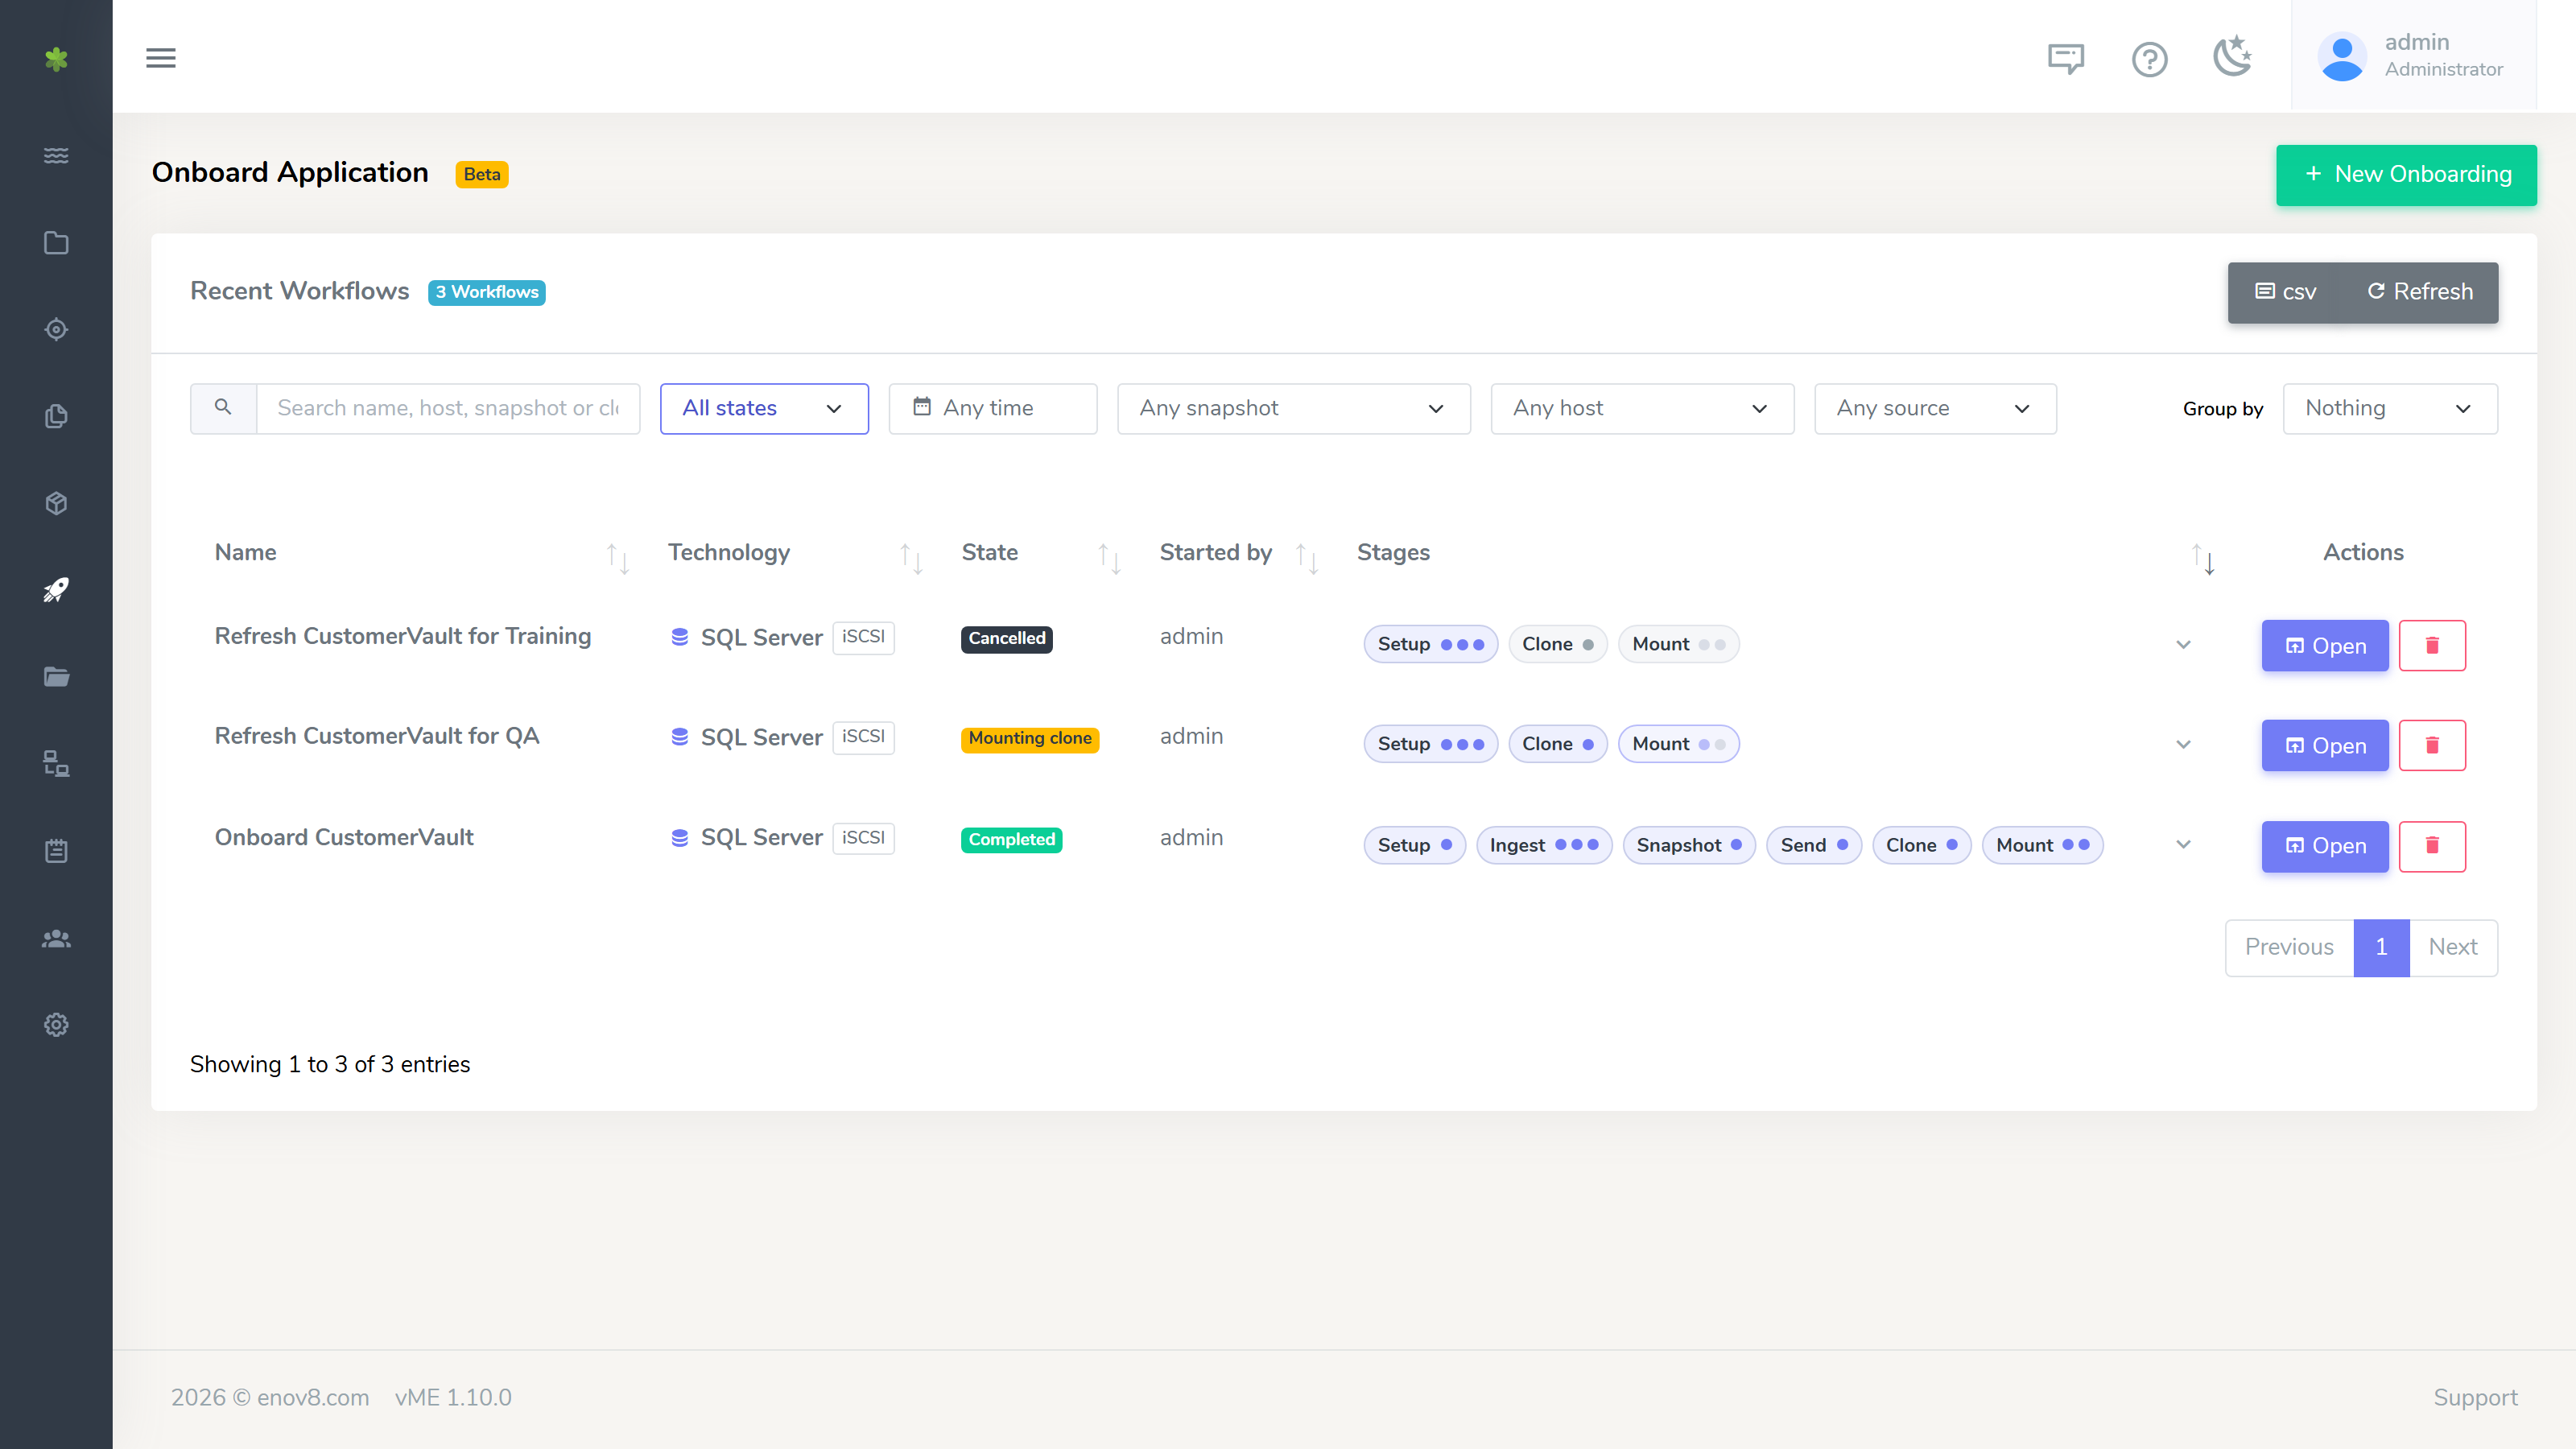
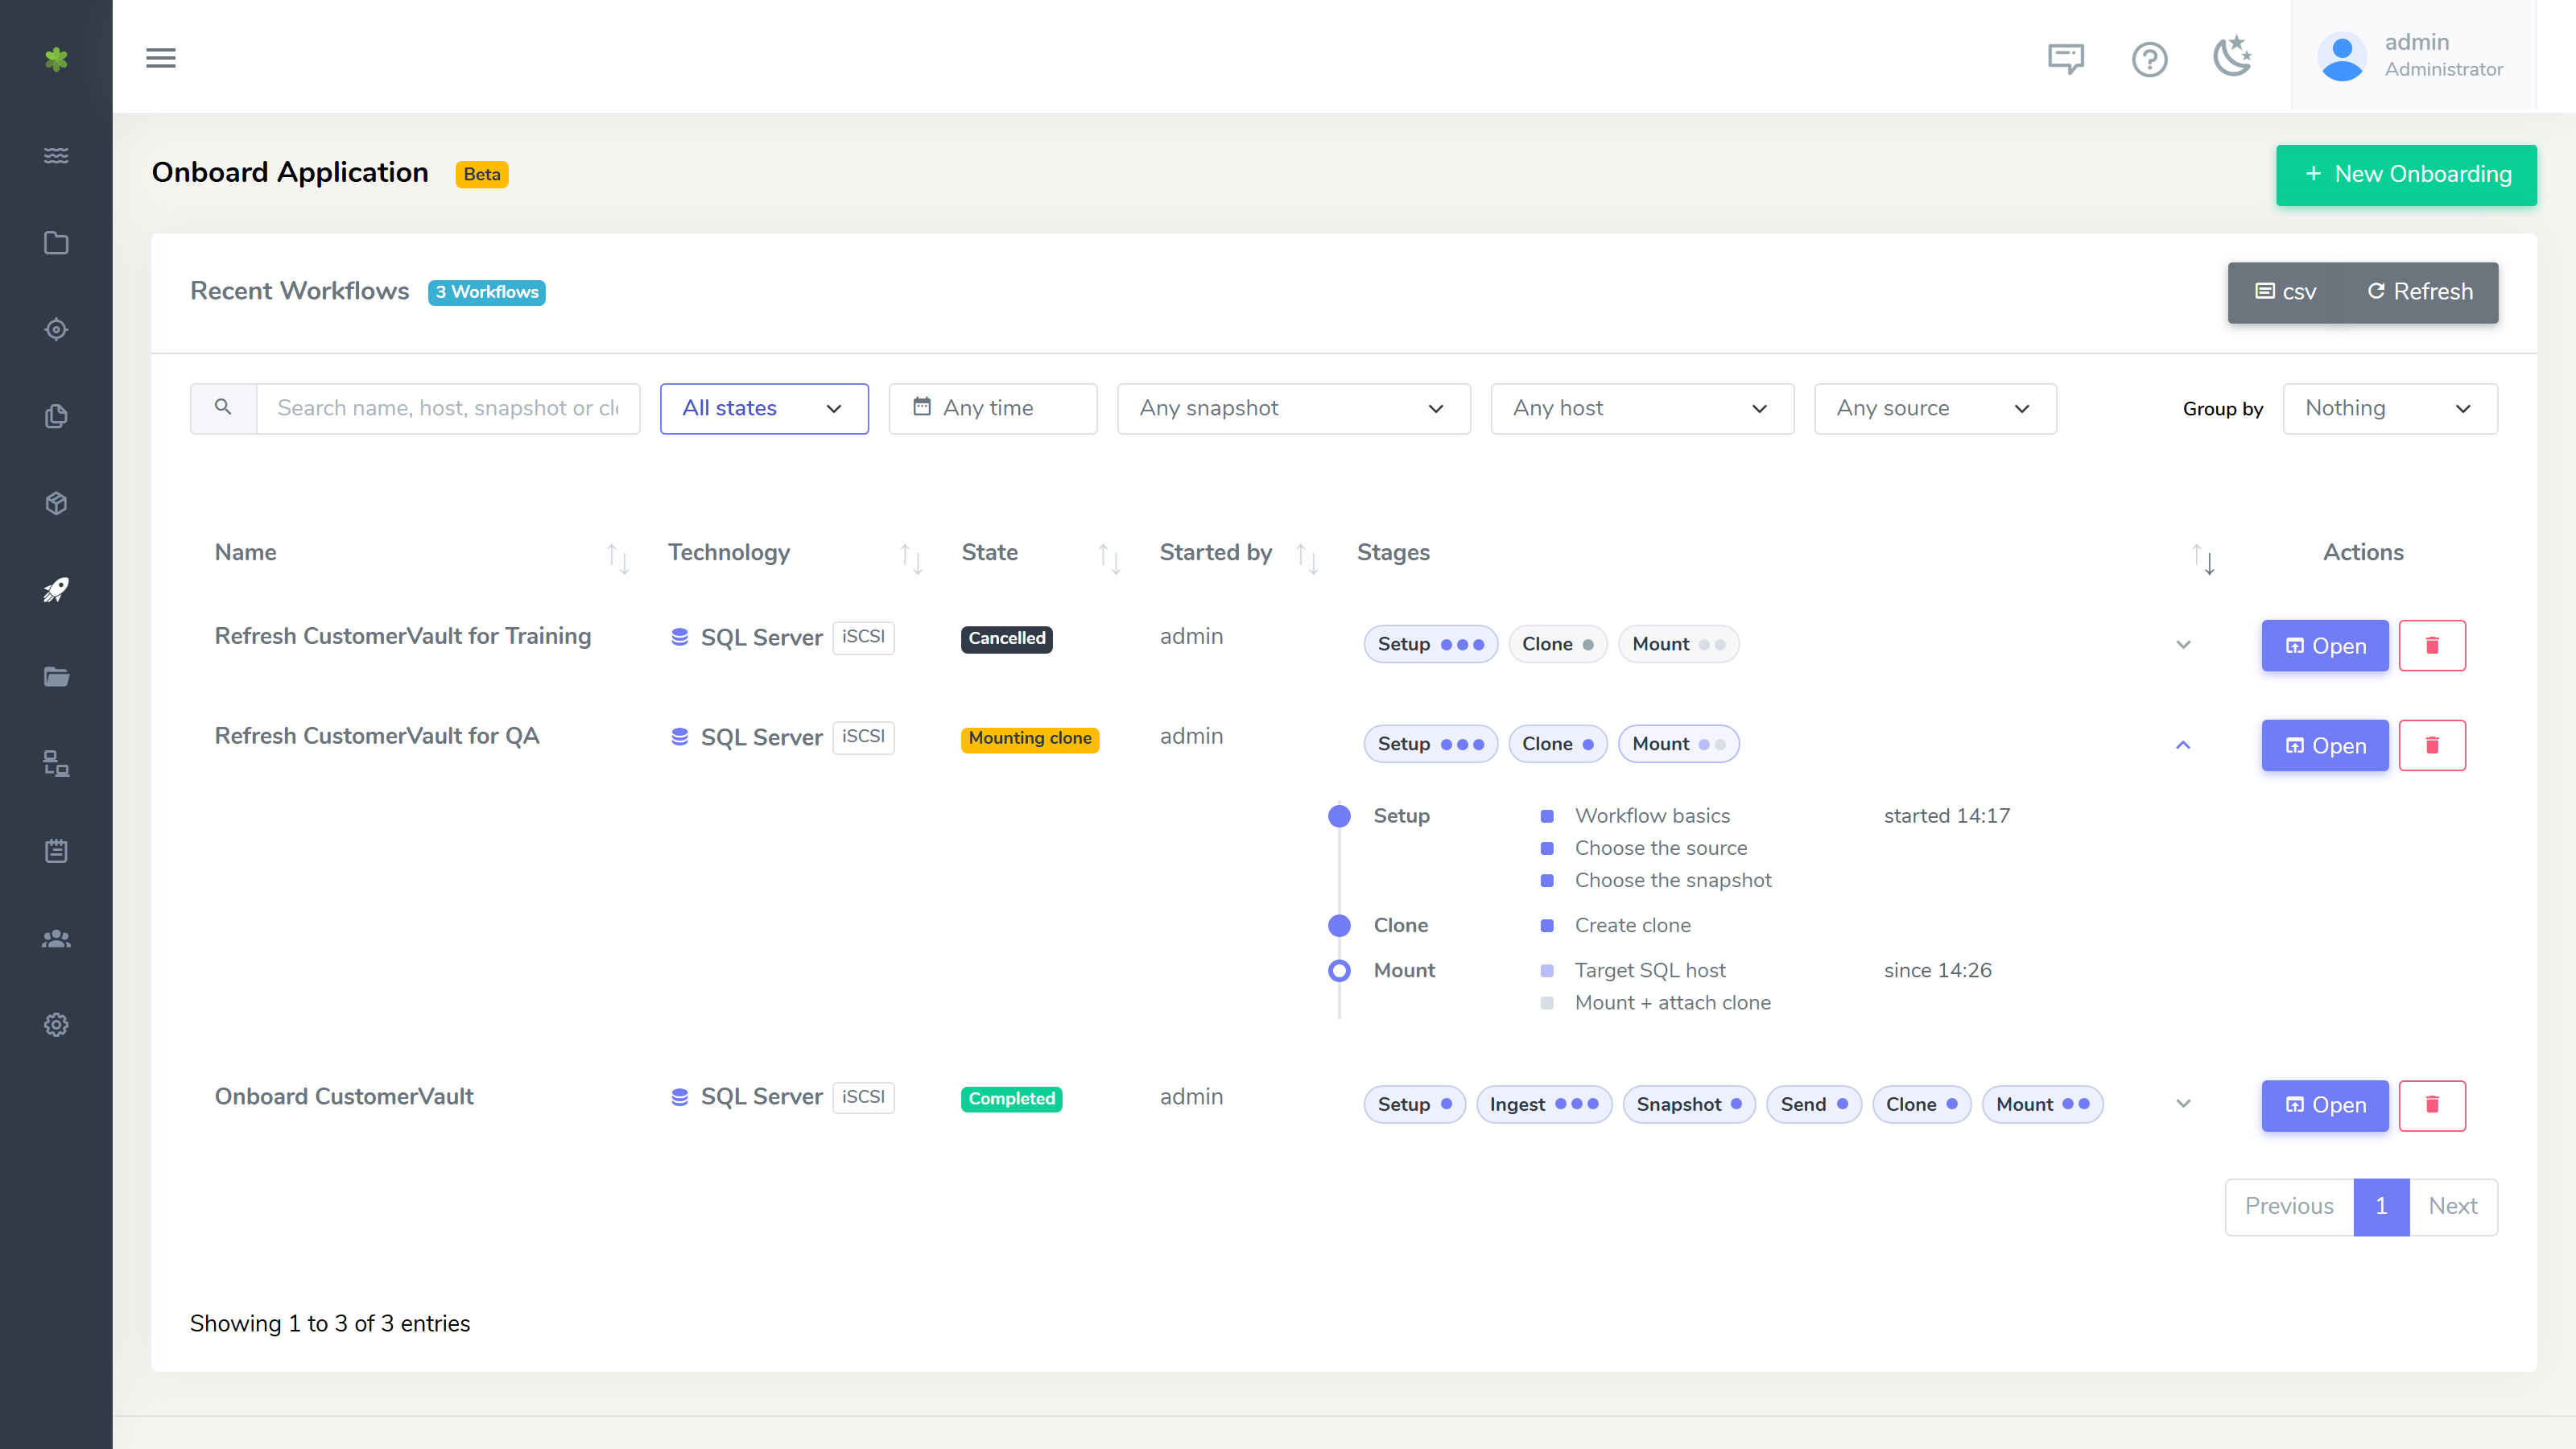
The Stages column shows each stage the run has as a chip, with a dot per step. Click a row's stages to open its stepper: every step under its stage, with the times recorded for it (when it started, finished or failed, and how long it took) and since when the run has been on its current step.
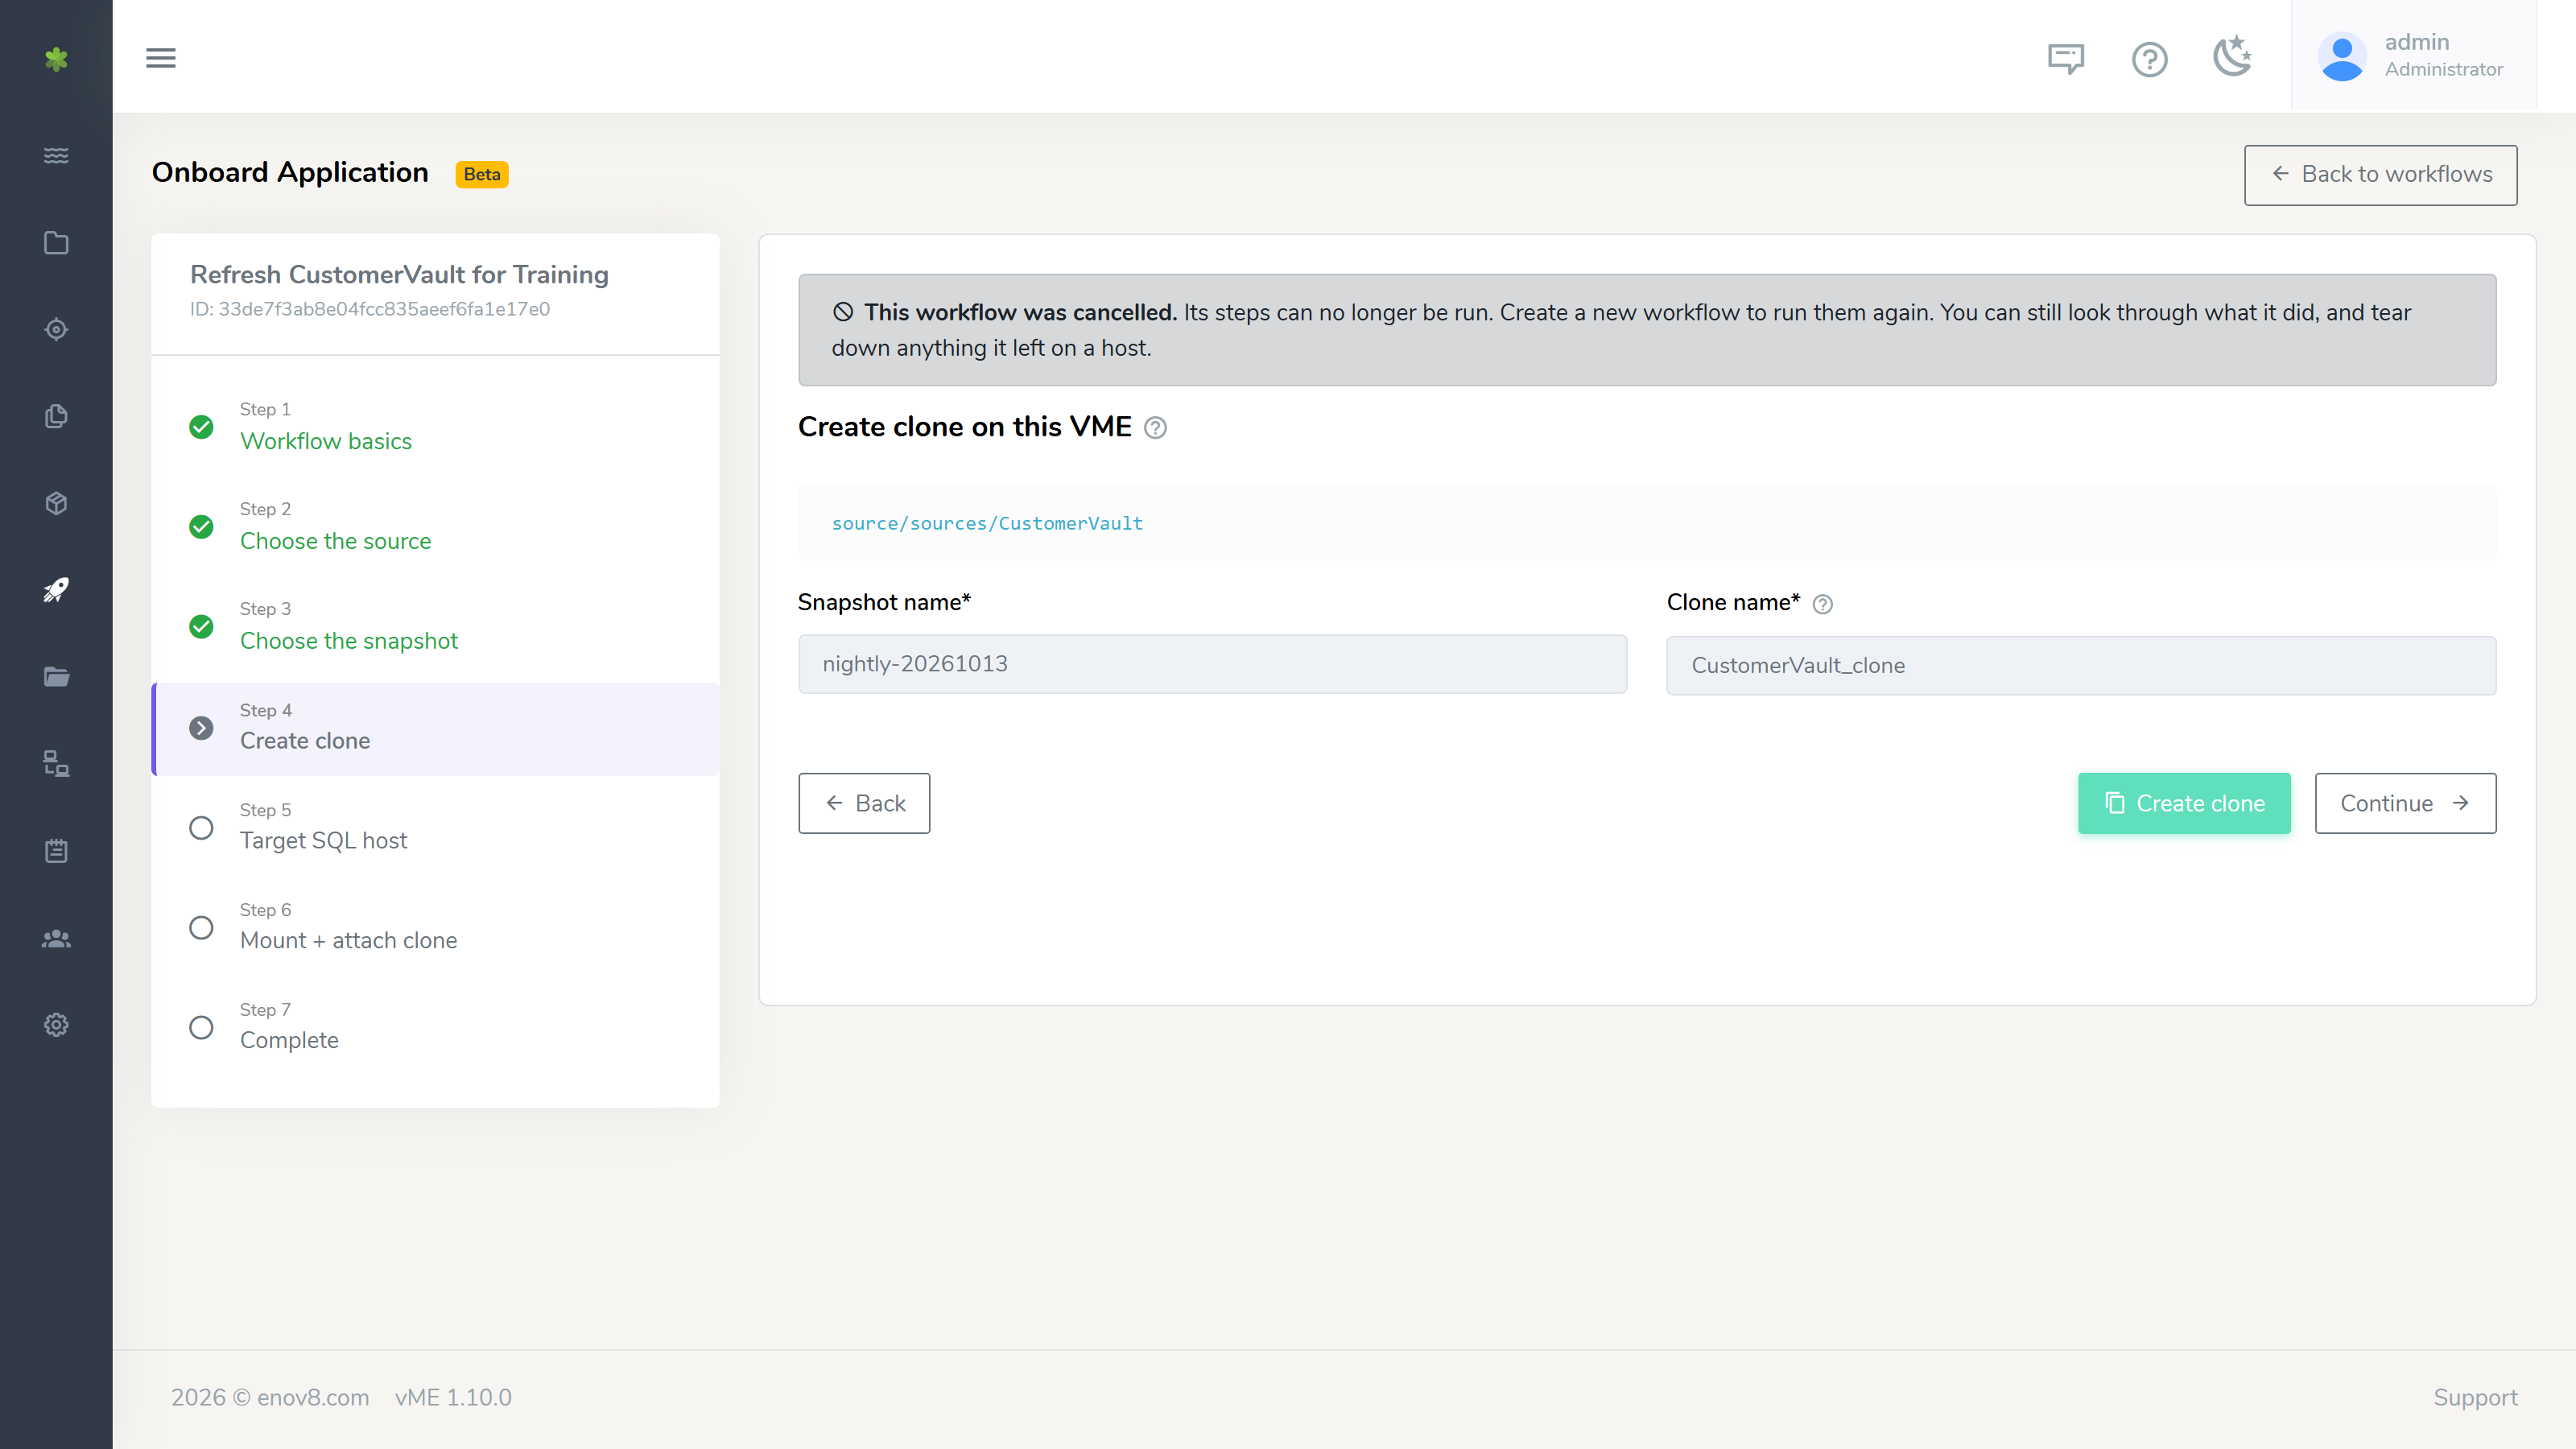
Use Open to reopen a workflow: an unfinished one opens at its saved step, a finished or cancelled one opens for you to look through. The bin button beside it deletes the workflow. Delete offers to also destroy what the workflow created, and lists each object and the appliance it is on before you confirm:
- Only objects the run made are offered. A source or snapshot it started from is left alone, because other runs may use it.
- A clone is looked for where the run made it: on the target appliance if the run sent, otherwise on this one.
- Objects are destroyed in order (clones, then snapshots, then sources), and the list shows each result. If any cannot be destroyed, the workflow record is kept so you can try again, with Force delete record to remove the record anyway.
A cancelled workflow is finished with: its steps cannot be run again, and it opens read-only. You can still look through what it did, step by step, and tear down anything it left on a host. Everything it made is kept, and is not counted as in use by it, so the lists can delete it. To run those steps again, create a new workflow.
vME Appliances
On the Agent Manager screen, the vME appliances tab beside Agents holds the other vME appliances this one sends snapshots to. Registering an appliance stores its address and an administrator api-key once, so a workflow's Send step offers it from a list, with no address or key to enter on each run.
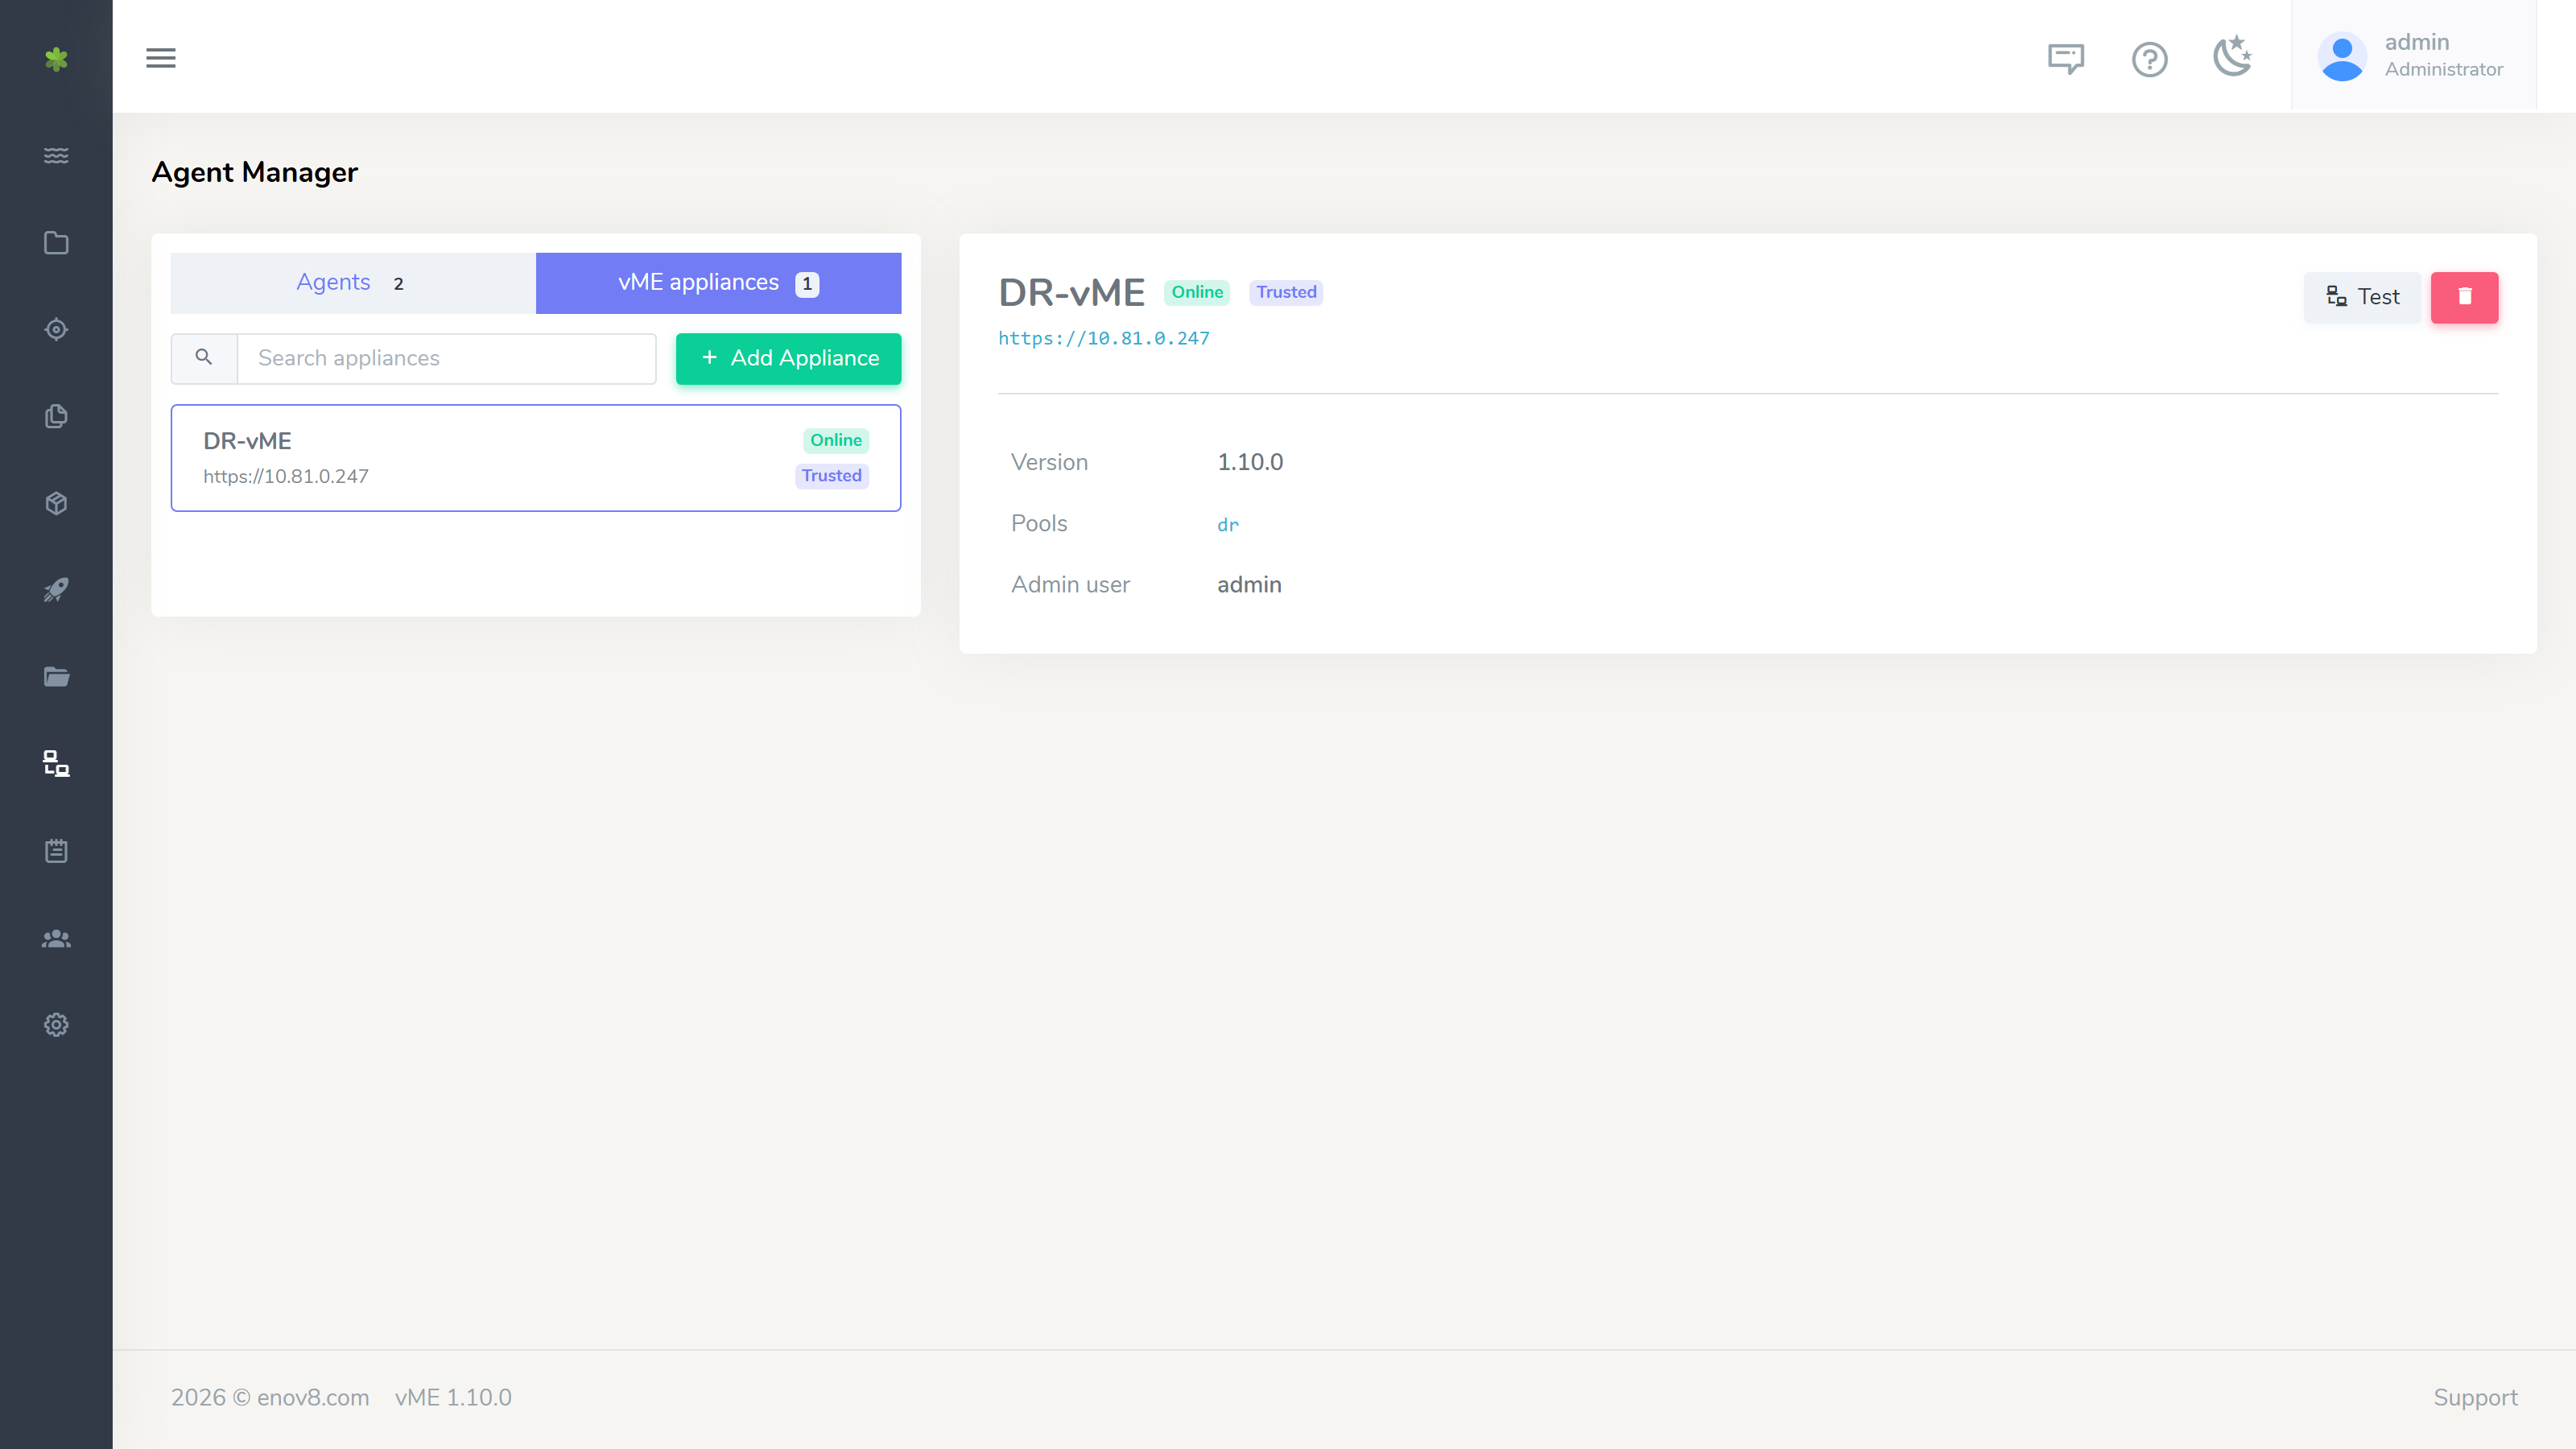
To register one, click + Add Appliance and give it:
| Field | Description |
|---|---|
| Name | A friendly name. This is what the Send step shows you. |
| URL | The appliance's address, for example https://10.0.0.20. |
| Admin username | An administrator account on that appliance. |
| Admin api-key | That account's api-key. It is stored encrypted and never shown again. |
Save & trust does three things in one go: stores the appliance, pushes this appliance's SSH key to it so snapshot transfers need no further setup, and reads back its version and pools. If one of the three does not finish, the form says which.
Each appliance in the list shows whether it is Online and Trusted. Select one to see its address, version, pools and admin user, with:
- Test: check it is reachable and refresh its version and pool list.
- Establish trust: shown while the appliance is not trusted; pushes the SSH key again, for when trust was not established on saving.
- Remove (the bin button): drop the registry entry. Workflows that send to it will need it registered again.
A workflow created before its target appliance was registered, which names the target by address, shows a notice on its Send step asking you to register that appliance and choose it.
Access Management
List Users
Navigate to the Access Management screen.

Add User
To add a new user, click on the "+Add User" button on the top right.
On click a new popup form will be shown which has the following inputs.
With LDAP Authentication selected:

With Local Authentication selected:

| Field Name | Description |
|---|---|
| Username | Login name for the new user. |
| Full Name | Display name of the user. |
| Email address for the user. | |
| Authentication Type | LDAP or Local authentication. |
Modify User
To modify an existing user, click on the pen icon next to any existing user
On click a new popup form will be shown which has the following inputs.
With LDAP Authentication selected:

With Local Authentication selected:

| Field Name | Description |
|---|---|
| Username | Login name of the user to modify. |
| Full Name | Updated display name of the user. |
| Updated email address for the user. | |
| Authentication Type | LDAP or VME Server (Local). |
| Rotate API Key | If true, invalidates the user's current API key and issues a new one. |
**Note: If modifying the user from LDAP to Local authentication, the current password and new password are needed for update.
Configure LDAP
To set the required field values for the LDAP server, click on the "Configure LDAP" screen for this.
On click a new popup form will be shown which has the following inputs.

| Field Name | Description |
|---|---|
| LDAP Server | Hostname or IP address of the LDAP server. |
| Port | Port on which the LDAP server listens (e.g. 389 for LDAP, 636 for LDAPS). |
| Bind DN | Distinguished Name (DN) used to bind/authenticate to the LDAP server. |
| Bind Password | Password for the bind DN account. |
| User Search Base | Base DN under which user entries are searched (e.g. ou=people,dc=example,dc=com). |
| User Filter | LDAP search filter for users; 0 is replaced by the login name (e.g. (uid=0)). |
| Username Attribute | LDAP attribute mapped to VME username (default: uid). |
| Name Attribute | LDAP attribute mapped to VME display name (default: givenName). |
| Mail Attribute | LDAP attribute mapped to VME email (default: mail). |
Getting container connection info
Navigate to the Containers screen.
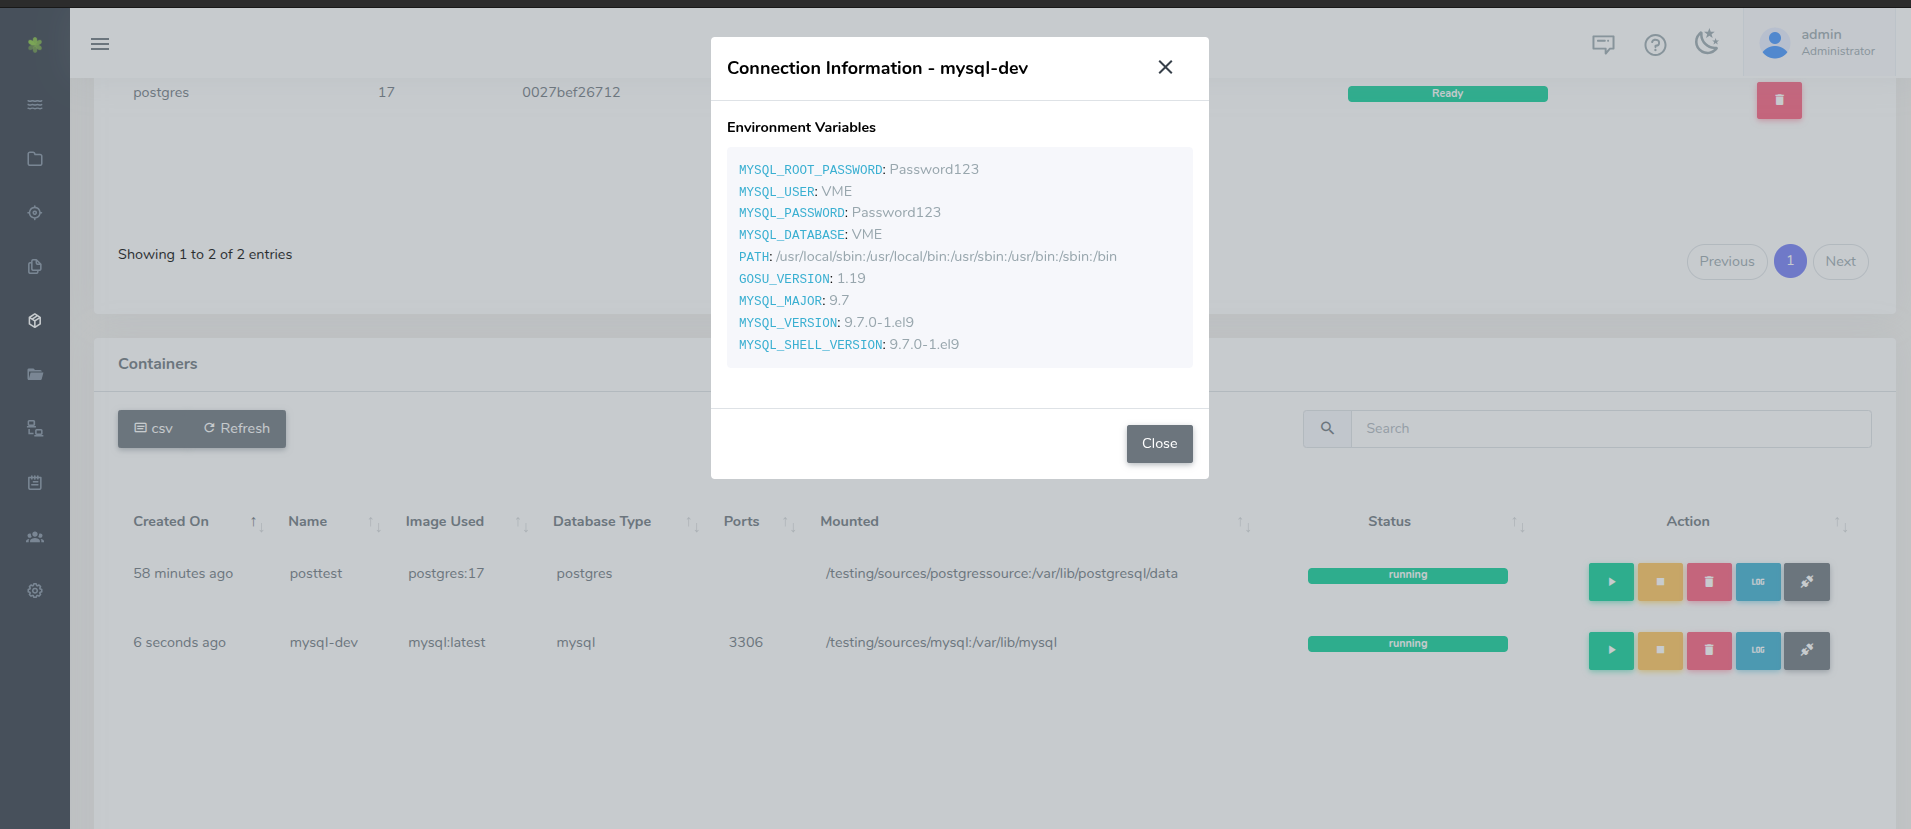
Scroll to the containers table and click the Connection Info button for the desired container.
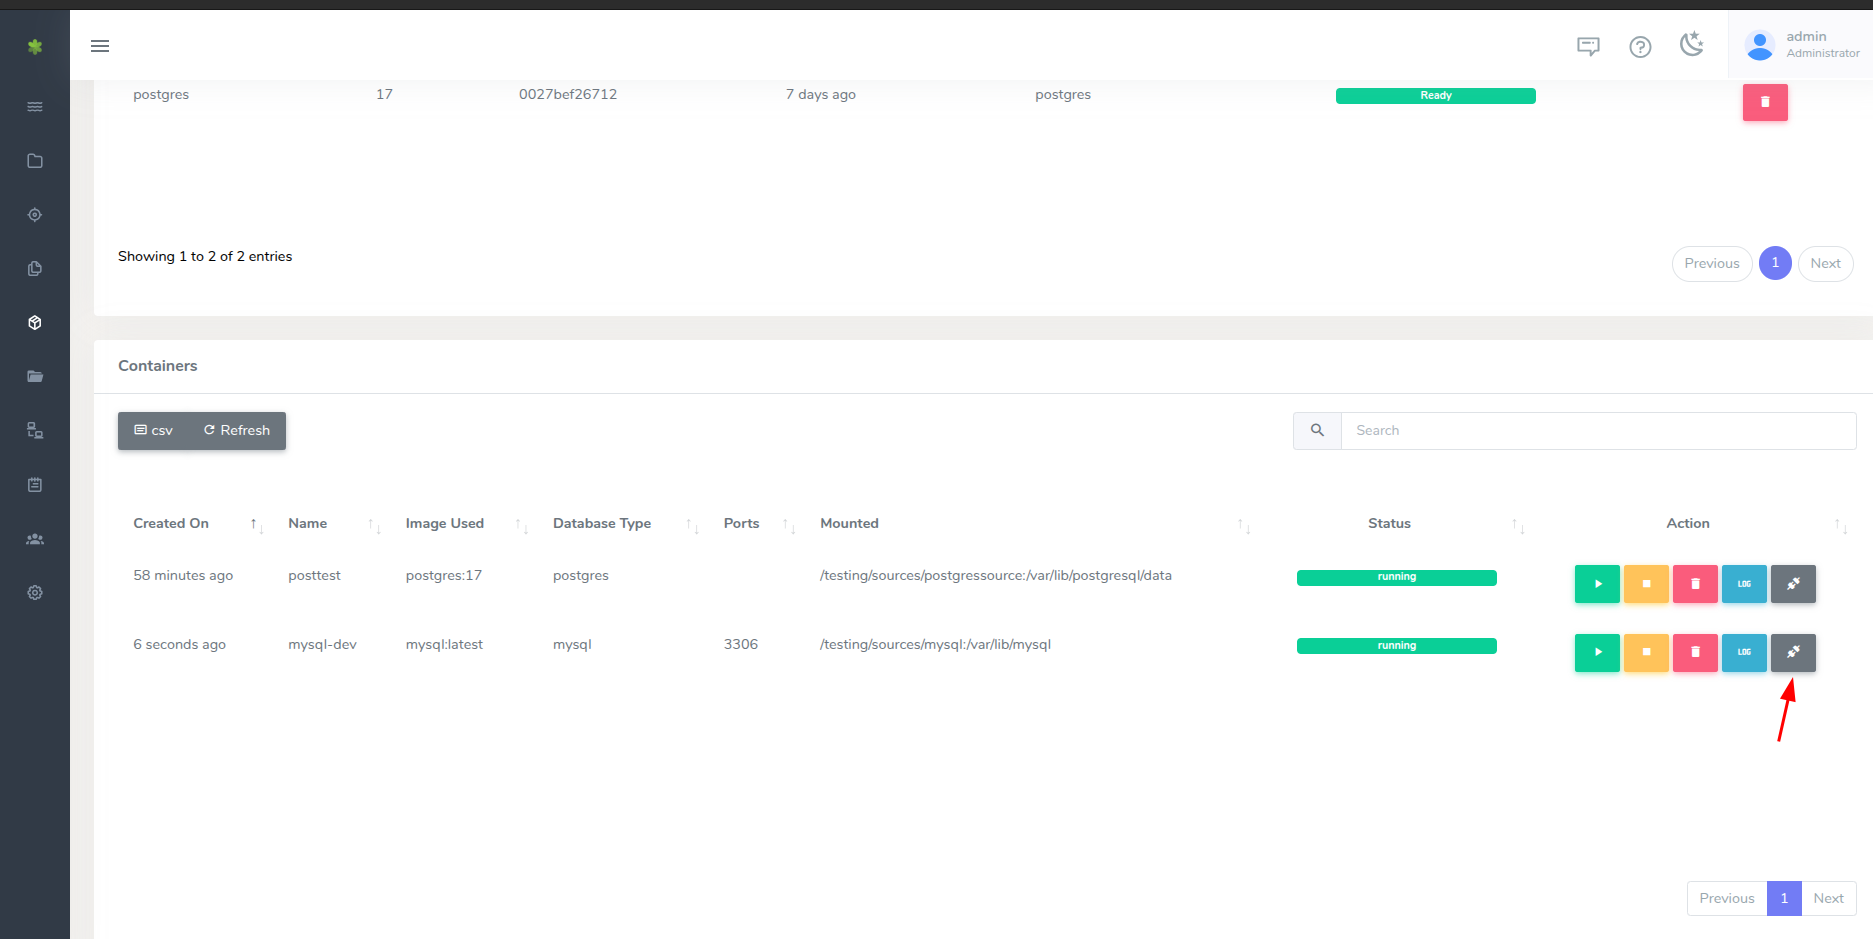
This presents a popup with the container's connection info.
Agent Manager
Agent Manager is where administrators manage the vME agents installed on Windows servers. From here you can register new agents using enrollment tokens, see what each host reports about itself, label and tag agents, rotate agent keys, and clear iSCSI targets a host has been left holding.
Navigate to the Agent Manager screen. It has two tabs:
- Agents: the agents registered with this appliance.
- vME appliances: the other vME appliances this one sends snapshots to.
The agents list
The Agents tab lists every agent, grouped by environment and sorted by host name. Each entry shows the host name, the agent's label, the SQL Server version the host reported (for example SQL 2025) and the agent's status: Online, Offline, Inactive or Disabled. The search box matches host, label, environment, tag or SQL Server version.
Pick an agent to see its details beside the list.
Agent details
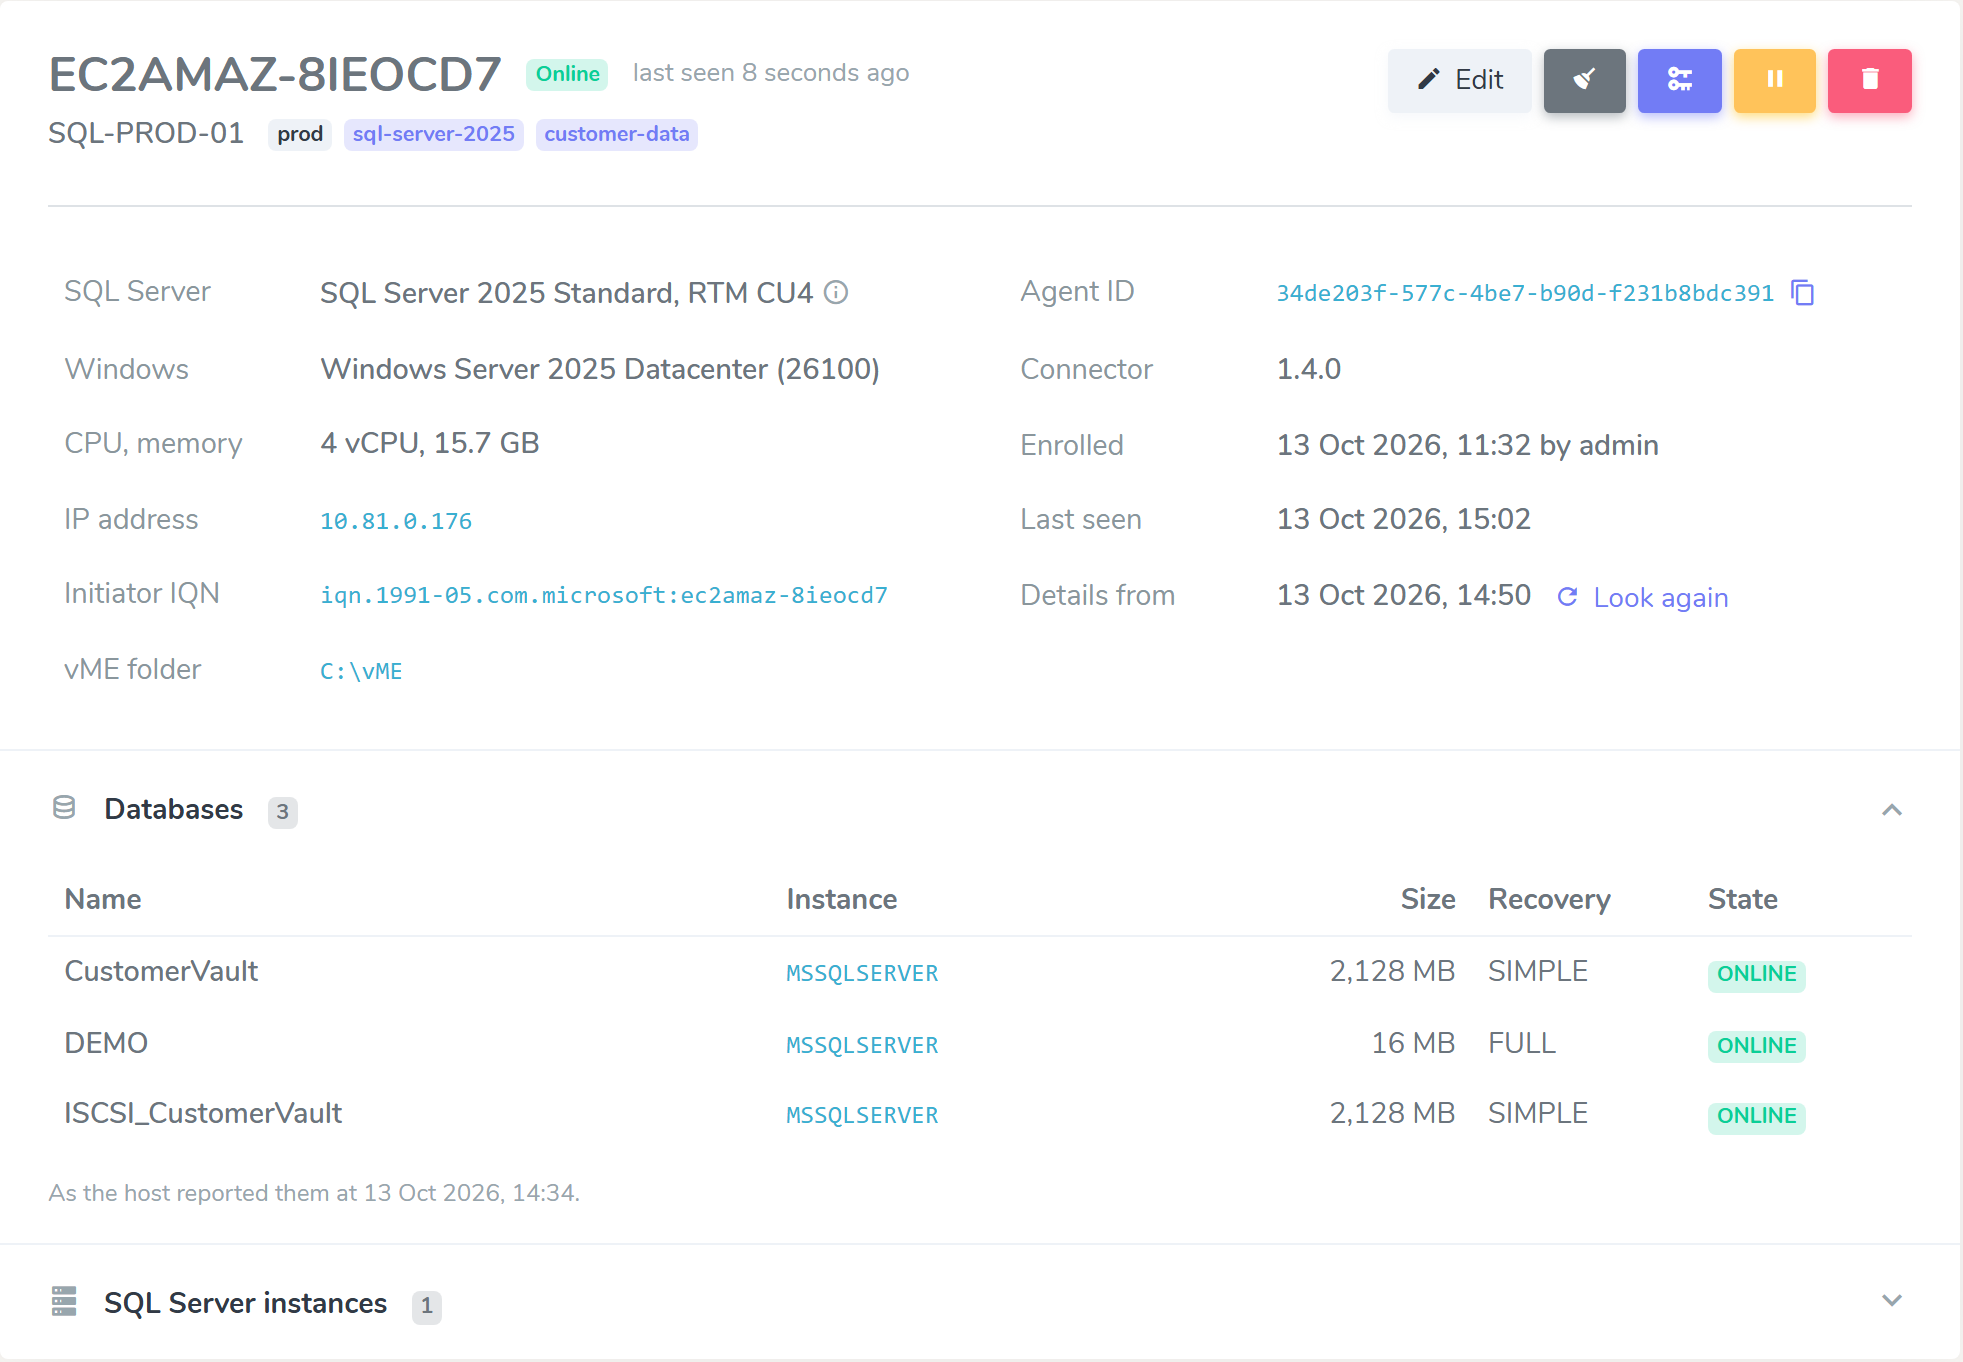
The top of the details shows the host name, the agent's status and when it was last seen, then its label, environment and tags. The buttons on the right are, in order:
| Button | What it does |
|---|---|
| Edit | Change the agent's label, environment and tags. See Edit Agent. |
| Broom | Open Host maintenance for this host. |
| Key | Rotate the agent's key. See Rotate Key. |
| Pause / Play | Disable or enable the agent. |
| Bin | Delete the agent. This cannot be undone. |
The fields below them are what the host reports about itself:
| Field | Description |
|---|---|
| SQL Server | The SQL Server product, edition and update level. Hover the information icon for the version number and collation. |
| Windows | The Windows edition and build. |
| CPU, memory | The host's logical CPUs and memory. |
| IP address | The host's IP addresses. |
| Initiator IQN | The host's iSCSI initiator name. |
| vME folder | The folder on the host that sources and clones are mounted under. It is set in the agent's tray Settings; see Edit Agent Settings. |
| Agent ID | The agent's ID. The copy icon copies it to the clipboard. |
| Connector | The version of the connector on the host. |
| Enrolled | When the agent enrolled, and the vME user who created its enrollment token. |
| Last seen | When the agent was last heard from. |
| Details from | When the host last reported these details. Look again asks the host to discover itself again, and refreshes the details when it has finished. It is available while the agent is online. |
Below them are two panels, each opened and closed by clicking its heading:
- Databases: each user database on the host, with its SQL Server instance, size, recovery model and state, as the host last reported them.
- SQL Server instances: each instance's service name, version, collation, number of databases, and whether it is running.
A field the host did not report shows Not reported. When the connector on the host does not report its SQL Server and Windows details at all, the details say so: update the connector on that host to see them.
Edit Agent
Click Edit in an agent's details to change how the agent is labelled and grouped. What the host reports about itself is not edited here. What you save is kept: the agent's own heartbeats do not overwrite it.
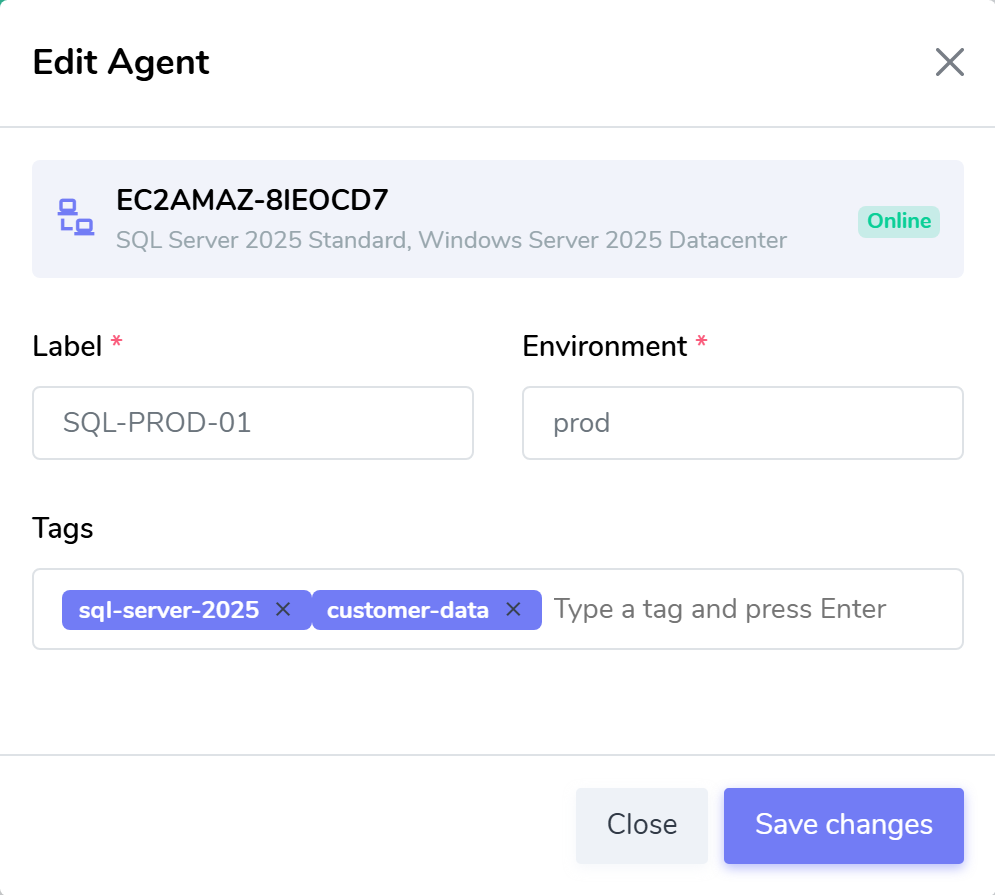
| Field | Description |
|---|---|
| Label* | A friendly name for the agent, shown under the host name in the agents list. Up to 128 characters. |
| Environment* | The group the agent is listed under, for example prod or dr. Up to 64 characters: letters, digits, spaces, dots, underscores and hyphens, starting with a letter or digit. The environments other agents use are offered as you type. |
| Tags | Type a tag and press Enter (or type a comma) to add it. An agent can have up to 20 tags, each up to 32 characters, using the same characters as an environment. Tags that differ only in case are the same tag. Tags used on other agents are offered underneath as buttons; click one to add it. To remove a tag, click the × on it, or press Backspace in the empty box. |
Click Save changes. Tags can be searched for in the agents list.
Add Agent
To register a new agent, click on the "+ Add Agent" button at the top of the agents list.
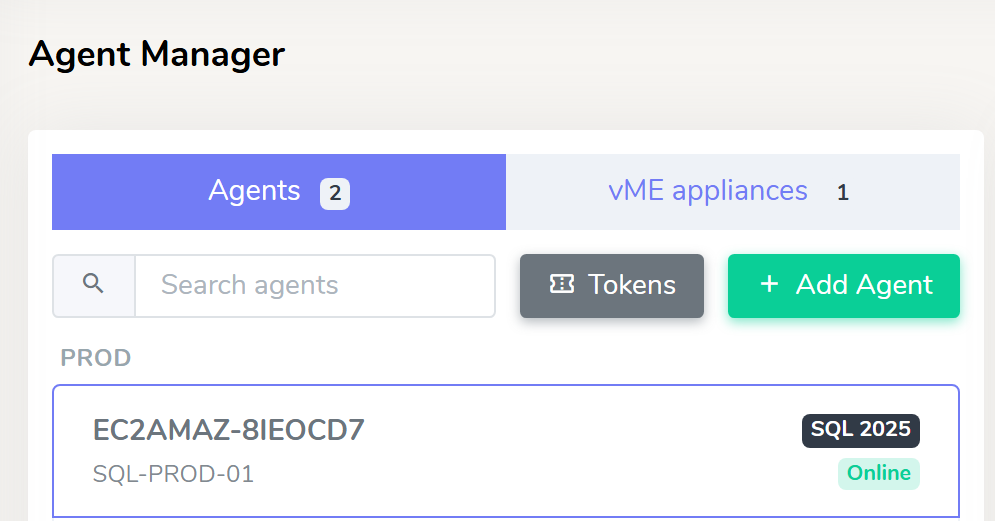
On click a new popup form will be shown which has the following inputs.
| Field Name | Description |
|---|---|
| Label | A friendly name for this agent, e.g. sql-source-01. |
| Environment | The group the agent is listed under, e.g. staging or test. |
| TTL (minutes) | How many minutes the enrollment token stays valid. Default is 60. |
Click Create Token. The enrollment token will be displayed once.
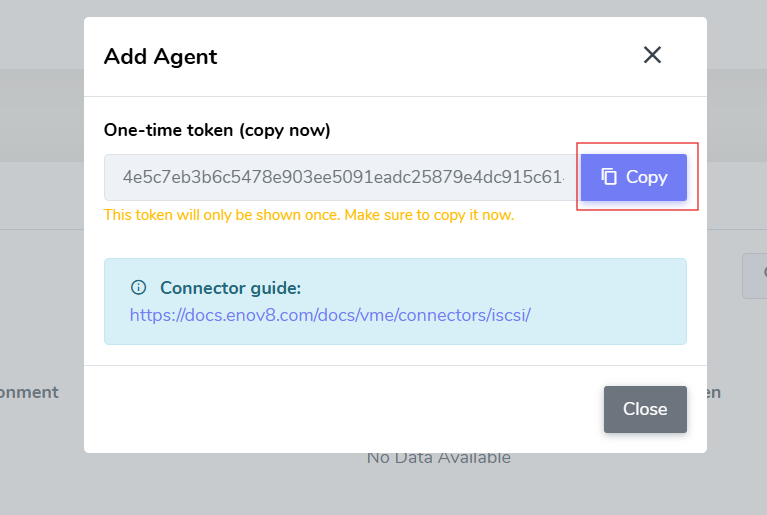
Copy the token immediately - it is shown only once and cannot be retrieved again after closing this dialog.
Tokens, beside + Add Agent, lists the enrollment tokens that have not been used yet. A token can be revoked there.
Rotate Key
Navigate to the Agent Manager screen and pick the agent in the list.
To generate a new key, click on the Rotate Key button (the key icon) in the agent's details.

A dialog will appear showing the new agent key.
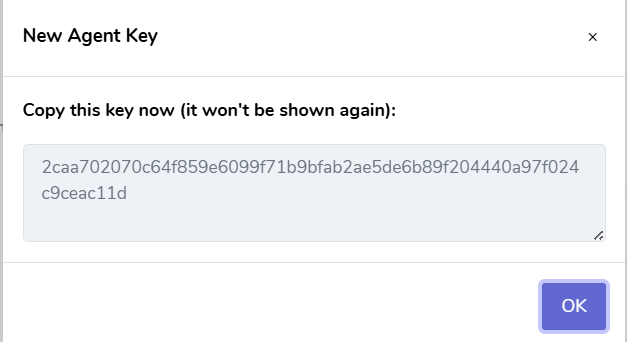
Copy the key immediately - it is shown only once. Apply it on the Windows server using the Rotate Agent Key option in the agent tray menu.
Host maintenance
A SQL Server host keeps every iSCSI target it has been given until it is told to forget it. When a source or clone is deleted on vME, the host can be left holding a target that leads nowhere. Host maintenance shows the iSCSI targets and portals a host still holds from this appliance, and tells the host to forget the ones you pick. Nothing else on the host is touched, and the datasets on vME stay as they are.
To open it, pick the agent in the list and click the broom button in its details.
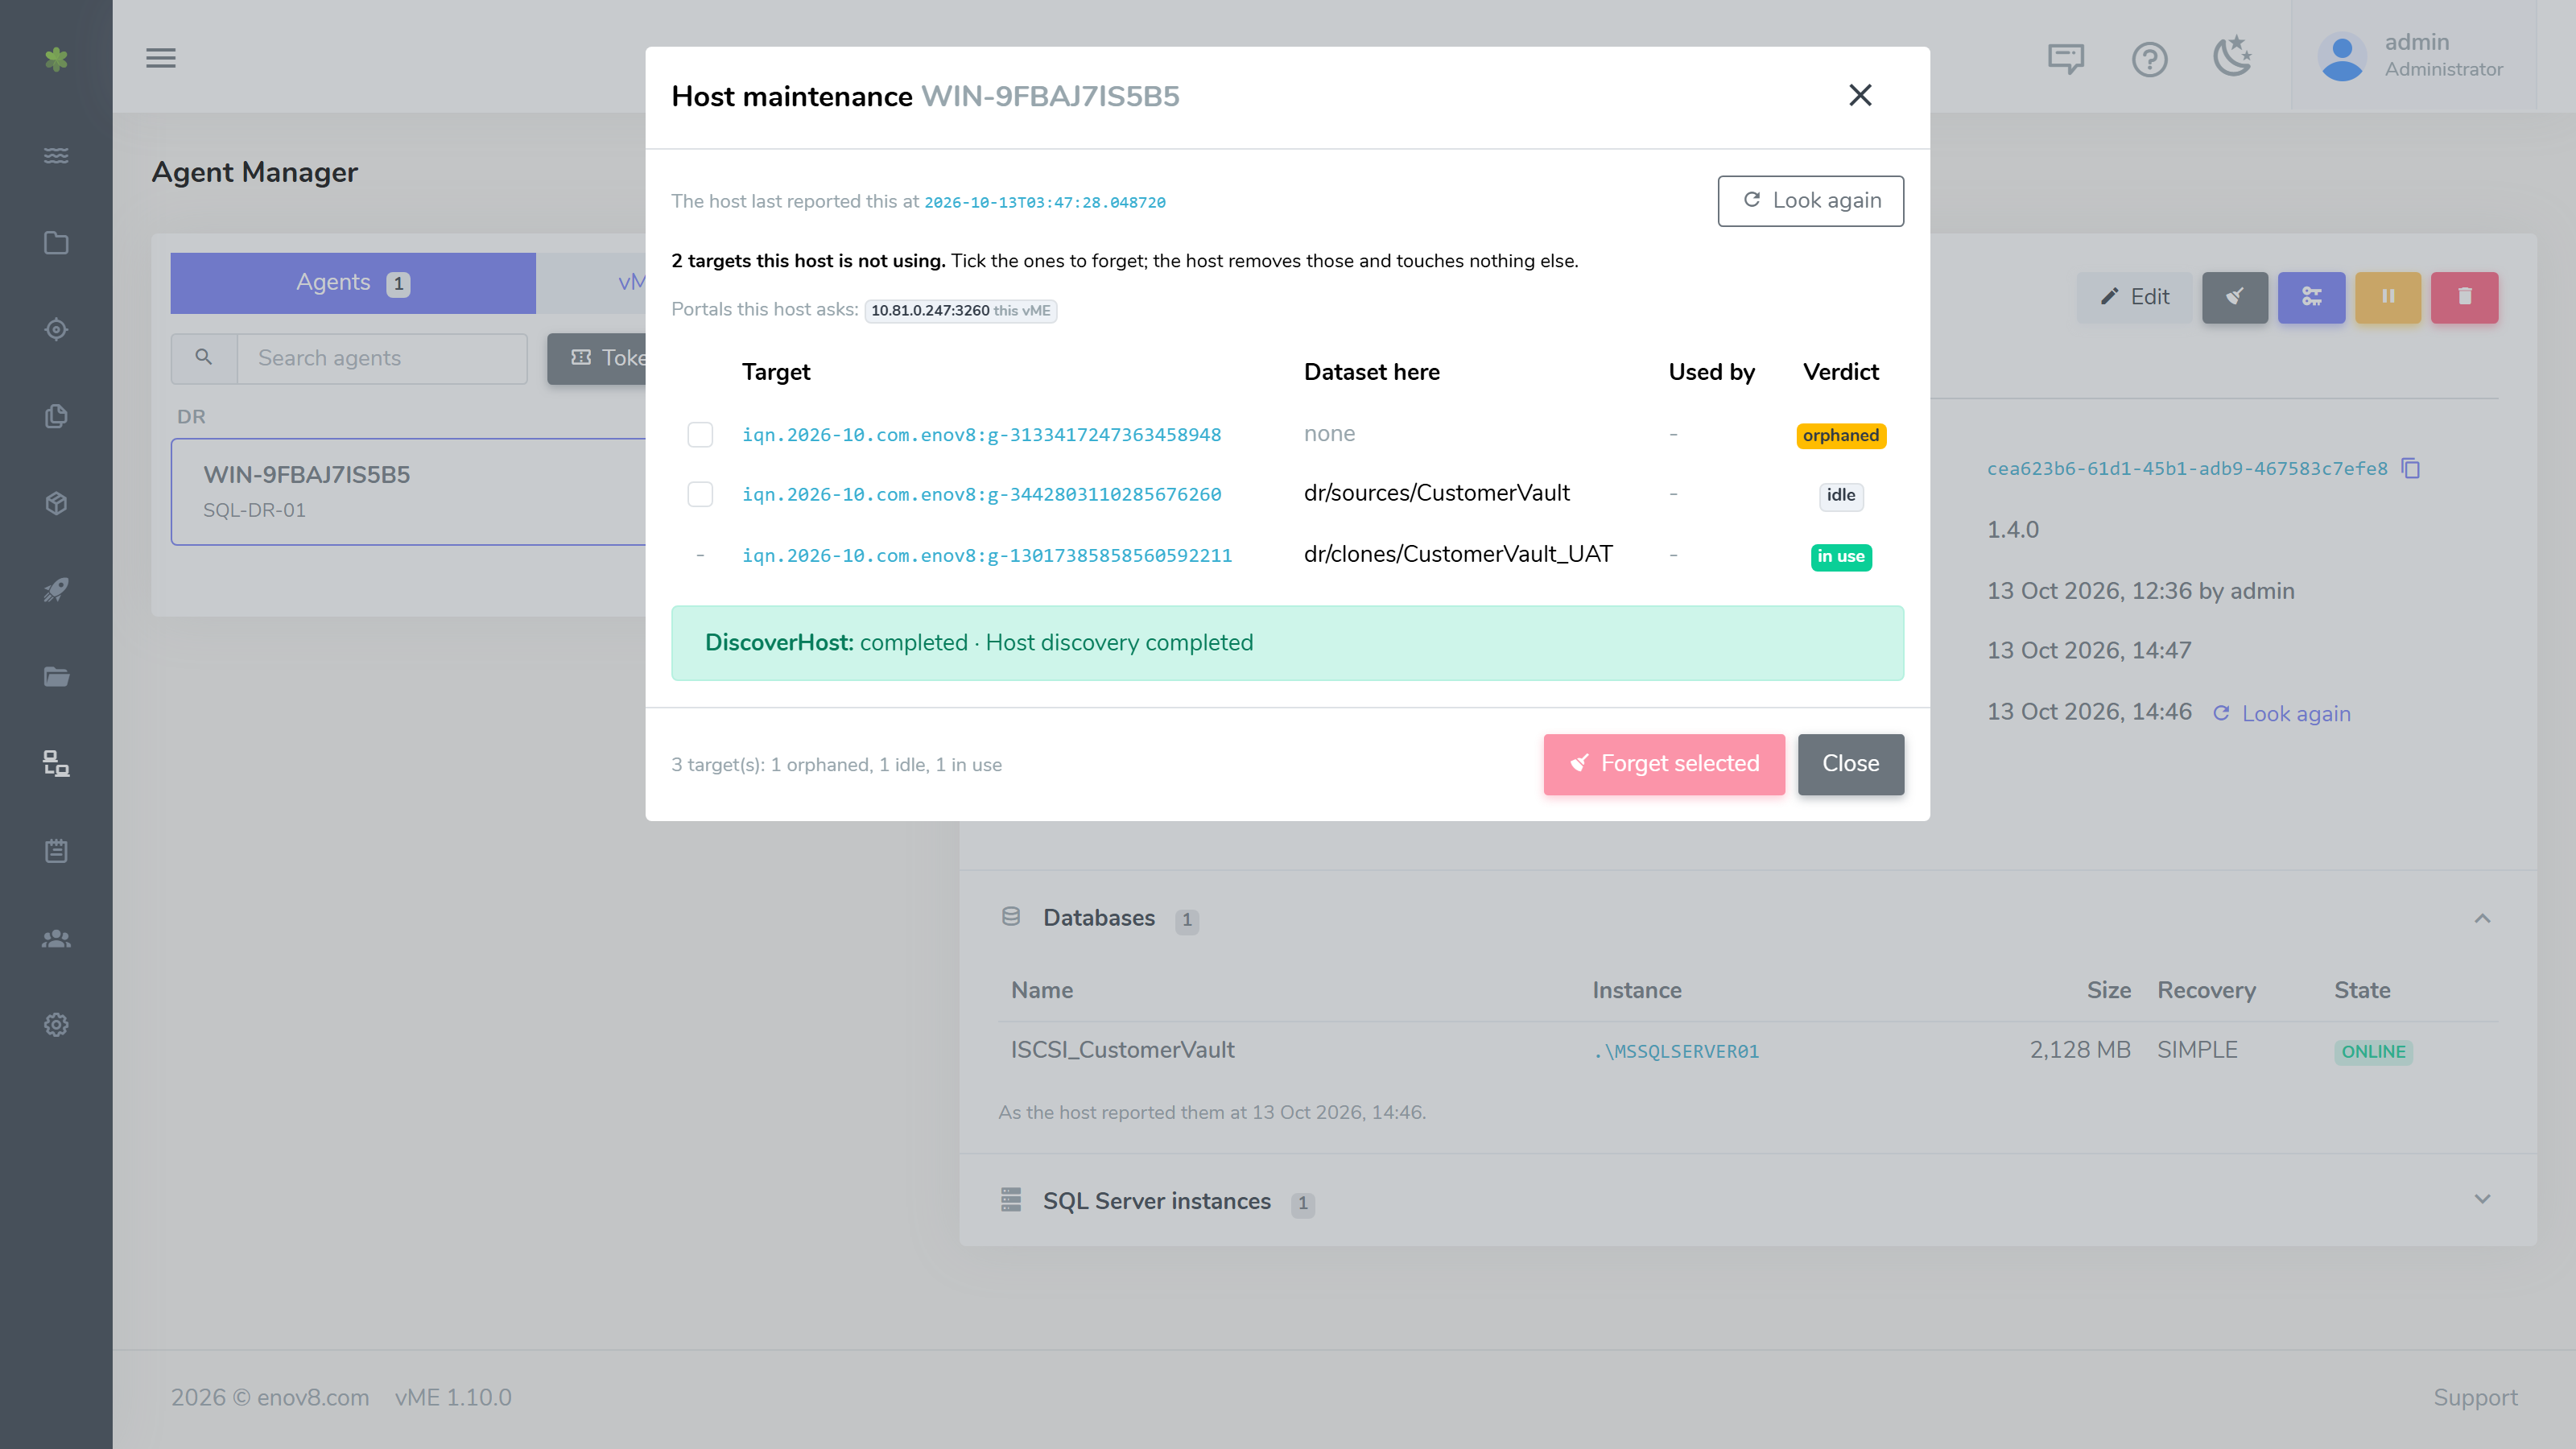
The panel shows what the host last reported, and when. Look again asks the host to report again, and the panel refreshes when it has.
Portals this host asks lists the iSCSI portals the host asks for targets, as address and port. This appliance's own portal is marked this vME.
The table has one row per iSCSI target the host knows from this appliance:
| Column | Description |
|---|---|
| Tick box | Picks the target for Forget selected. A target that is in use cannot be picked. |
| Target | The target's IQN. |
| Dataset here | The source or clone on this appliance behind the target, or none. |
| Used by | The unfinished onboarding workflows using that source or clone. |
| Verdict | in use, idle or orphaned, as below. Hover a verdict for the reason, and for whether the host is connected and has a disk from the target. |
| Verdict | Meaning |
|---|---|
| in use | A source or clone on this appliance answers for the target, and the host is connected to it or has a disk from it. |
| idle | The source or clone is still on this appliance, but the host is not connected to the target and has no disk from it. Forgetting the target loses nothing: the source or clone stays, and it can be mounted on the host again. |
| orphaned | Nothing on this appliance answers for the target. Its source or clone was deleted without the host being told. |
The footer counts the targets of each verdict, for example "3 target(s): 1 orphaned, 1 idle, 1 in use".
Forget targets
- Tick the orphaned or idle targets to forget.
- Click Forget selected.
- The confirmation lists the targets the host is told to forget. Click Forget.
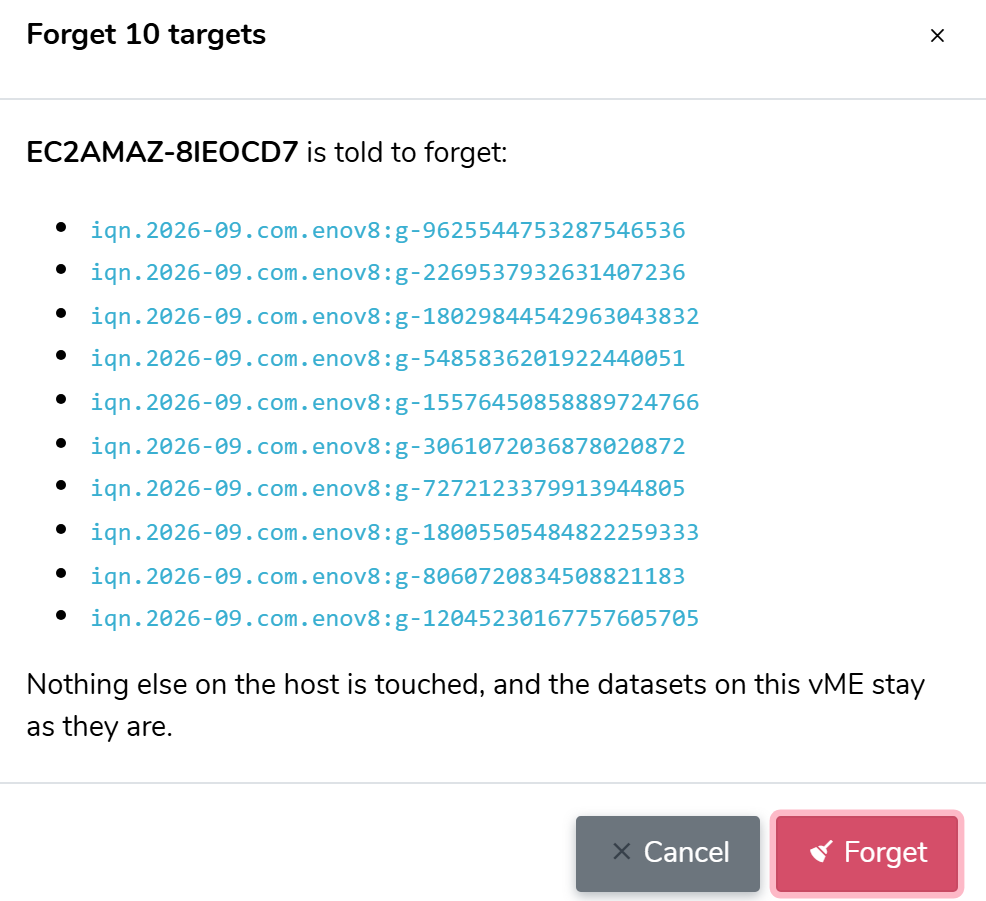
Forget a portal
A portal of another appliance, for example one that has been taken out of service, has a forget icon beside its address. Click it and confirm, and the host stops asking that portal for targets. Only that portal is removed. This appliance's own portal has no forget icon.
Following the job
Forgetting and Look again each run as a job on the host. The panel follows the job as it runs and shows its latest progress lines. When a forget finishes, the panel asks the host to report again, so the table shows what is left. While a job runs, the buttons that would start another are held.
Stop waiting stops the panel following the job. The job is not cancelled: the host still finishes it, and Look again shows the result. Closing the panel does the same.
Hosts whose connector cannot forget
Forgetting a target needs a connector that reports it can forget a named target, and forgetting a portal needs one that reports it can forget a named portal. On a host whose connector does not:
- the targets table is a list only, with no tick boxes and no Forget selected, and a note says to update the connector, then look again;
- the portals have no forget icon, and a note says so.
Update the connector on that host, then click Look again.