Orchestration Management
Overview
Orchestration Management module can be used to add environment and release automation. This module allows the capability to upload your automation scripts, execute them on demand and schedule it. These automation scripts can also be attached to your configuration items or Runsheet tasks.
Administration
General Configuration
This section displays the current Orchestration Scheduler configuration.
Each field represents a key system-level parameter that controls how scheduled scripts and automation tasks operate.
Configuration Fields
| Field | Description |
|---|---|
| Scheduler Status | Indicates whether the Orchestration Scheduler service is currently running or stopped. |
| Ecosystem URL | Base URL of the Ecosystem application. Used internally by scripts triggered by the scheduler. |
| Ecosystem API URL | API endpoint used by the scheduler to communicate with Ecosystem services. |
| VO URL | VO (Virtual Orchestrator) service URL used by automation scripts. |
| Version | Current version of the orchestration engine installed in the environment. |
| Log Retention Period (Days) | Number of days audit logs and execution logs are retained before automatic cleanup. |
| Shared Folder Location | Physical or network disk location where automation scripts are stored and executed. |
| Debug | Enables or disables debug mode. When set to true, additional logs are captured for troubleshooting. |
| TimeZone | Timezone in which scheduled jobs will execute. Script scheduling follows this timezone. |
| String Secure | When enabled, sensitive input parameters are encrypted and masked during script execution. |
| Email Notification | Enables email notifications for script completion or failures when set to true. |
TDM Queue Manager
With the support for grouped reporting (running scans in bulk using grouped data connections) added in TDM.6, the TDM Queue Manager can be toggled on/off through the Orchestration Management >Administration >Configuration page. The toggle button is located at the very top of the page.

IMPORTANT: After toggling the button on/off, restart Ecosystem Server and refresh the browser for the changes to take place.
Backup & Restore
The Backup & Restore section allows administrators to manually back up or restore the Orchestration Model.
This is useful when moving configurations between environments (DEV → QA → PROD) or recovering from failures.
Backup & Restore Options
| Field | Description |
|---|---|
| Restore Model | Select a previously saved Orchestration Model from the dropdown. After selecting a file, use the Restore action to load the model. All configurations, scripts, schedules, and automation settings from the selected backup will be applied. |
| Backup Model | Enter a name for creating a new backup of the current Orchestration Model. Once the name is provided, you will have two options: Backup Only, which stores the backup on the server, and Backup & Download, which saves the backup on the server and immediately downloads it to your system for external storage or migration. |
Script Management
Manage Scripts
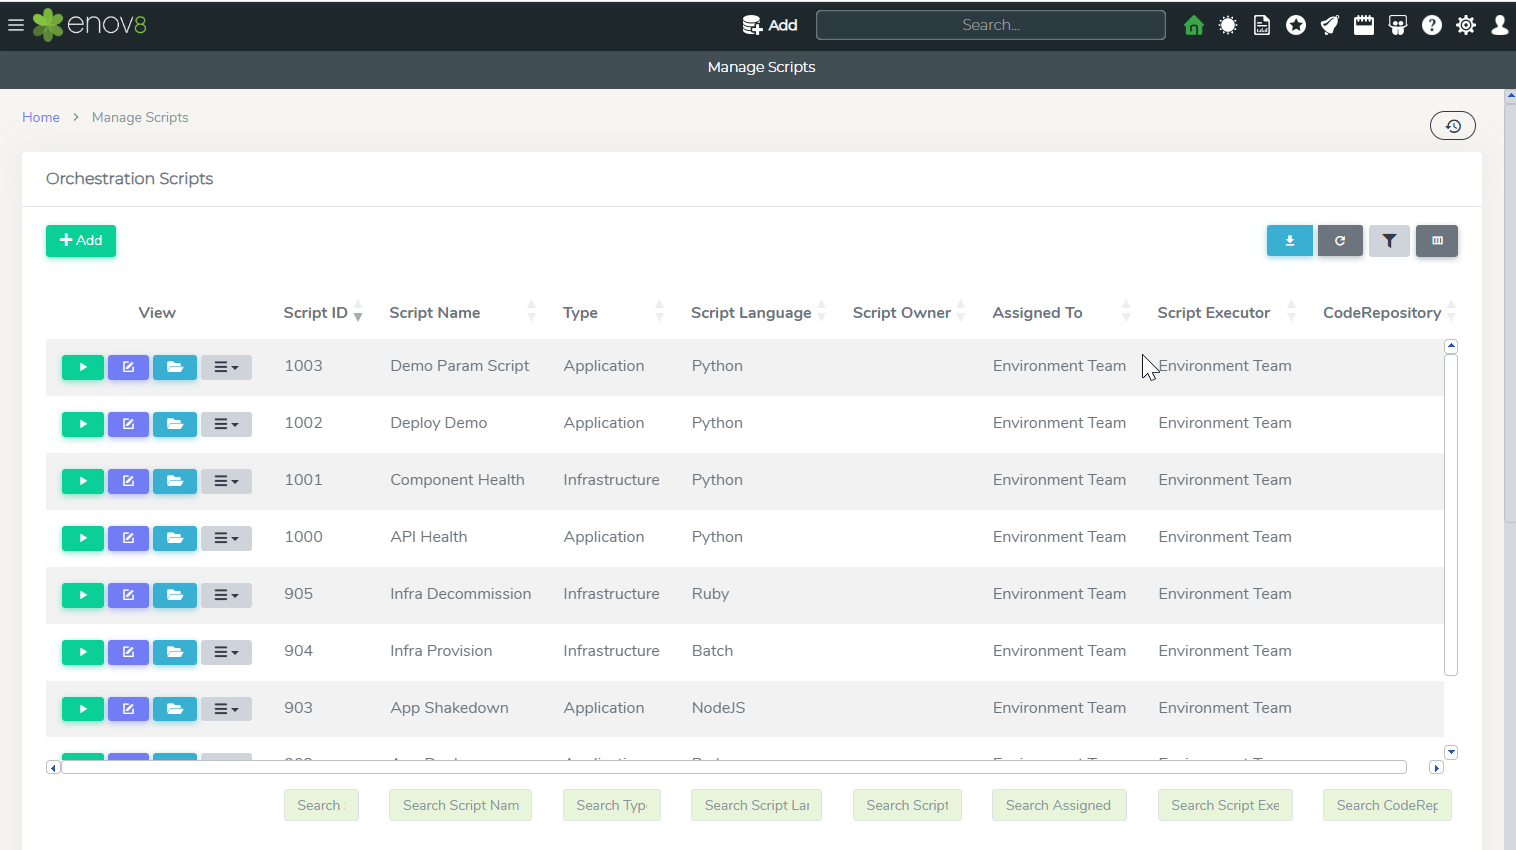
“Manage Script” section can be used to manage all your automation scripts.
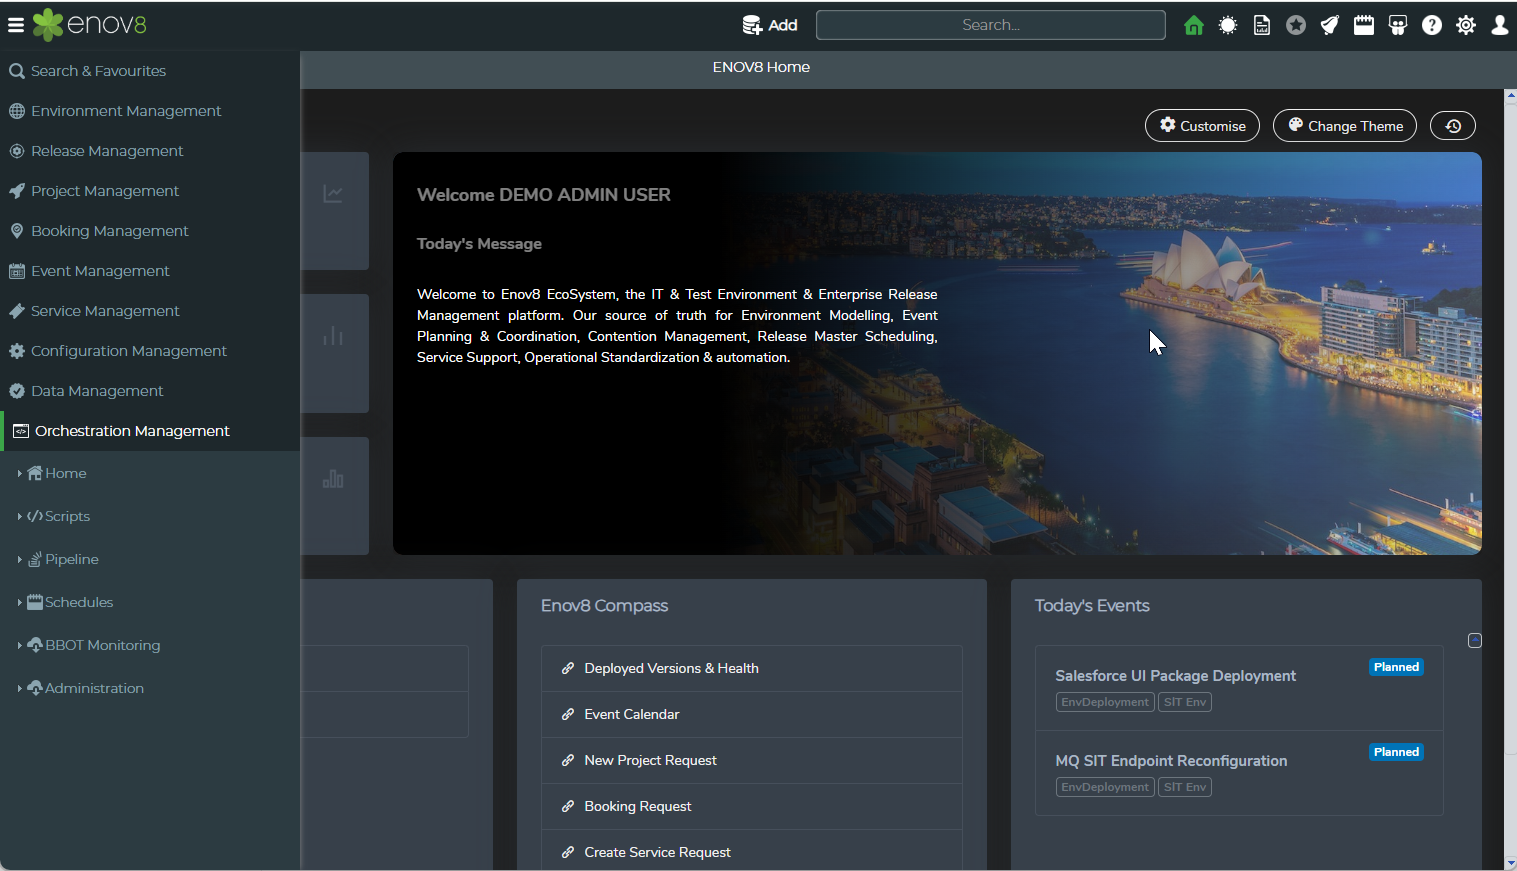
To access, navigate to Orchestration Management > Scripts > Manage Scripts
This section allows the following options:
| Action | Description |
|---|---|
| Add Script | This option can be used to add new scripts. |
| Execute | This option allows the user to execute the script. |
| Clone | This option allows making a copy of the script. |
| Explorer | This option allows the user to view the script files and modify the content. |
| Execution Logs | This option allows the user to view the logs of each execution of the script. |
| Download | This option allows downloading the script as a zip file. |
| Delete | This option allows the user to delete the script. |
Add/Edit Scripts
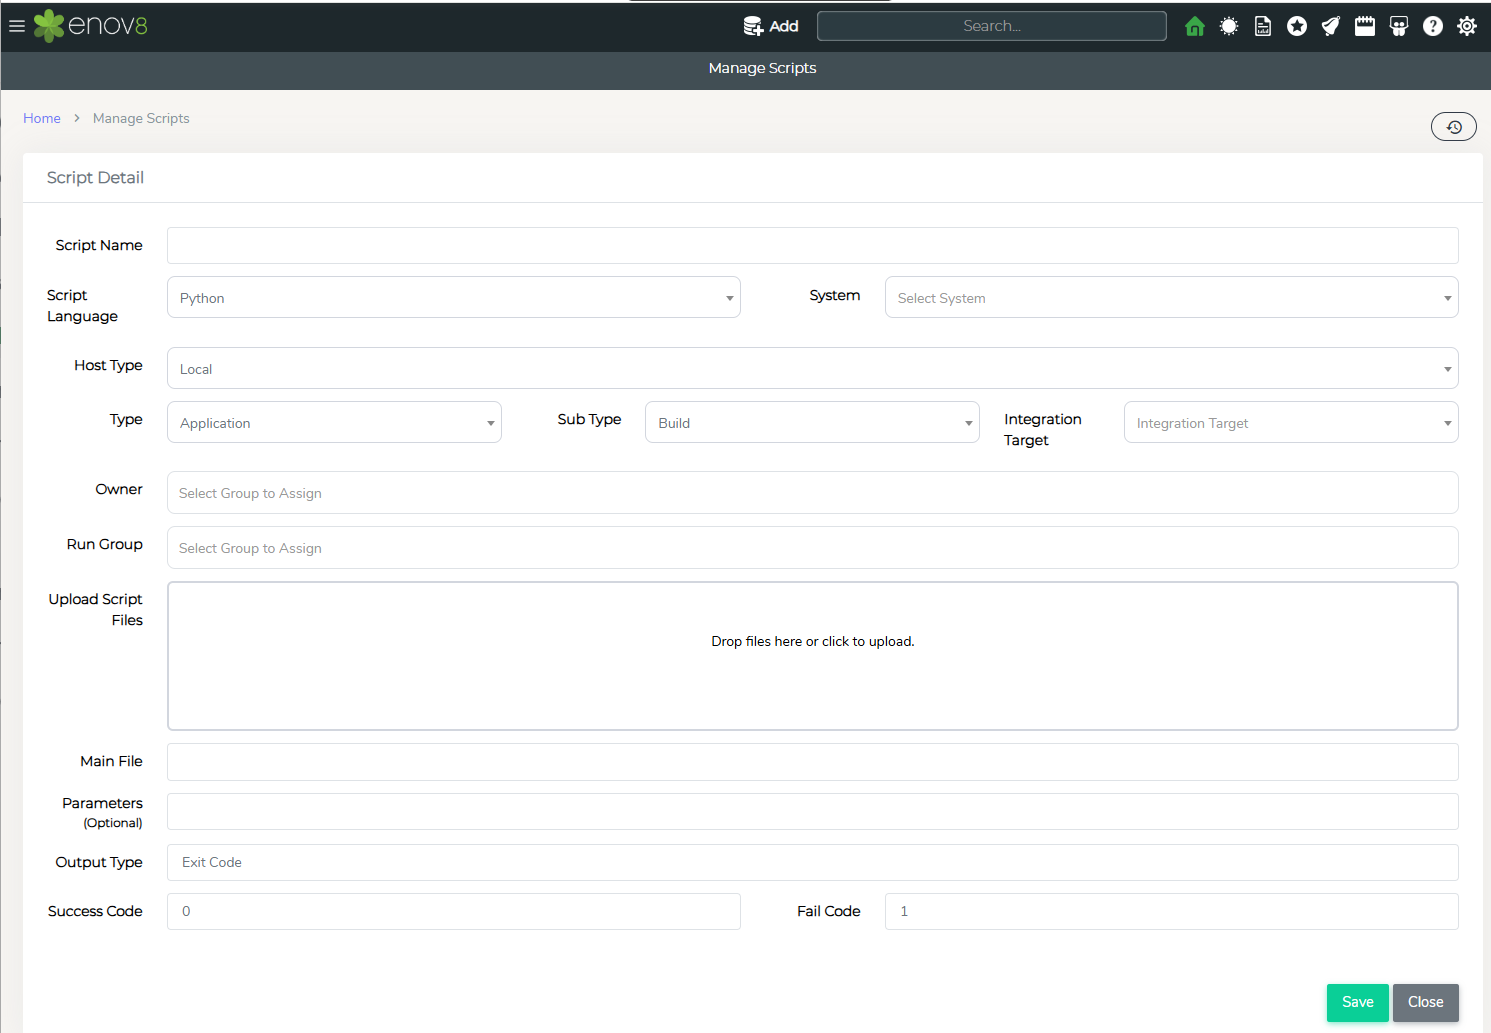
To add a new script, click on “Add Script” button and to edit click on “Edit” button in the listing area for the script to be edited.
On clicking the button, a new form will be opened with the following properties to be filled.
| Property | Description |
|---|---|
| Script Name | Name of the script |
| Script Language | Coding Language of the script |
| System | System to which this script belongs |
| Host Type | Local or Remote – In Remote Repository |
| Type | Type of script |
| Sub Type | Sub Type of script |
| Integration Target | Target System with which the script is interacting |
| Owner | User Group(s) which will have edit rights on the script |
| Run Group | User Group(s) who can execute the script |
| Upload Script Files | Area where you can drag or select script files to be uploaded |
| Main File | The script file which will be called first during execution |
| Parameters | Parameters which need to be passed to the script by command line |
| Output Type | Type of output expected to determine if the script execution can be classified as Passed or Failed |
| Success Code / Text | Output value which would define if the script passed |
| Fail Code / Text | Output value which would define if the script failed |
| Parent Repository | Select the repository Available for Remote Host Type. This can be added via Drop List Management |
| Repository | Repository to be used. This is auto populated based on the parent repository |
| Branch | Repository branch which will be used |
Once all details are provided, click Save to save changes.
Script Explorer
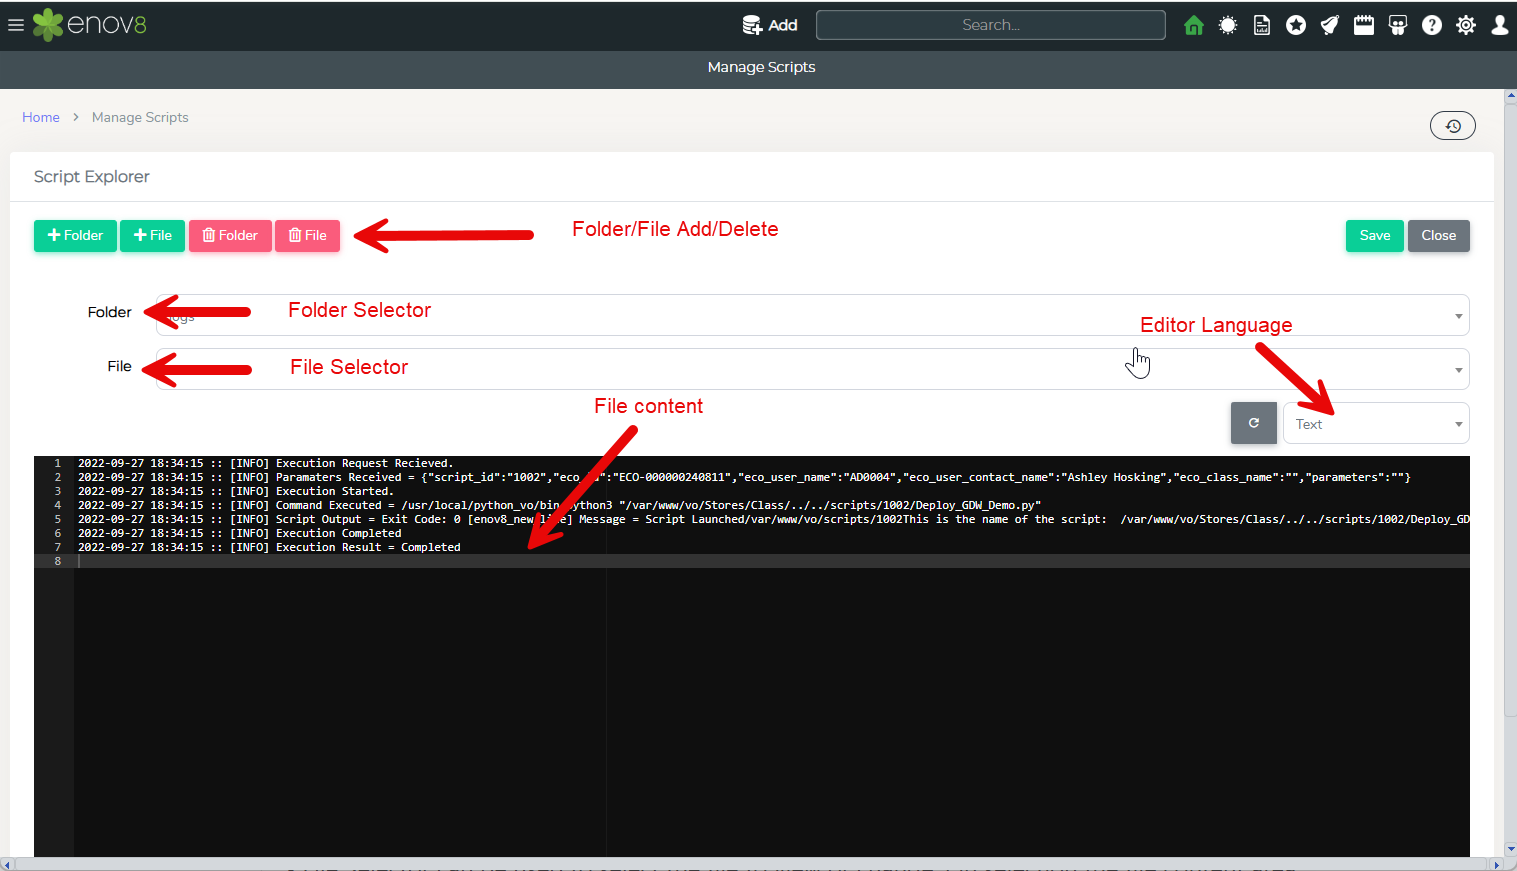
Script Explorer option in the script listing can be used to view the content of the script files and make changes if required.
• Folder selector can be used to select the folder for which files has to be viewed. Root folder shows the files in the root folder of the script.
• File Selector can be used to select the file to view or change. On selection the file content area will be refreshed with the content of the file.
• File Language dropdown will automatically be selected to the type of code language based on file extension. This option can be changed to change the editor language colour coding.
• The file content can be changed in the content area and pressing Save button will change the content of the file.
• Delete Folder or Delete File can be used to delete the respective object.
• Clicking on Add Files will open a new section in the form where new files can be uploaded.
NOTE – Root Folder and Main file of the script cannot be deleted. The button will automatically hide for these options.
Execute Script
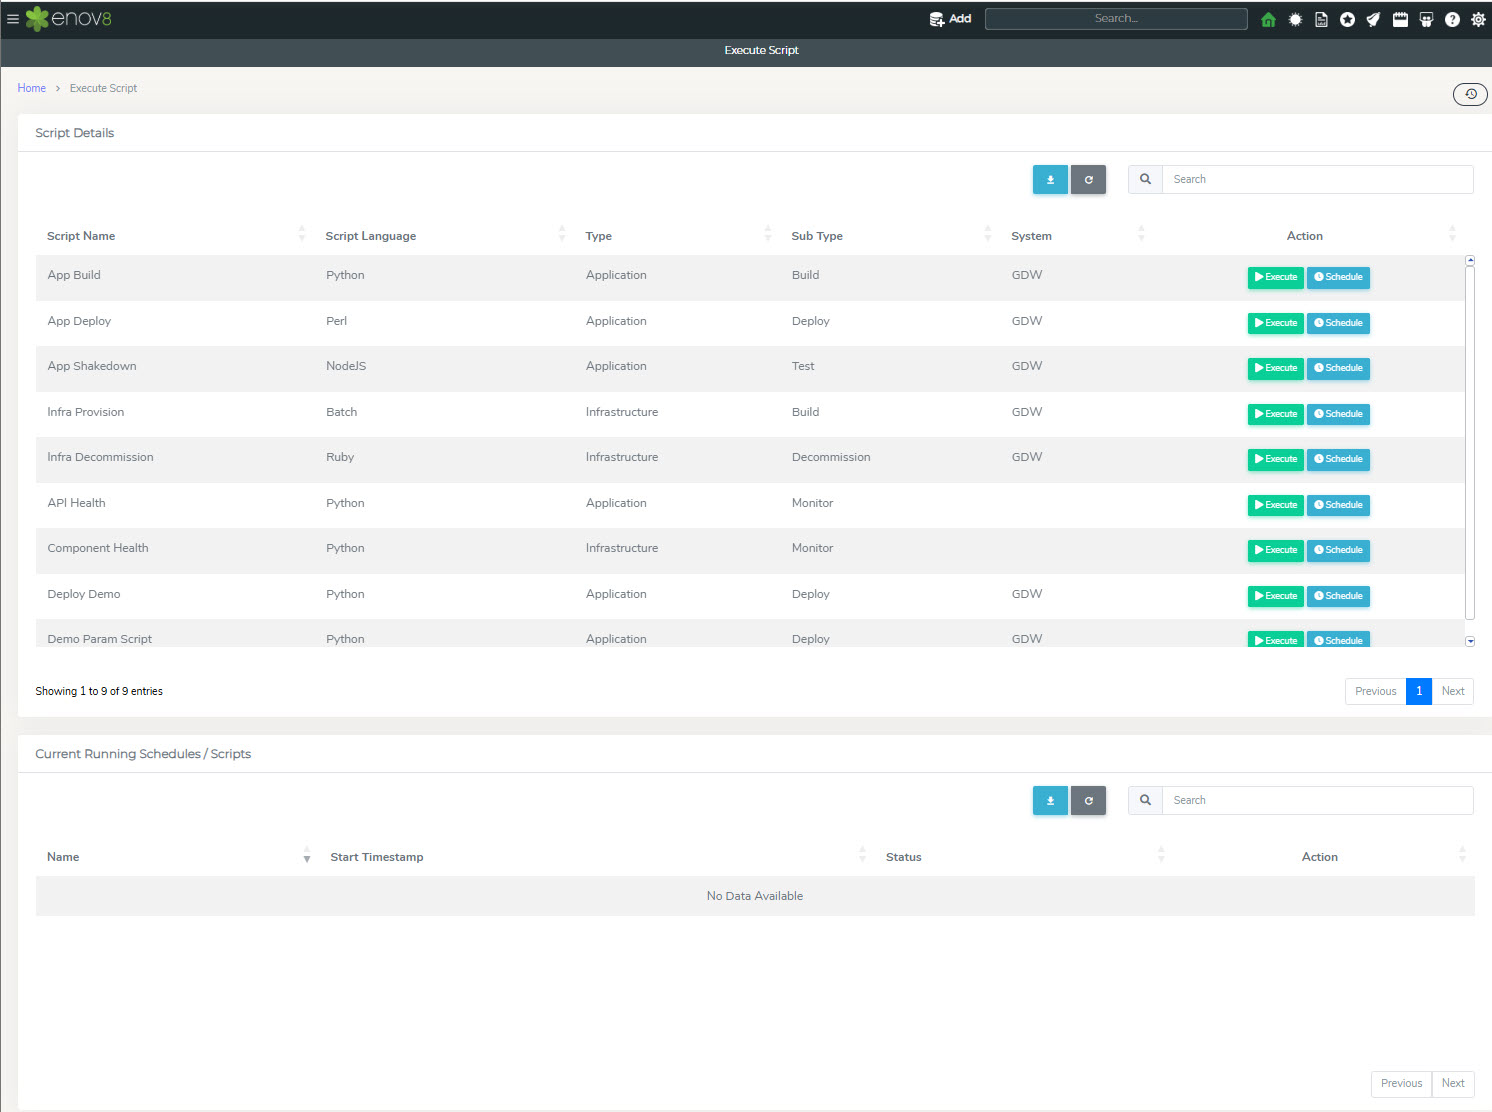
Execute script sections allows the users to execute the script which they have execute permissions.
Navigate to Orchestration Management > Scripts > Execute Script
To execute, simply click on Execute button. Schedule button can be used to schedule the script execution on a later time.
Script Execution Results
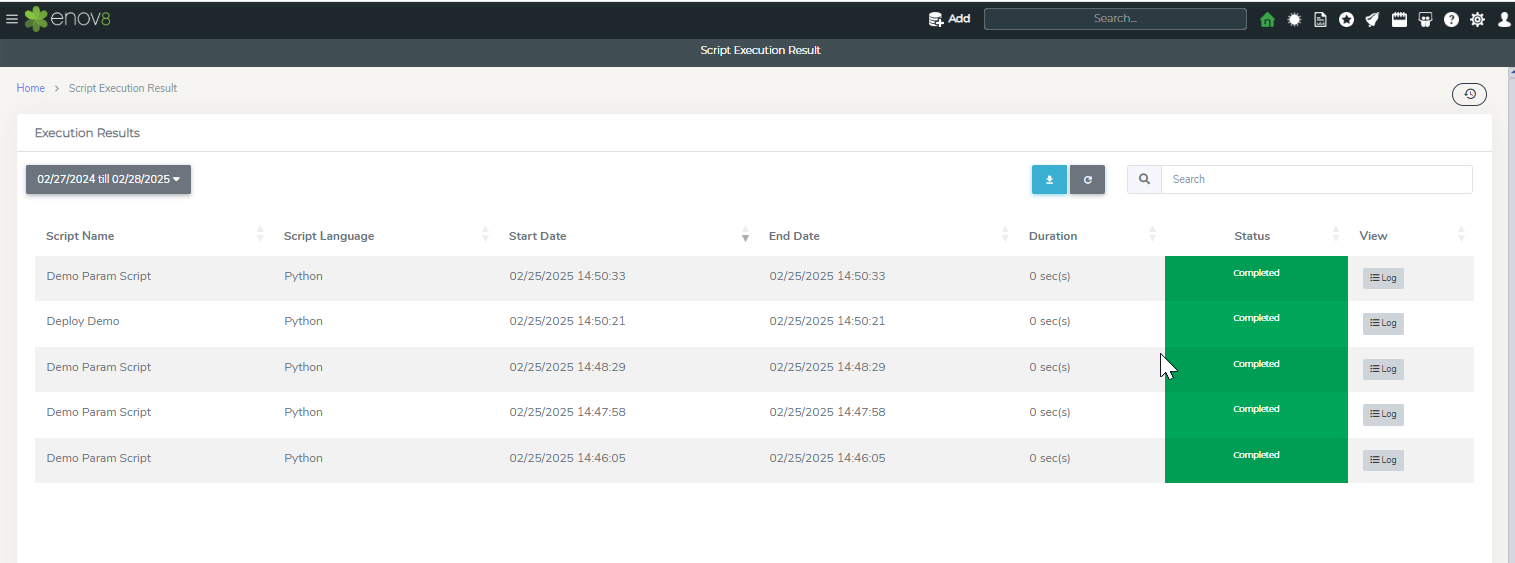
Script execution results can be viewed via “Script Execution Result” section.
This can be accessed via Orchestration Management > Scripts > Script Execution Result
To view the logs, simply click on the “Log” button.
Managing Pipeline
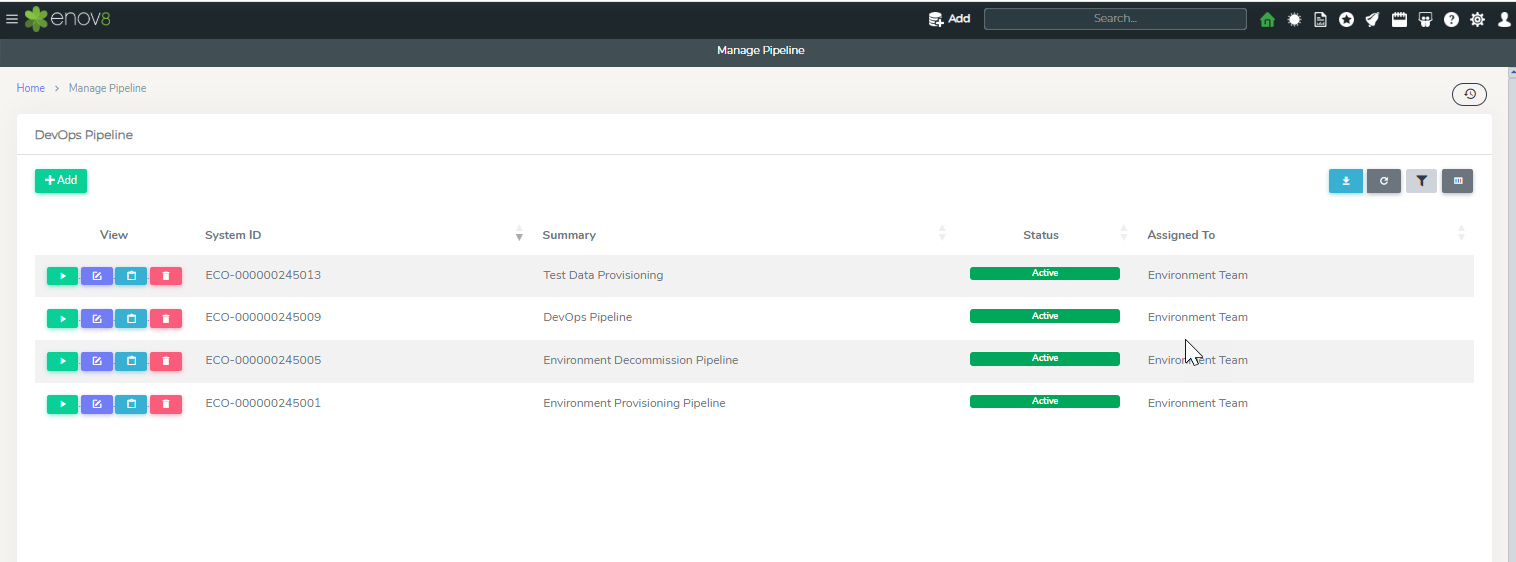
DevOps Pipeline allows the capability to create automation pipeline which can be execute on demand.
This section can be accessed via Orchestration Management > Pipeline > Manage Pipeline
To create a new pipeline simply click on Add Button or click edit icon to modify existing pipeline.To execute a pipeline, simply click on the execute button in front of the pipeline in listing area. To view logs of executed pipeline, click on log icon and select the execution for which logs has to be viewed.Clicking on Log button will open the log details.
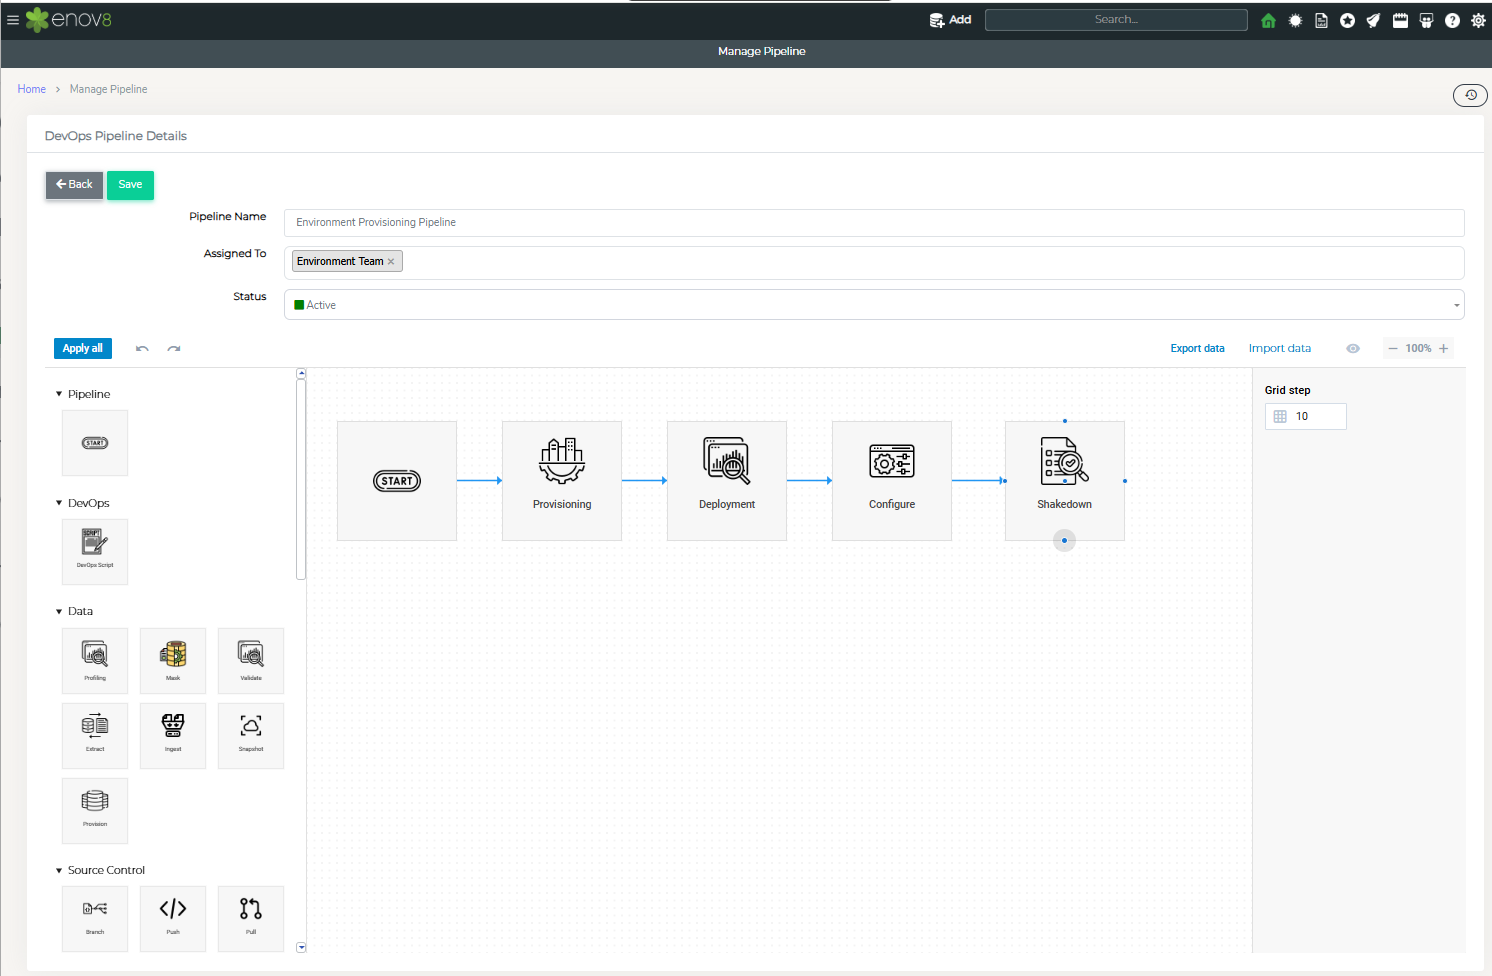
Manage Pipeline area has been subdivided into 2 parts:
Left Panel provides different objects that can be dragged and used in the pipeline.
Drawing Area where objects from left panel can be dragged into to create a visual pipeline.
To Start with Pipeline, Start By dragging “Start” object which defines the start of the pipeline. Other objects can be dragged from the panel and linked to start object to make a pipeline. Clicking on the objects open information panel on right hand side with different options for the selected object.
Note – “Start” object is mandatory for pipeline to be executed and denotes the point from which execution will start from.
Managing Schedules
Script schedules can be created and managed via “Manage Schedules” section. Schedules can consist of multiple scripts which will be executed in the order provided.
This section can be accessed via Orchestration Management > Schedules > Manage Schedules
To add a new schedule, click on “Add Schedule” button.
The following is the information required to create a new schedule
| Property | Description |
|---|---|
| Schedule name | Name for the Schedule |
| Type | Type of the schedule. Options available: Daily, Once, Hourly, Minutely |
| Scripts | Drop down of scripts to be selected to be added to the schedule. |
| Edit Permissions | User Group(s) who have access to modify the schedule. |
Schedule Execution Results
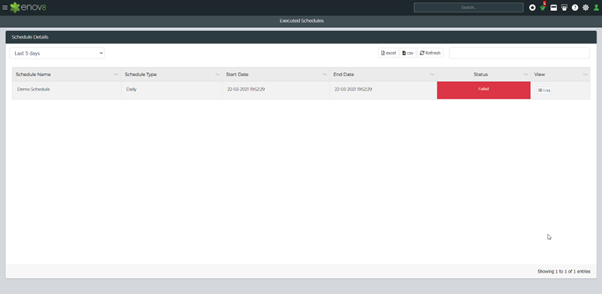
Schedule Execution can be viewed via “Executed Schedules” section.
This can be accessed via Orchestration Management > Schedules > Executed Schedules
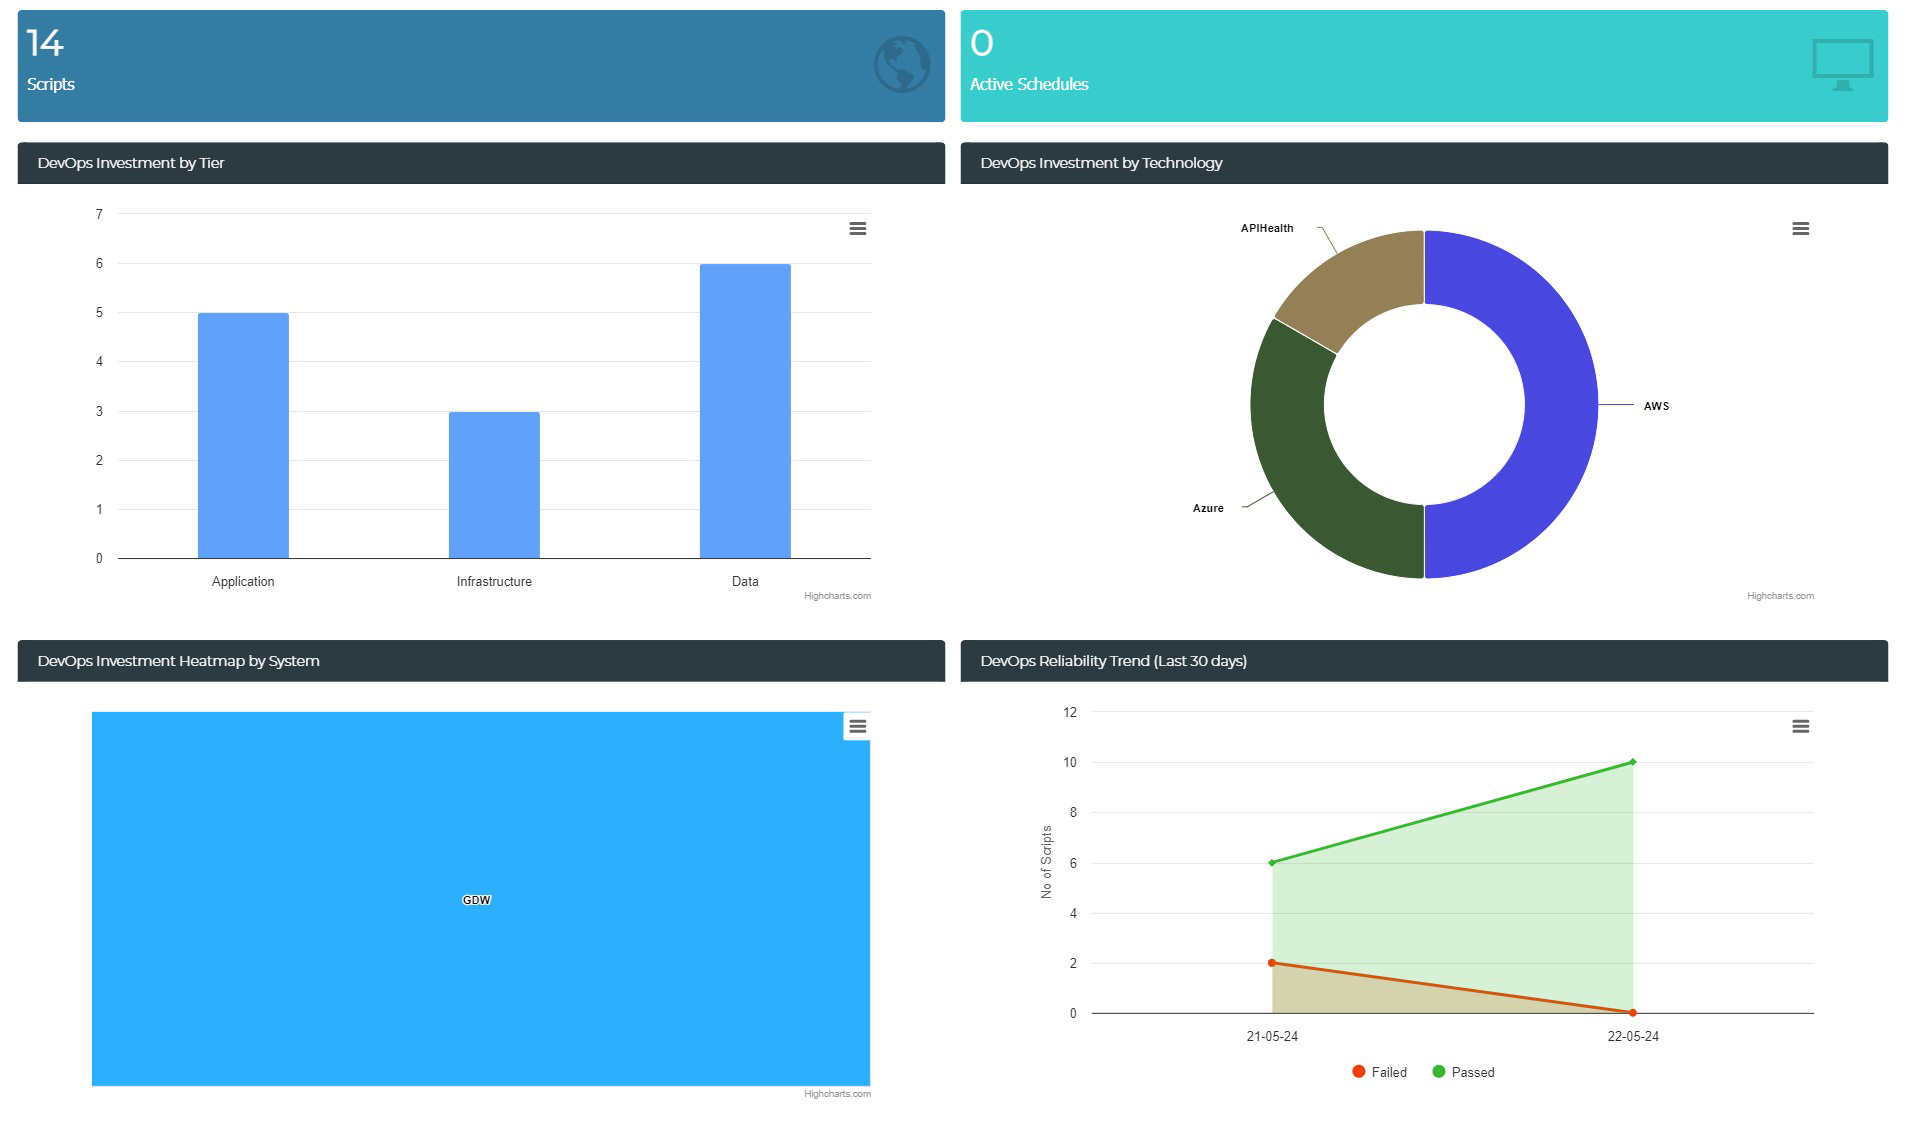
Orchestration Dashboard
Orchestration Dashboard provides an overview report of the DevOps investment in the organisation from different perspectives.
This can be accessed via Orchestration Management> Home > Orchestration Dashboard
Managing Script Language
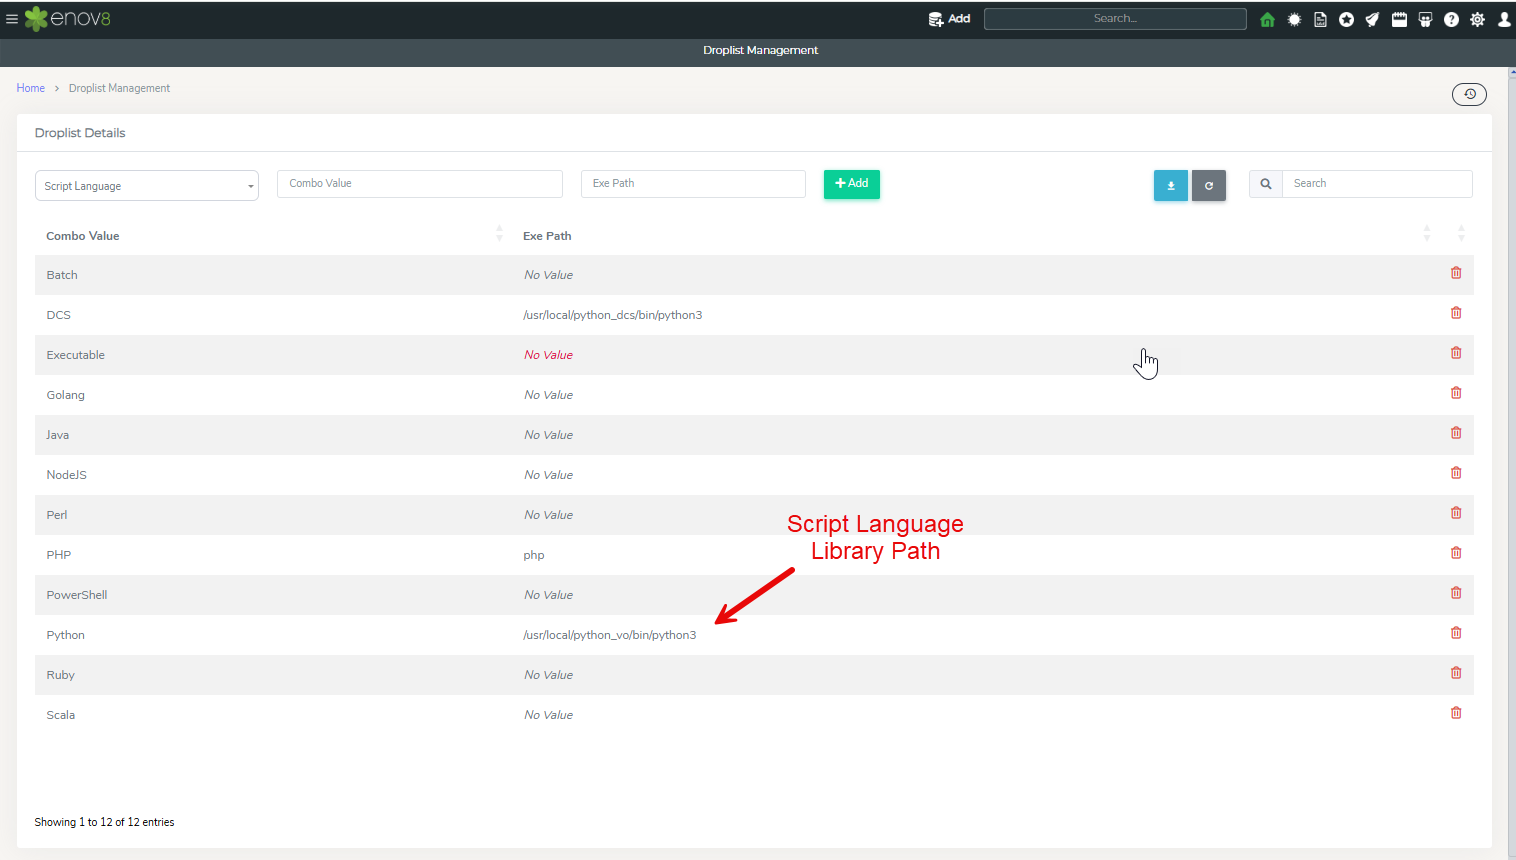
The various script languages which can be used in Orchestration Management can be managed via Drop List Management section of the product.
To access this section, navigate to Configuration Management > System Administration > Drop List Management.
To manage the script languages, simply select “Script Language” from the selection dropdown.
To Add a new script language, provide the script language name in Combo Value text box and the script language library path in Exe Path textbox.
Managing Code Repository
Main code repository root can be added in ecosystem via Drop List Management
