Project Management
Overview
A Project is a planned set of changes to a group of systems for a particular objective to be achieved, often within a portfolio release (optional). Projects must, therefore, be requested or created while specifying the environments and systems that will be used within the project.
Further in the project lifecycle, a project can request environment bookings. Service Requests can be created by Service Management module for lean ITSM.
For project implementation operations, implementation plans can be created. Each implementation plan consists of a set of tasks which can be assigned to different teams or individuals and these tasks can be linked to runsheets. These runsheets can be further connected to the DevOps library to integrate with third party products.
Managing Projects
Adding a new Project
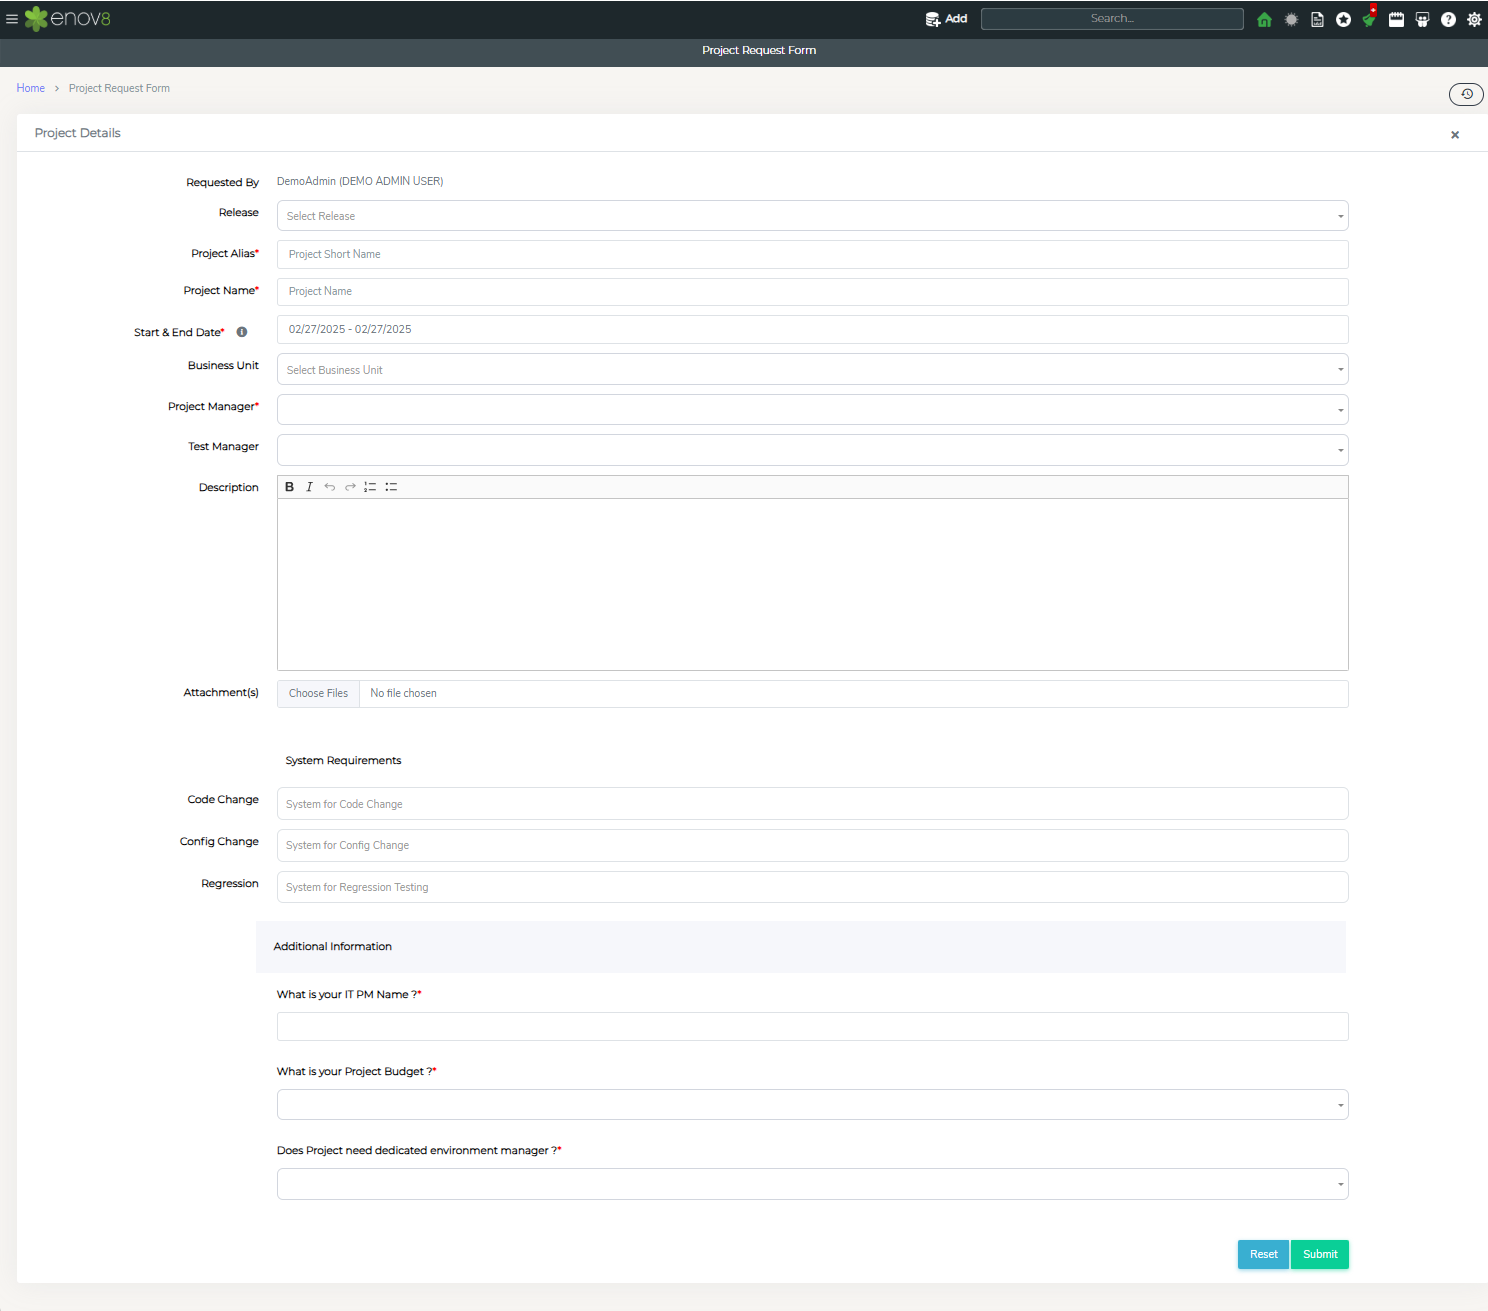
In this section we’ll go through the first step of adding a new project. This can be done via the “Project Request Form” or via Onboarding form in other reports in project management module or via the enov8 REST-API.
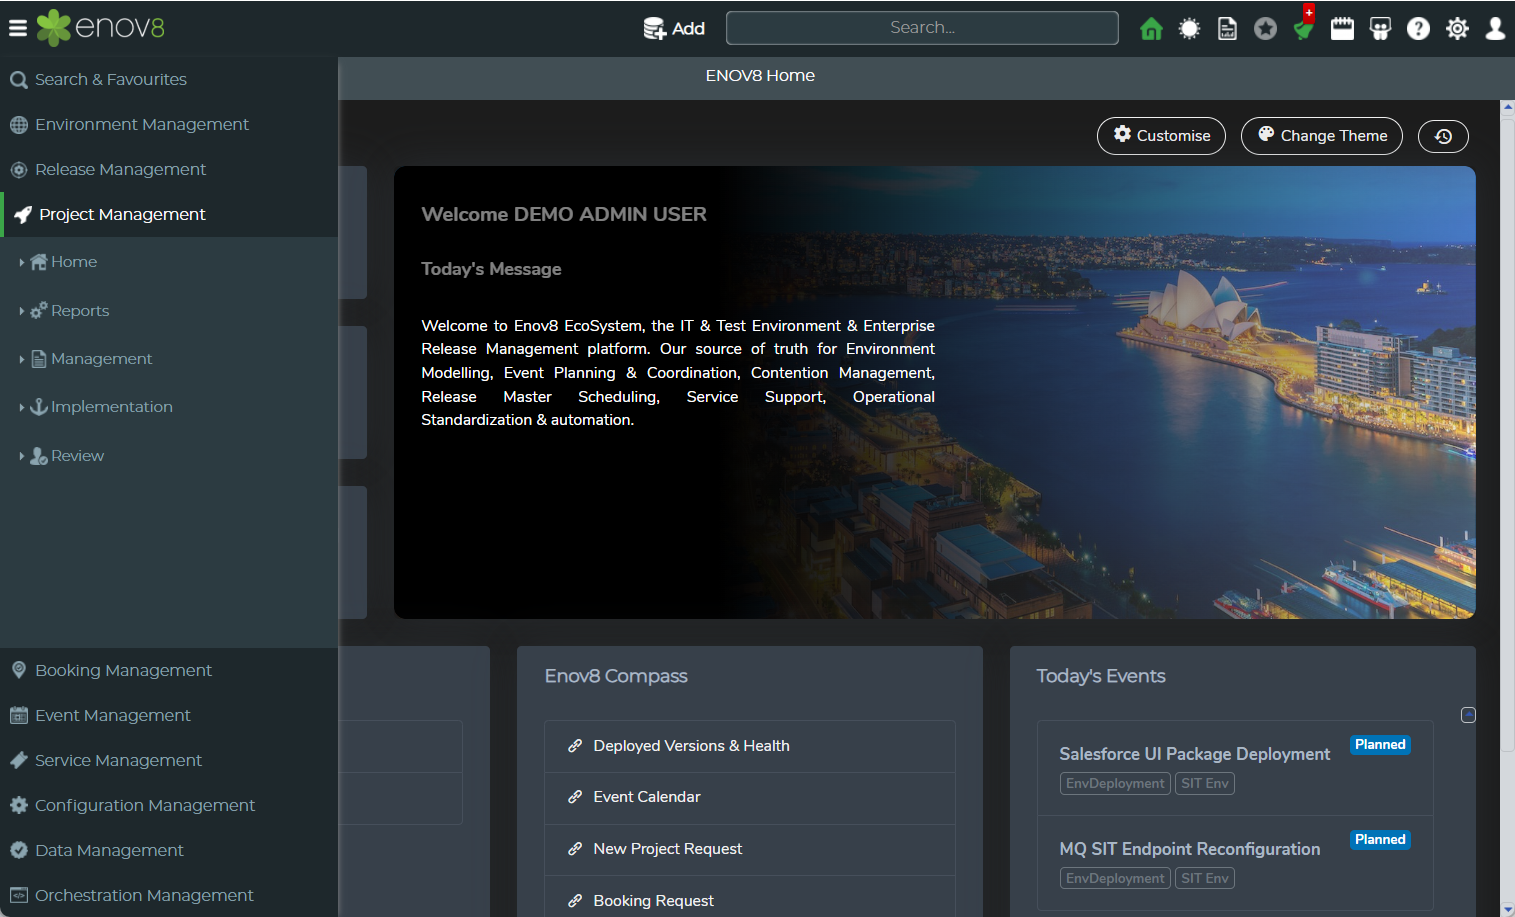
Navigate to Project Management > Management > Project Request Form
This table outlines the various properties that need to be filled out in the Project Request form using the Onboarding Form:
| Property | Description |
|---|---|
| Requested By | Name of the user who is submitting the project request. |
| Release Name | Name of the Release to which the project belongs. |
| Project Alias | Short name for the project. |
| Project Name | Name or Title of the project. |
| Start & End Date | Start and End Date of the project. |
| Business Unit | Department the project belongs to. |
| Project Manager | User group(s) to which this project is assigned for action and who have permissions to modify this project. |
| Description | Description of the project. |
System Requirements for Project
| Property | Description |
|---|---|
| Code Change | System on which code changes are happening. |
| Config Change | System on which configuration changes are happening. |
| Regression | System that is being used by the project for regression testing. |
Additional Information
This section can be configured using the Information Template Management Section in Configuration Management >> System Administration.
Upon clicking submit, a new project will be created, and an email notification (if enabled) will be sent to the assigned user group.
Manage Projects
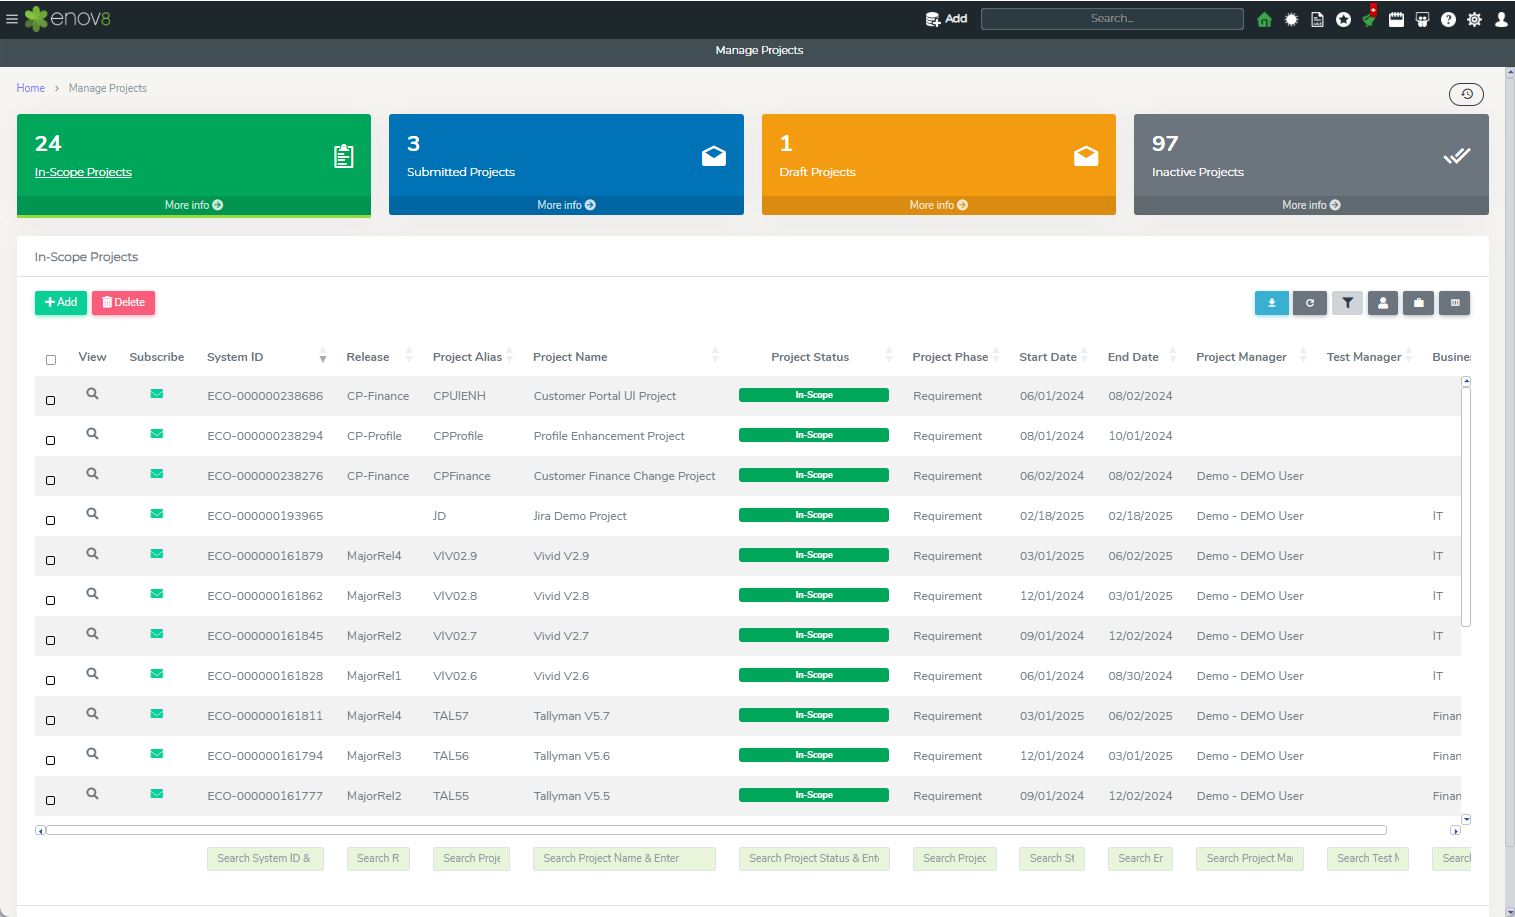
All the projects in the platform can be managed by Manage Projects. This can be accessed via Project Management > Management > Manage Projects
There are 4 tiles on the top of this report which shows the totals as per In Scope Projects, Submitted Projects, Draft Projects and Inactive Projects. You can select the object you want to display in the grid by clicking on the corresponding object tile.
● In Scope Projects – Shows all In Scope projects in the platform.
● Submitted Projects – Shows all submitted projects in the platform.
● Draft Projects-Shows draft projects in the platform.
● Inactive Projects – Shows all projects which are in “Closed”, “Rejected” or “De-Scoped” status.
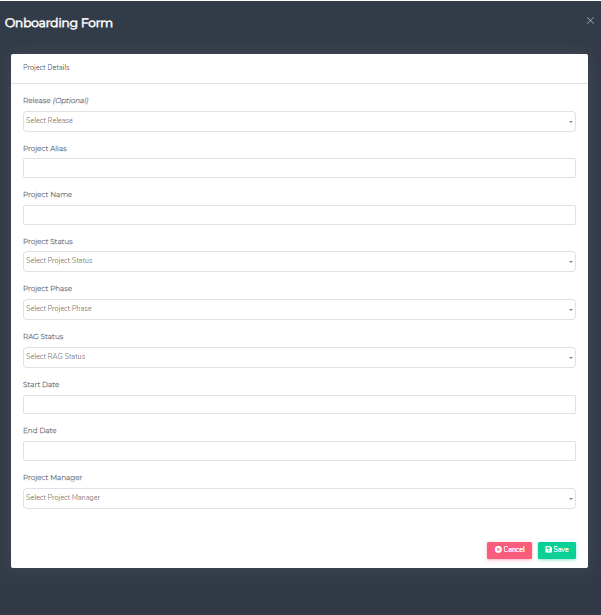
Note: You can also add a new project by clicking Add on any of the corresponding listing. This will open the “Onboarding Form” popup to add a new project.
This table lists the key properties to be entered in the project editor:
| Property | Description |
|---|---|
| Release (Optional) | Associated release, if applicable. |
| Project Alias | Short name for the project |
| Project Name | Name of the project |
| Project Status | Status of the project e.g., In-Scope, Draft, Submitted, De-Scoped, Rejected, Closed |
| RAG Status | Current RAG (Red, Amber, Green) status of the project |
| Start Date | Start Date of the project |
| End Date | End Date of the project |
| Project Manager | User who is managing this project |
Note: By clicking the Detailed View you’ll “Deep Dive” into the Detailed Editor to be able to add and modify all additional properties and relationships with other objects.
Once finished adding you can click the Green Submit button to Save and Submit the object or cancel to undo/lose any changes.
Project Activity
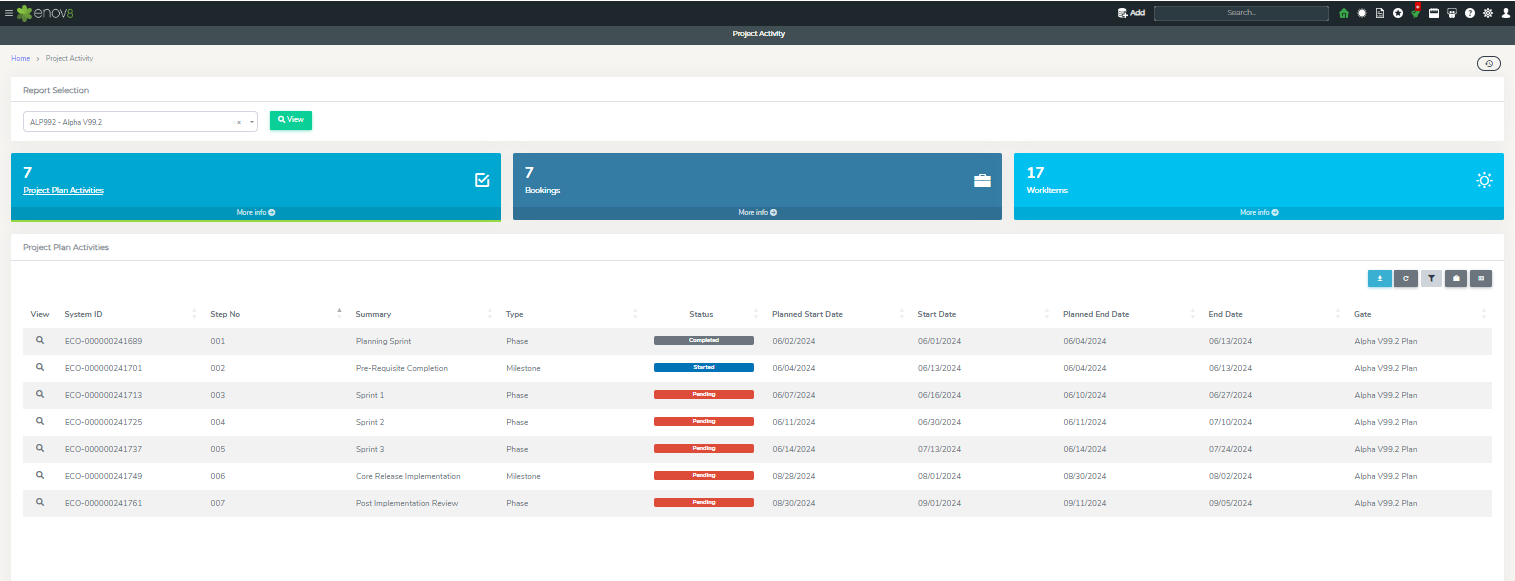
The Project Activity view in the Enov8 platform provides a comprehensive overview of various activities associated with project management, allowing users to track and manage different aspects of a project effectively.
Accessing the Project Activity View
To view the Project Activity report, follow these steps:
- Navigate to Project Management.
- Click on Management.
- Select Project Activity.
Features of the Project Activity View
The report is organized with four main tiles at the top, each representing a different category of project-related data. You can explore specific data sets by selecting the corresponding object tile:
-
Project Plan Activities: This tile provides a list of all project plan activities for the selected project, giving an overview of the planned tasks and their statuses.
-
Bookings: Shows all bookings associated with the selected project, which is crucial for resource allocation and scheduling.
-
Objectives: Displays a list of all objectives set for the selected project, offering insights into the project's goals and success metrics.
-
WorkItems: Lists all the WorkItems for the selected project, detailing the individual tasks and assignments that contribute to the project's progress.
This view is a valuable tool for project managers and team members, enabling them to monitor and coordinate various aspects of project activities, ensuring alignment with project plans, objectives, and timelines.
Manage Project Milestones
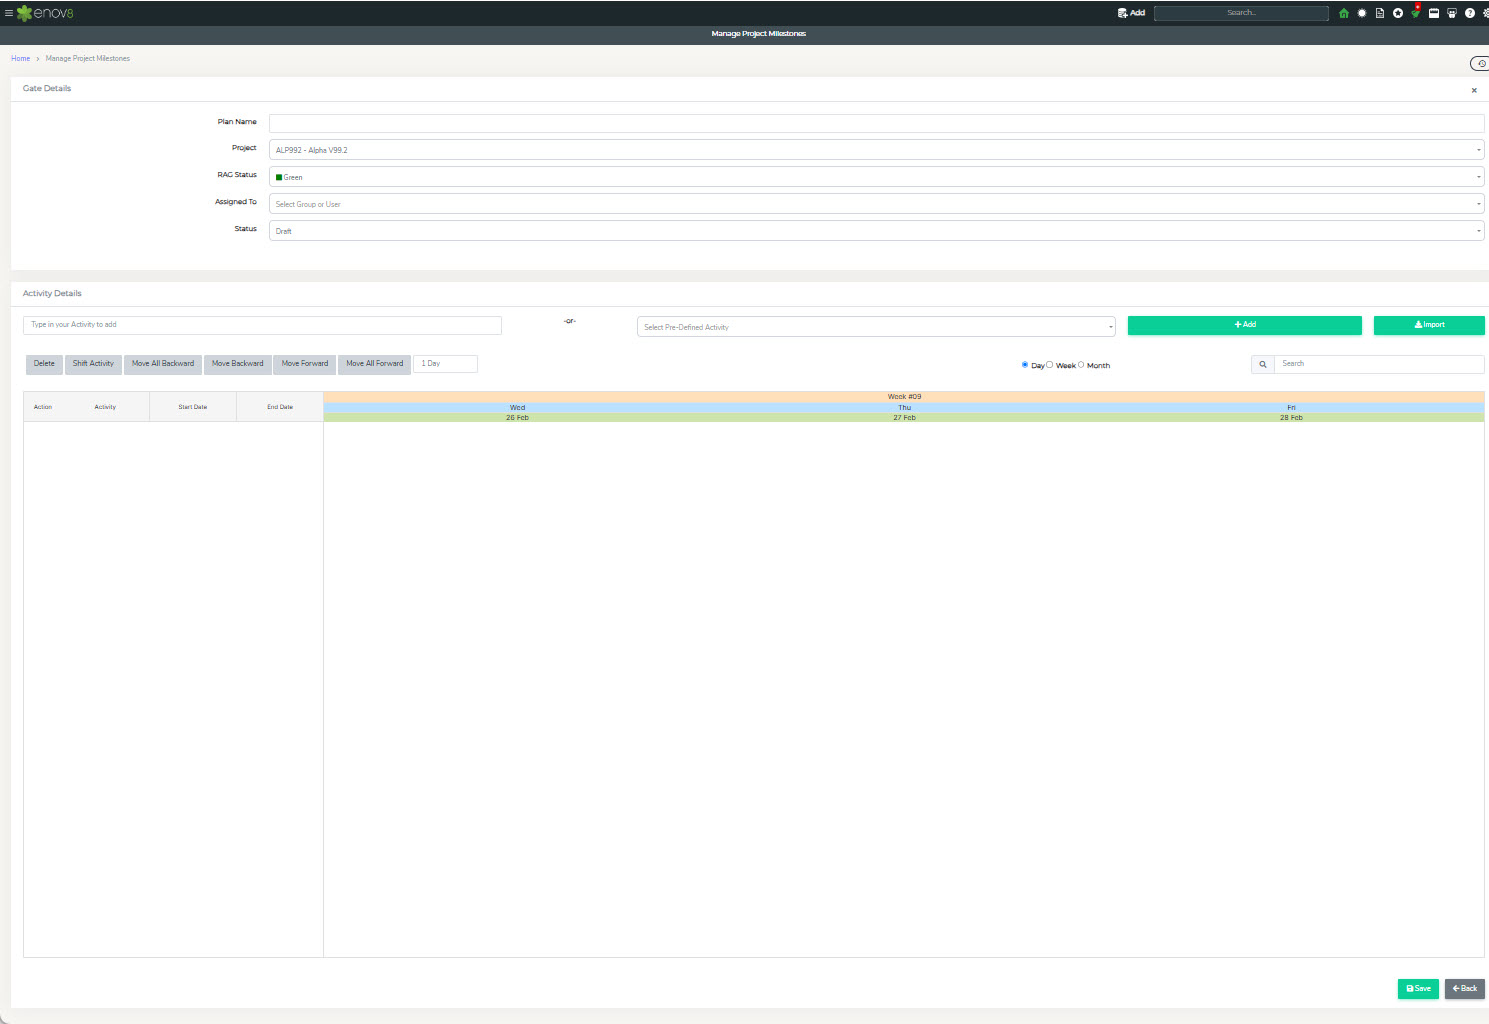
Project Plan Module can be used to define a plan with list of activities (e.g. Phase and Milestones) to be completed. This module also allows the user to copy the plan from the Release in which they are participating.
To access this module, Navigate to Project Management > Management >Manage Project Milestones
Project Plan allows a graphical way of creating or managing Project plans.
The form provides the ability to add or edit existing Project plans. Copy Option can also be used to copy an existing Project plan for another Project.
The following is the information required to create a Project plan.
Gate Details:
● Plan name: Name for the Plan.
● Project Name: Project for which the plan is being created.
● RAG Status: RAG Status of the Project
● Assigned To: User Group(s) whom this Project plan would be assigned to for action and have permissions to modify.
● Status: Status of the Project plan.
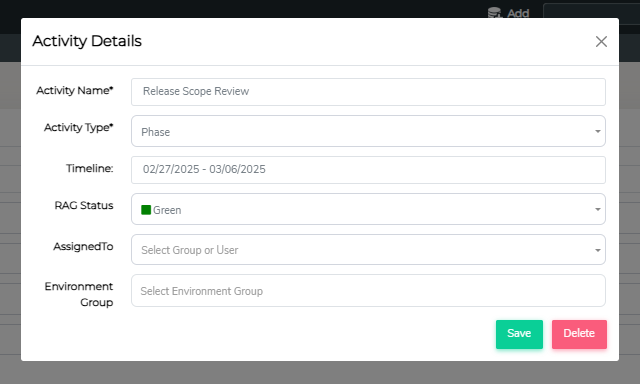
Activities can be added using the Gantt view. Simply type the activity or select the predefined activity and click Add. On this a quick form will be opened where further details for the activity can be added.
NOTE – Import option can be used to import activities from existing plan or from csv.
● Activity Name: Short Name or Title of the activity
● Activity Type: Type of activity
● Timeline: Start & End Datetime of the activity
● RAG Status: RAG Status of the activity
● Assigned To: Group or user who is assigned to the activity and have permissions to modify this object.
● Environment Group: Environment group on which this activity will be performed.
Manage WorkItems
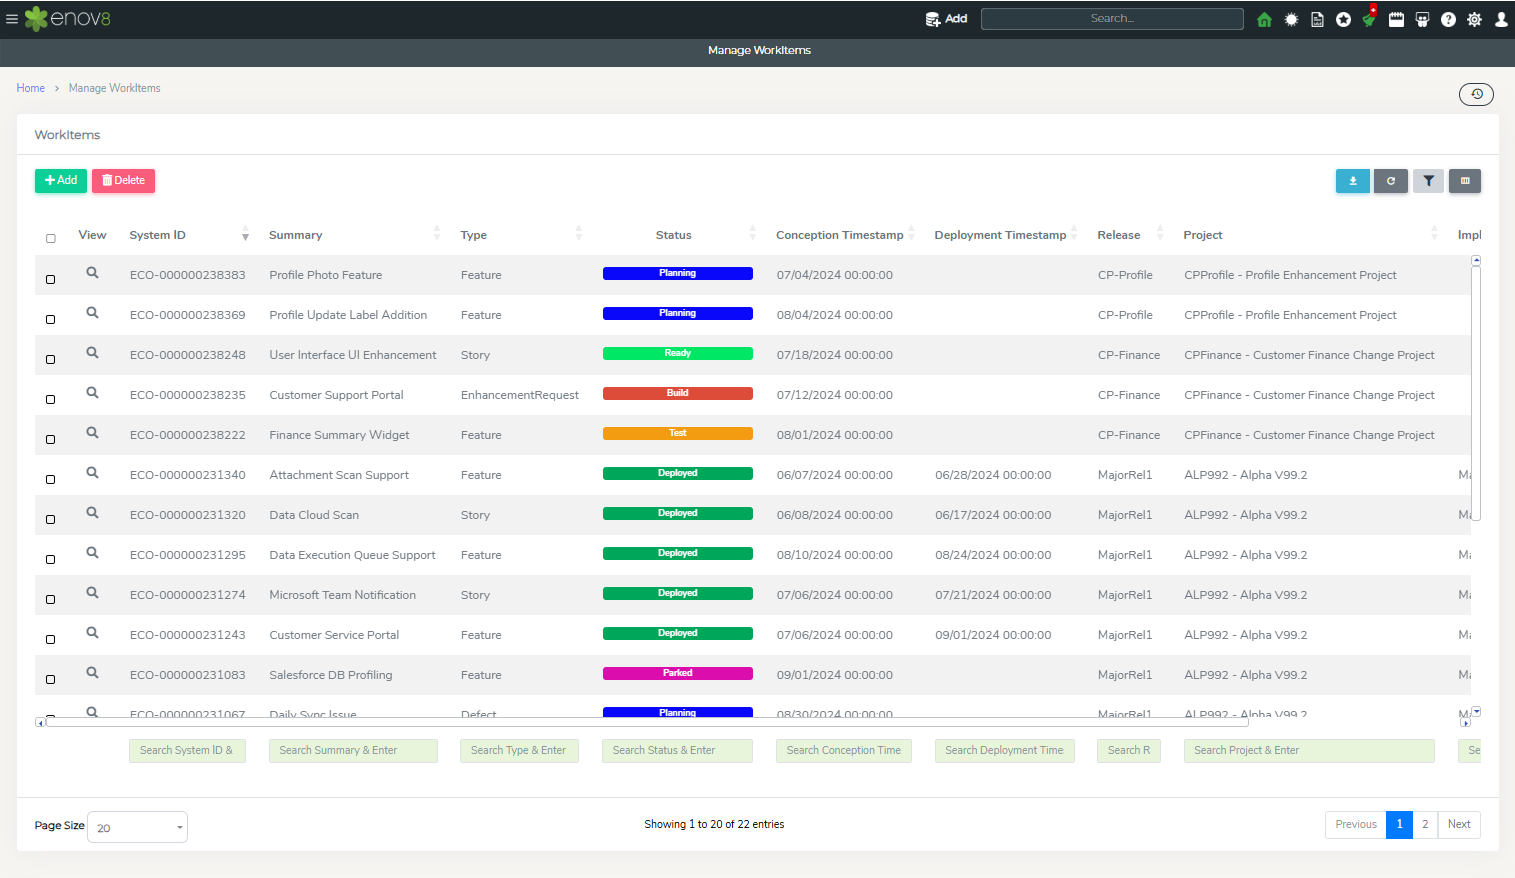
Workitem can be defined as a key deliverable like a feature, enhancement or a bug which is being delivered by teams as part of the project and/or Release.
In Enov8, All the work items can be managed by “Manage WorkItems”.
Project Implementation
The Implementation Plan is a crucial component of any successful project release, ensuring that all necessary tasks are clearly defined, tracked, and assigned. This plan outlines the key steps required to transition from development to production and provides a structured approach for executing the project release.
Our implementation plan consists of various tasks that are distributed across different teams or team members based on their roles and expertise. These tasks can be organized to address all aspects of the release process, including environment preparation, code deployment, testing, and post-deployment validation.
Each team or member involved is responsible for specific tasks, with clear deadlines and expectations to ensure seamless coordination and timely delivery of the release. The implementation plan also serves as a roadmap for managing risks, addressing potential issues, and maintaining continuous communication across all involved stakeholders.
By following this structured plan, we can ensure that releases are executed efficiently, with minimal disruption to the live environment, while meeting the desired objectives and business outcomes.
Creating an Implementation Plan
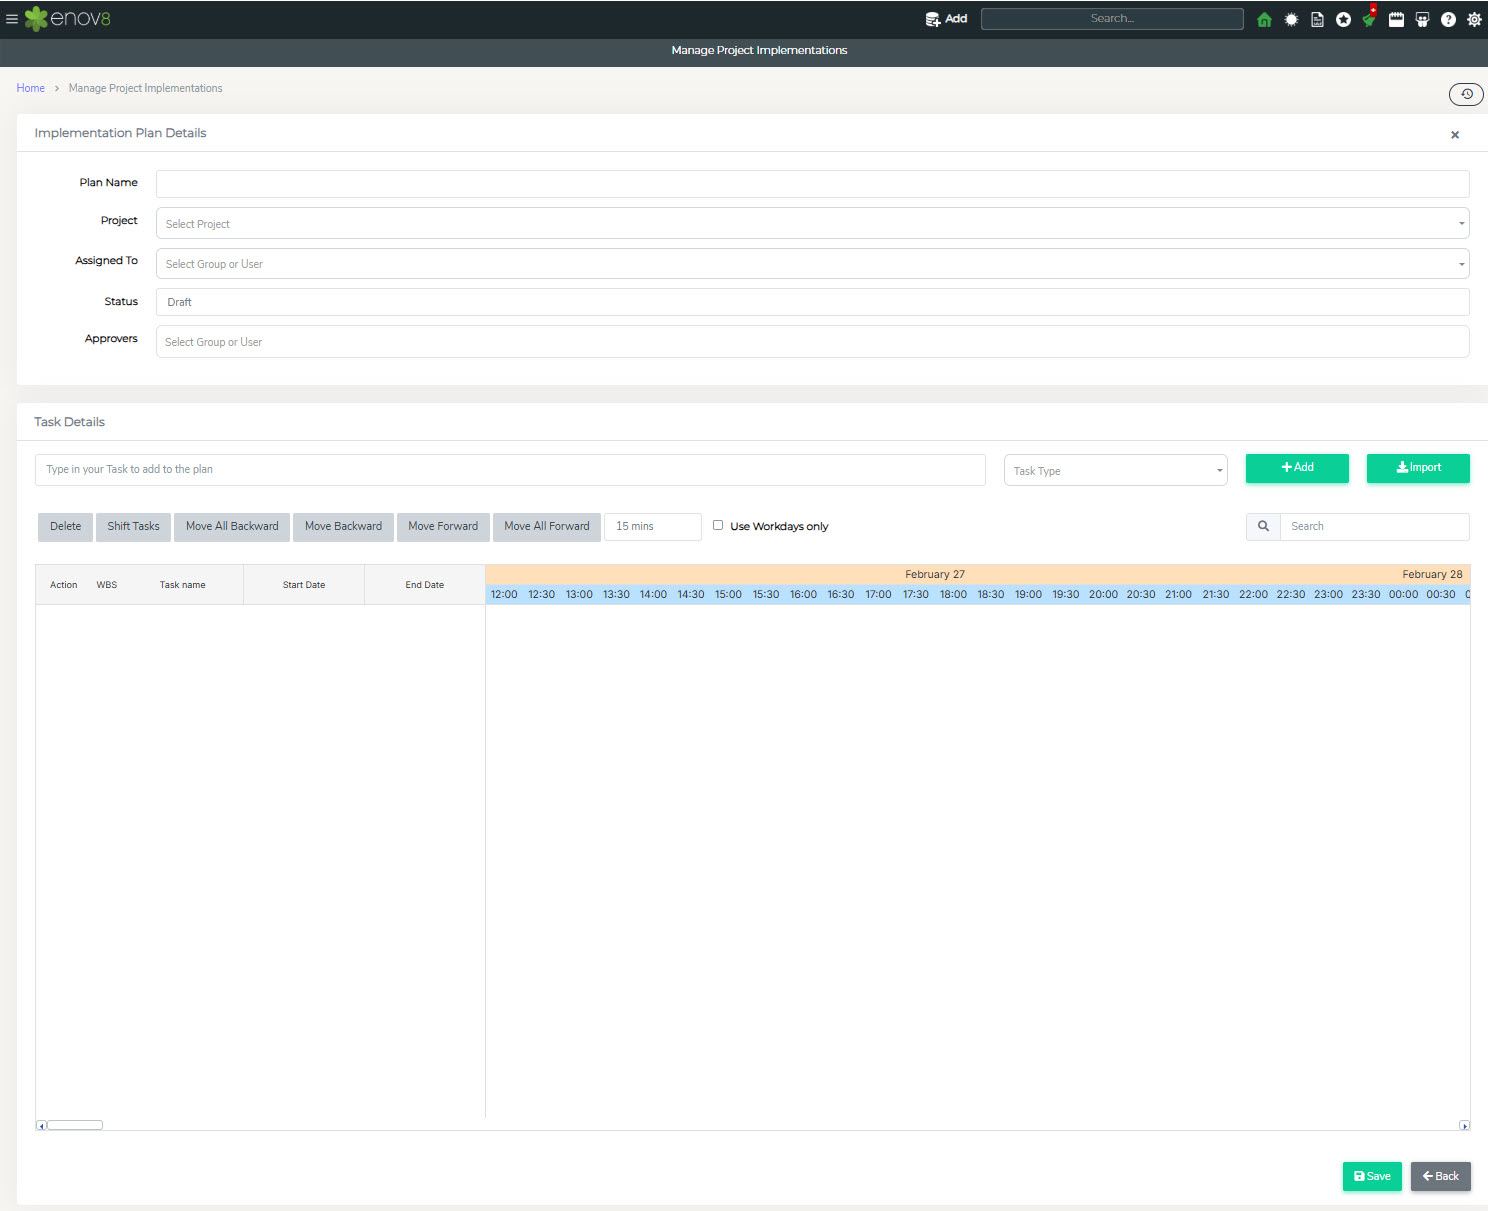
The first step in project implementation is to create an implementation plan. This can be done via “Manage Project Implementations” section. This section can be accessed via Project Management > Implementation > Manage Project Implementations
The following is the information required to create a new plan and tasks.
Implementation Plan
● Plan name: Name for the Implementation template.
● Project: Project for which the implementation plan is being created.
● Assigned To: User Group(s) which would have permissions to modify this plan.
● Status: Status of the plan.
● Approvers: Groups or uses which provide approval for the plan.
Users can quickly add a new task by adding the task name in the textbox and clicking add.
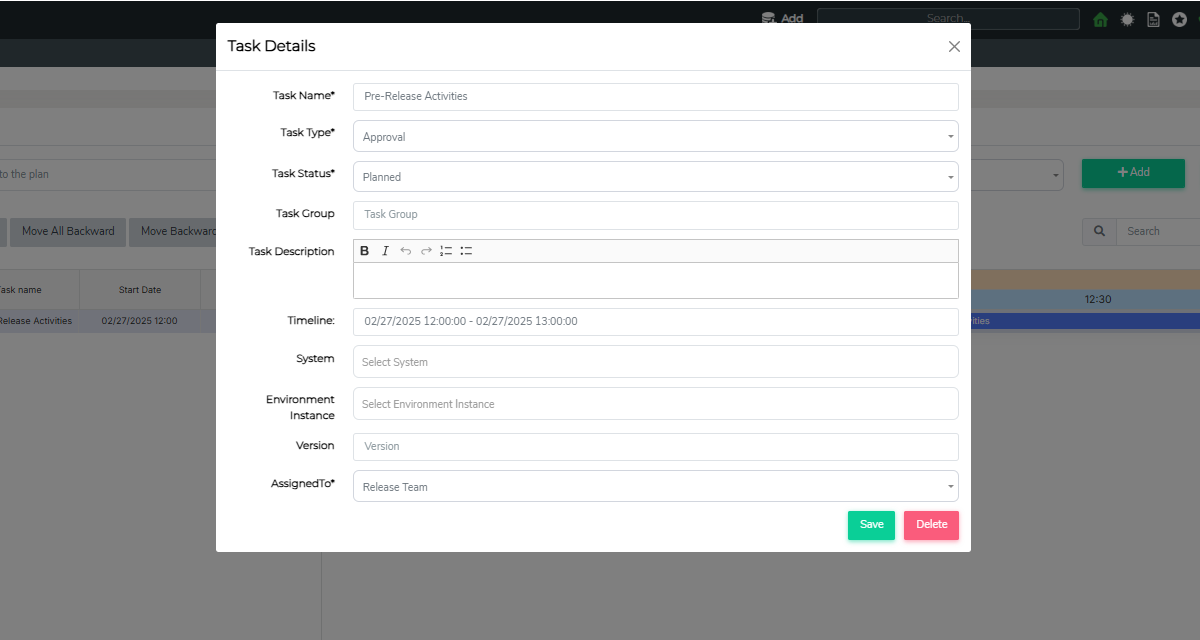
This table outlines the various properties that need to be filled out in the Task editor:
| Property | Description |
|---|---|
| Task Name | Short Name or Title of the task |
| Task Type | Type of task |
| Task Status | Status of the task |
| Task Group | Group Name to group the tasks |
| Task Description | Description of the task |
| Timeline | Start & End Datetime of the Task |
| System | System for which this task is being created |
| Environment Instance | Environment Instance for which this task is being created |
| Version | Version of the Environment Instance being implemented as part of the task |
| Assigned To | User Group(s) to whom this ticket would be assigned for action and have permissions to modify this request |
There is also an option to bulk upload the tasks using a csv file or importing it from existing plan.
Once the task is added to the Gantt view, a user can double click the task to add more details if required. The tasks time and order can be planned by dragging the tasks on the timeline. Clicking Save will save the implementation plan.
Implementation plans can only be created or updated in Draft or Submitted status. Once the plans are approved or assigned and need a change, they must go through the approval process again. The changes can be initiated by changing the status of the plan to Draft and resubmitting it once all the changes are done.
Approving an Implementation Plan
Once the plan status is set to Submitted, approval emails will be automatically triggered. To approve or reject the plan, users can either click on the Approve or Reject button directly in the email notification or access the My Task section by clicking the user icon in the top right corner of the screen.
Once the plan is approved, the status will automatically update to Approved.
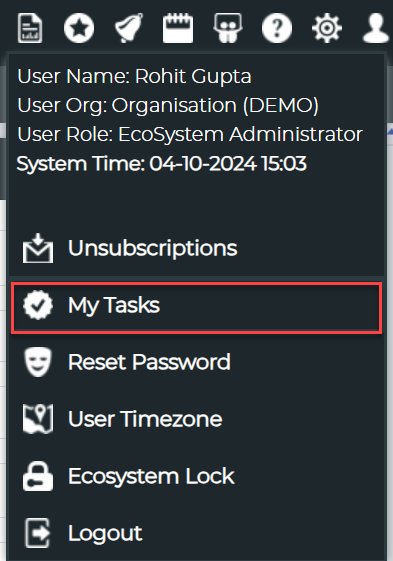
My Task Button
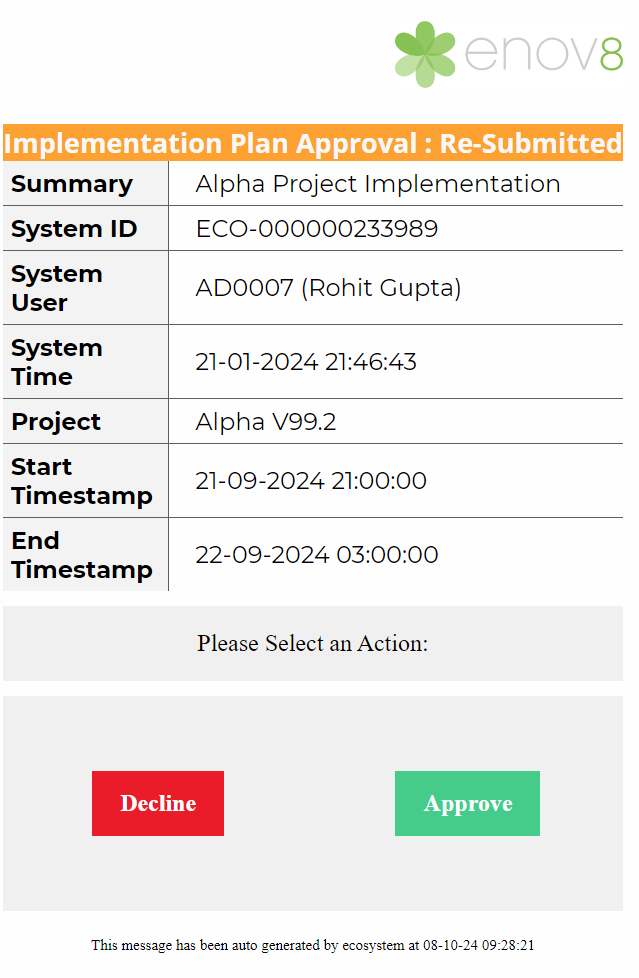
Sample Approval Email
In case approval emails are not recieved, users can regenerate the email by clicking on the  Email button on the plan listing screen.
Launch Project Implementation
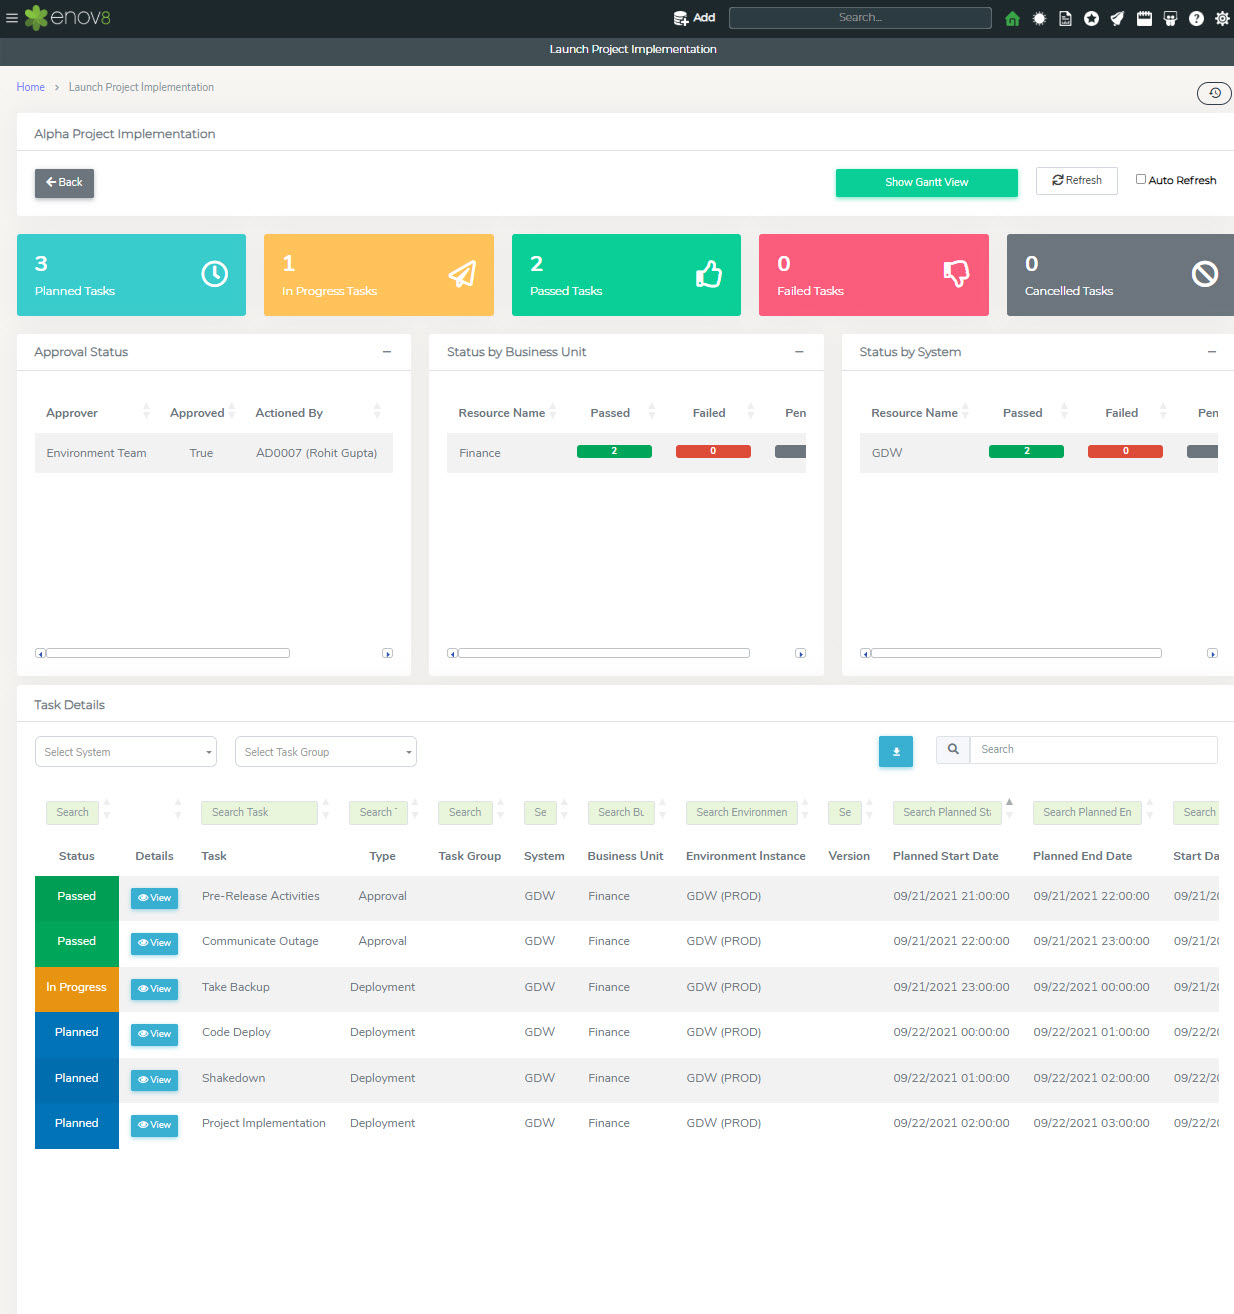
Project Implementation Plan can be used and reported using “Launch Project Implementation” report. This can be accessed via Project Management> Implementation > Launch Project Implementation
To view, simply click view button.
The report has been divided into 3 key sections
Top Section provides a summary totals of different status of the tasks.
The next section provides the details of the Approvals and also provides summary of Task Status by Business Unit & System.
The final section in this report provides detailed listing of all the tasks and current status. The status of the task can be changed by the assigned user by clicking on the task in the listing. In order to view the task details, click the view button.
Implementation Plan Insights
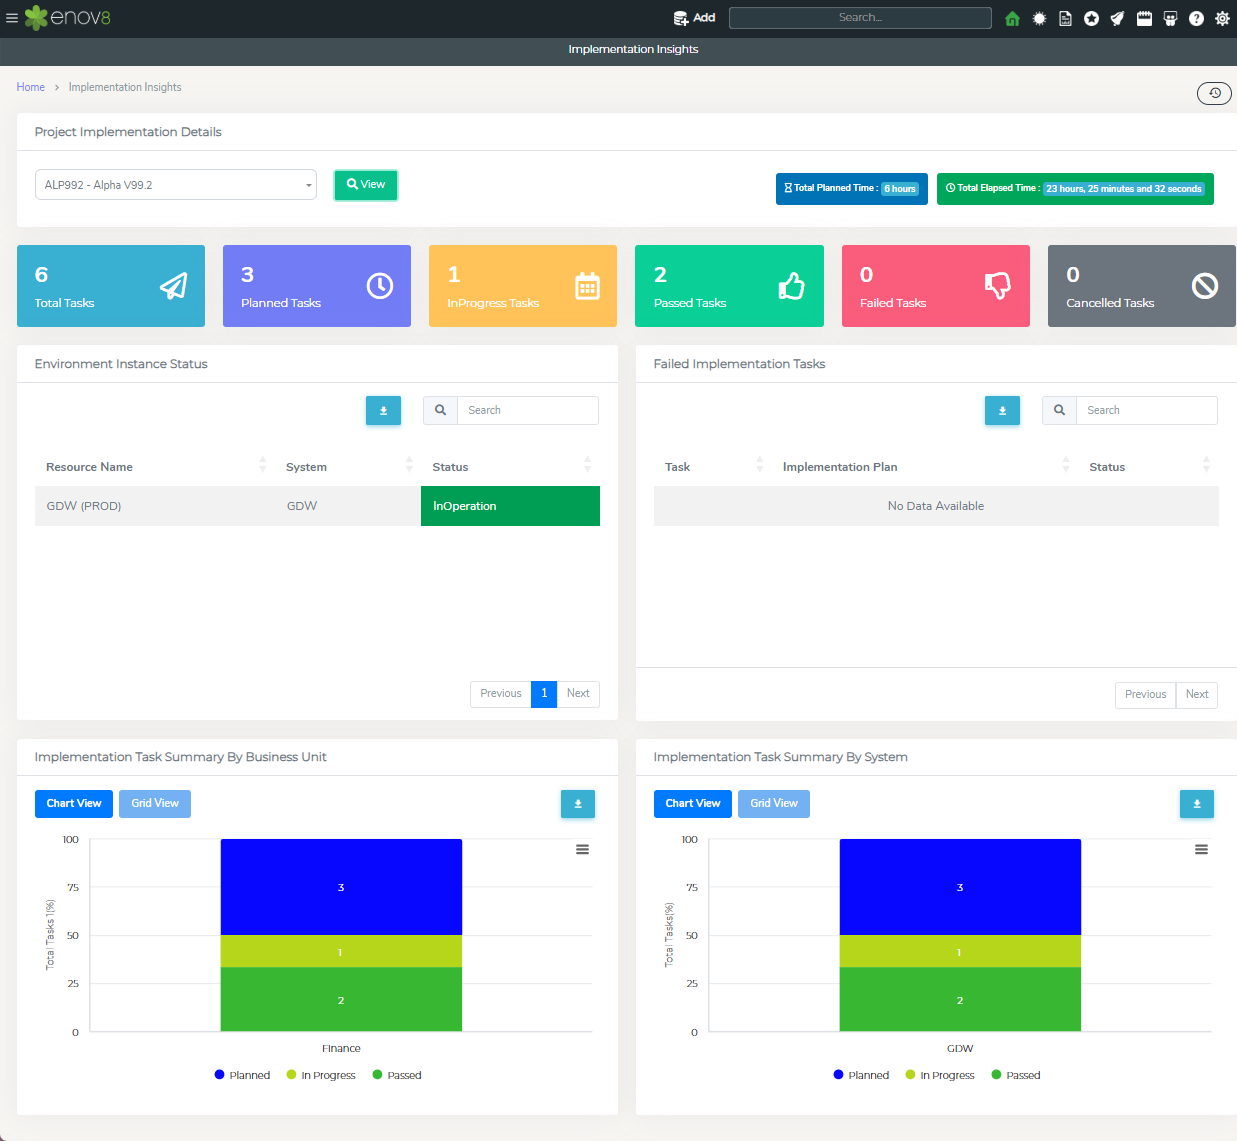
Implementation Plan Insight report allows to visualise implementation plan overview from a project perspective. It shows a summarised view of all the tasks related to multiple implementation plan connected to a project.
Project Management Post Implementation Review
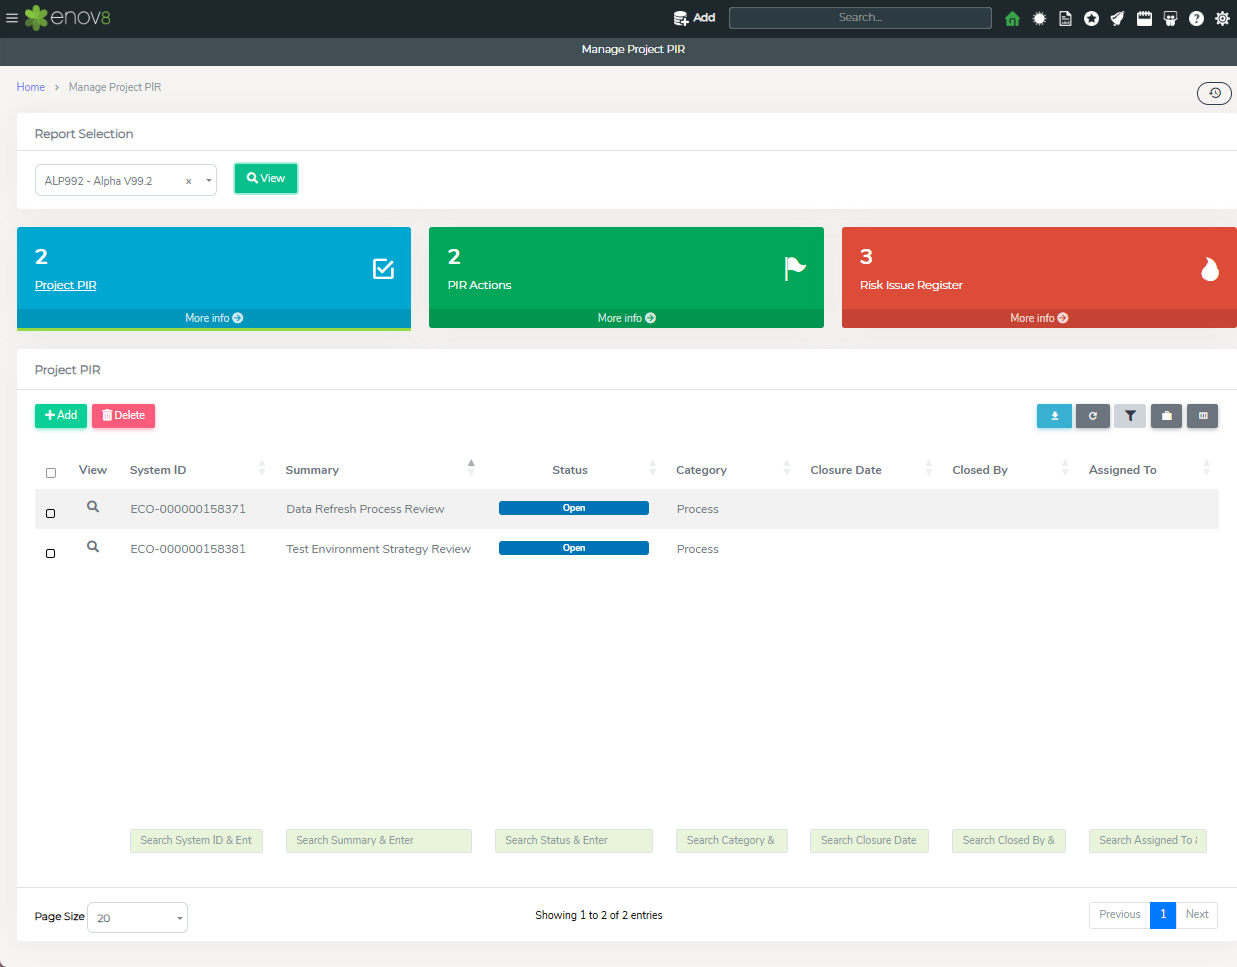
Post Implementation Review (PIR) feature allows an organisation to capture and manage the reviews after the implementation and actions associated with each review. This can be accessed via Project Management> Review > Manage Project PIR
At the top there is a dropdown which shows a list of projects. Selecting a project refreshes the data for the selected project.
● Project PIRs - All PIRs for the selected project
● PIR Actions – All PIR actions for each review
● Risk Issue Register - All risks and issues raised for the project.
Project Management Dashboard & Reports
In this section we’ll go through the various Project Management Dashboard and Reports.
Project Dashboard
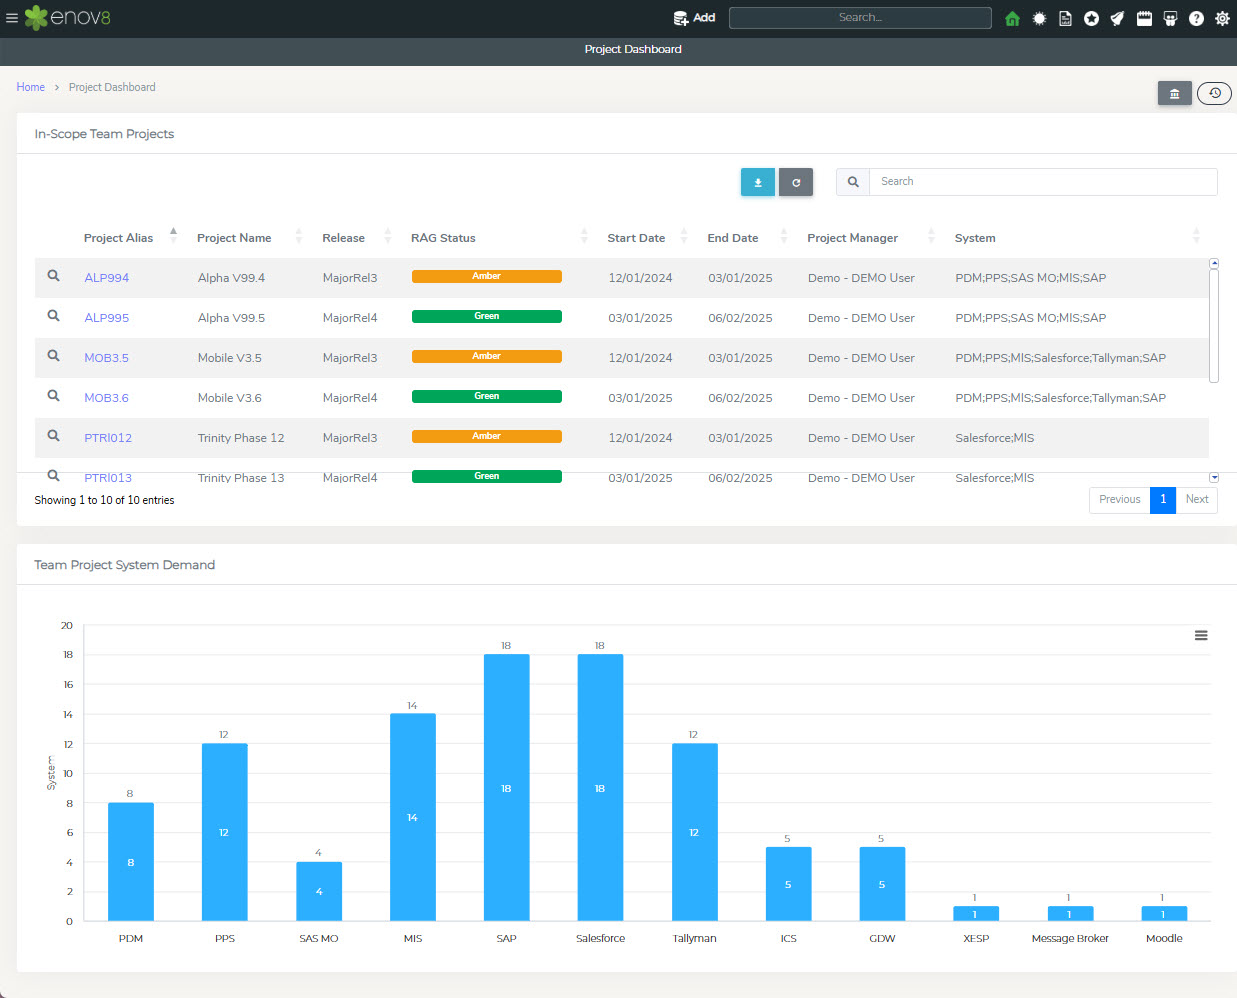
The Project Dashboard provides a high-level view of all the active projects.
To View, navigate to Project Management > Home > Project Dashboard
The dashboard has been divided into 2 widgets.
In-Scope Team Projects – List of all in-scope active projects along with RAG Status.
Team Project System Demand – Graphical view of the system demand in various projects.
Project Insights
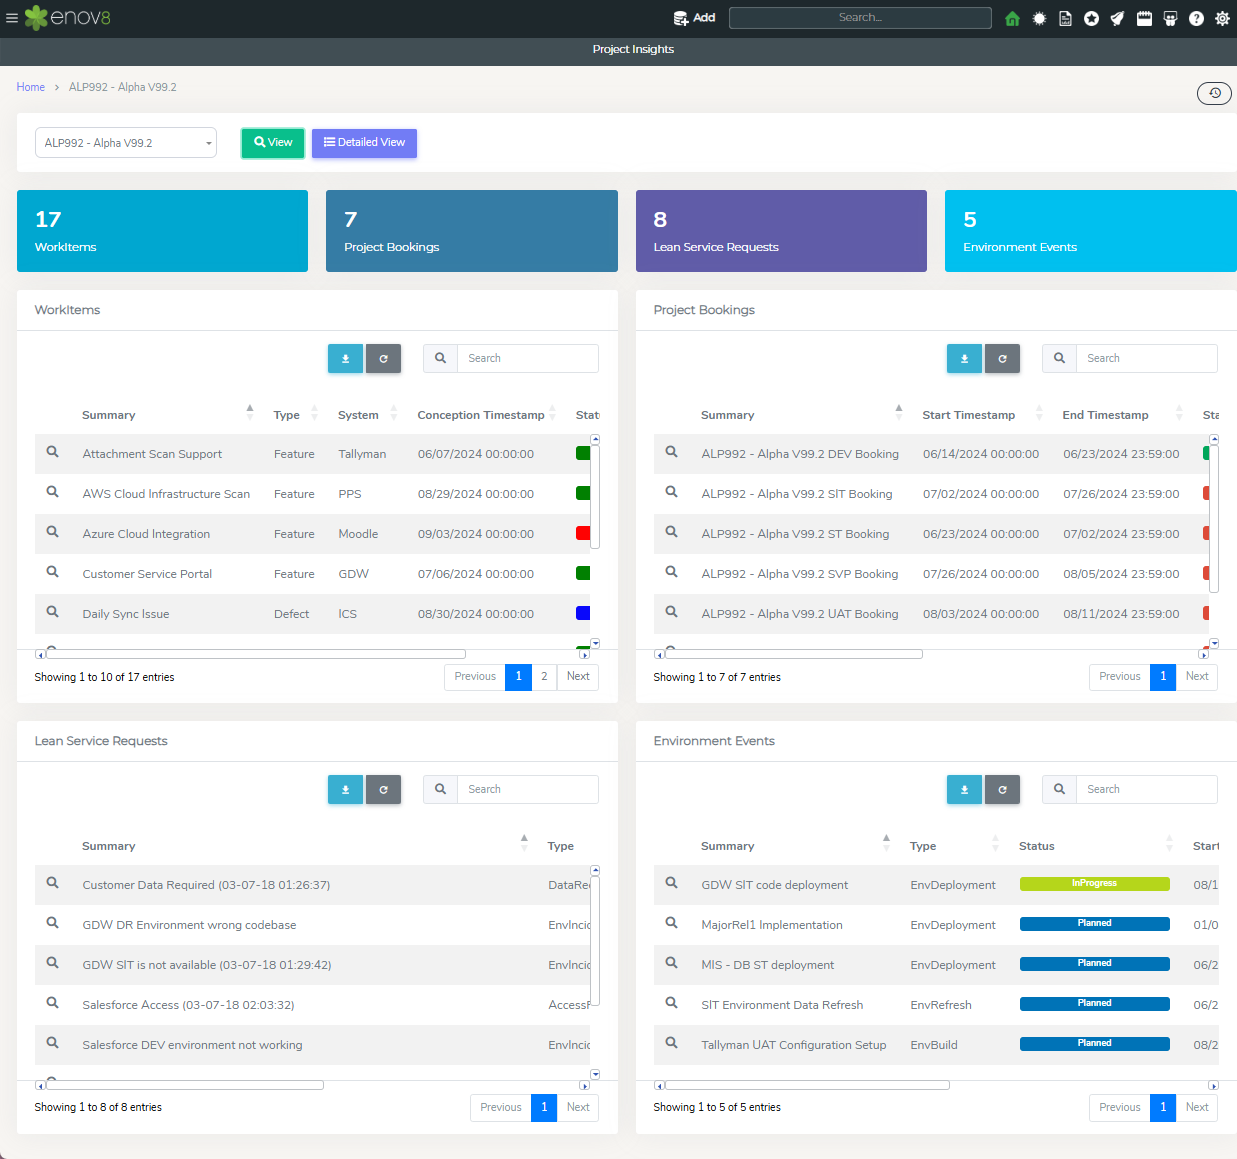
The Project Insight report in the Enov8 platform provides a comprehensive view of a specific project, offering a detailed breakdown of various components and their statuses, which can be selected from a dropdown menu for targeted analysis.
Accessing the Project Insight Report
To view this report, follow these steps:
- Navigate to Project Management.
- Click on Reports.
- Select Project Insights.
Features of the Project Insight Report
The dashboard is organized into four main widgets, each offering a distinct perspective on the project's components:
-
Workitems: This widget presents a list of all workitems associated with the project, including their statuses. It provides a snapshot of the tasks and their progress, crucial for monitoring project execution.
-
Project Bookings: Displays all bookings related to the selected project, offering insights into resource allocation and scheduling specific to the project's needs.
-
Lean Service Requests: Lists all lean service requests that have been raised for the project, along with their statuses, providing a view of the additional support or resources requested for the project.
-
Environment Events: Shows all events created for the project, detailing their statuses. This gives an overview of significant occurrences or milestones within the project timeline.
The Project Insight report is an essential tool for project managers, stakeholders, and team members, offering a granular view of a project's various aspects, facilitating better understanding, tracking, and management of project components.
WorkItem Insights
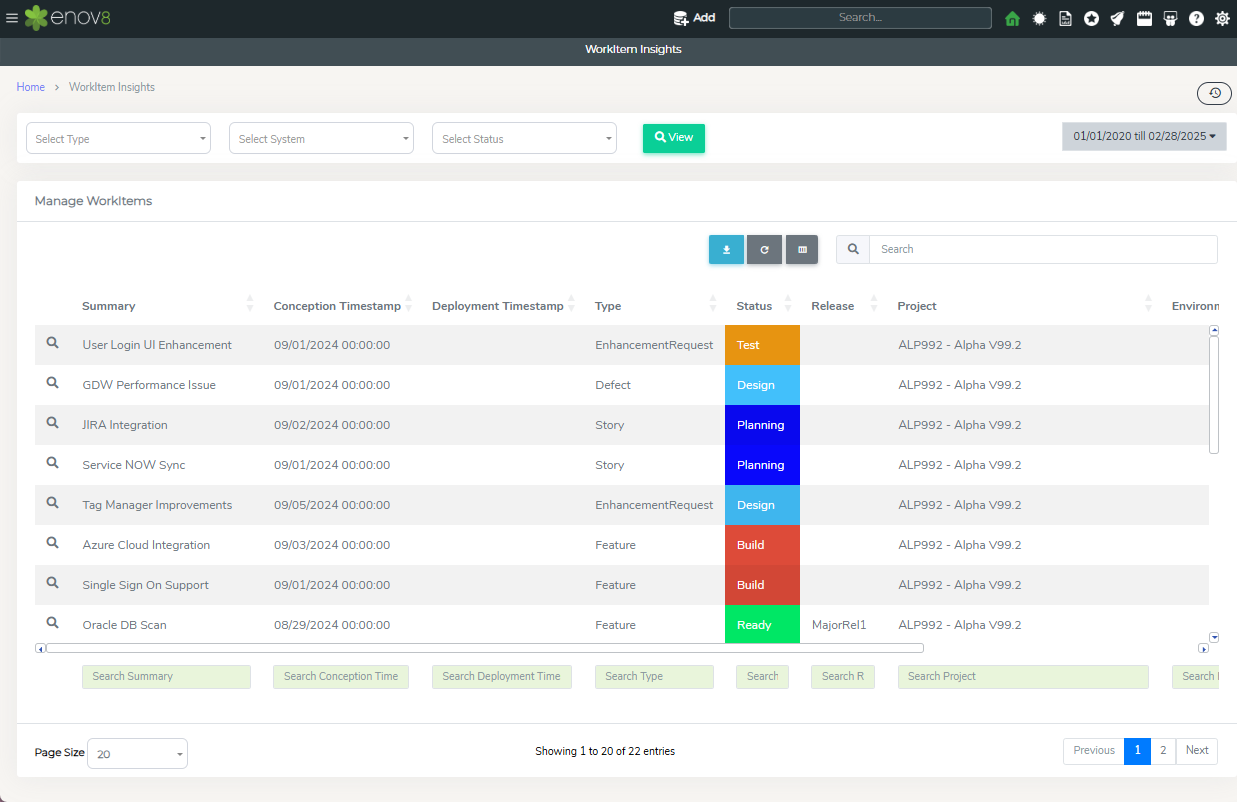
The Workitem Insight report in the Enov8 platform delivers a tabular view of all workitems within a specified timeframe, offering a detailed and organized perspective on the tasks at hand. This report is particularly useful for managing and tracking workitems effectively.
Accessing the Workitem Insight Report
To view this report, follow these steps:
- Navigate to Project Management.
- Click on Reports.
- Select Workitem Insights
Features of the Workitem Insight Report
-
Tabular View: The report presents workitems in a tabular format, providing clear visibility into various details such as status, assignee, due dates, and more, enabling comprehensive tracking and analysis.
-
Timeframe Selection: Users can specify the timeframe they wish to view, filtering the workitems to those that fall within the selected dates.
-
Bulk Actions: A notable feature of this report is the ability to take bulk actions. Users can select multiple workitems using checkboxes alongside each row and then apply an action to all selected items simultaneously using an action dropdown located in the footer of the table.
This functionality not only provides a detailed view of the workitems but also streamlines the management process, allowing for efficient updates and actions on multiple items, enhancing productivity and task management.
Project Milestones
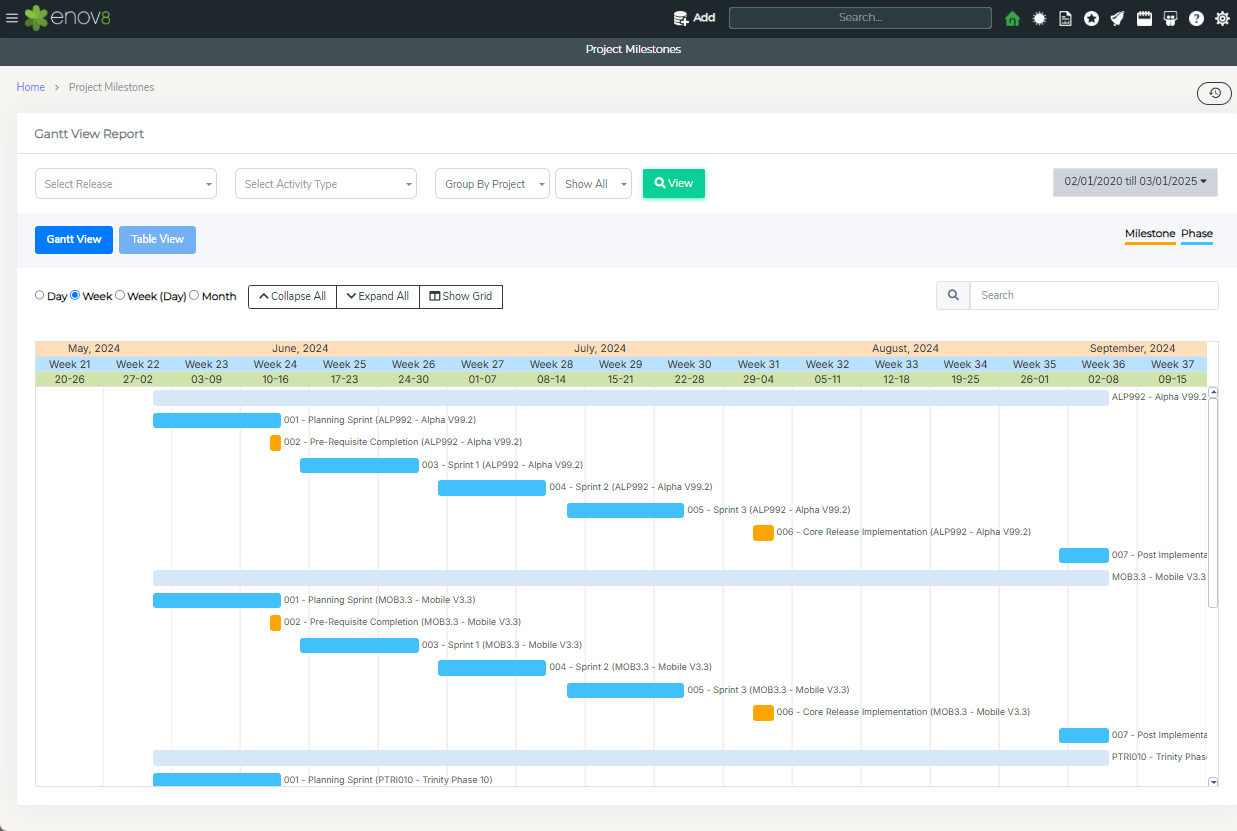
The Project Milestone report in the Enov8 platform offers both a Gantt and a table-style view, providing a detailed and visual representation of all the milestone activities for projects within a selected time range. This report is invaluable for tracking project progress and ensuring alignment with planned milestones.
Accessing the Project Milestone Report
To view this report, follow these steps:
- Navigate to Project Management.
- Click on Reports.
- Select Project Milestones.
Features of the Project Milestone Report
-
Gantt View: This view offers a timeline-based representation of milestone activities, allowing users to see the duration and overlap of different milestones, facilitating better planning and coordination.
-
Table View: For those who prefer a more traditional, list-based format, the table view provides a detailed breakdown of each milestone activity, including dates, descriptions, and statuses.
-
Filtering Options: The report allows for filtering by activity type or associated release, enabling users to tailor the view to their specific needs and focus on the most relevant information.
This report is essential for project managers and stakeholders, providing a comprehensive overview of project milestones, aiding in monitoring progress, identifying potential delays, and ensuring that projects stay on track towards their objectives.
Project Demand
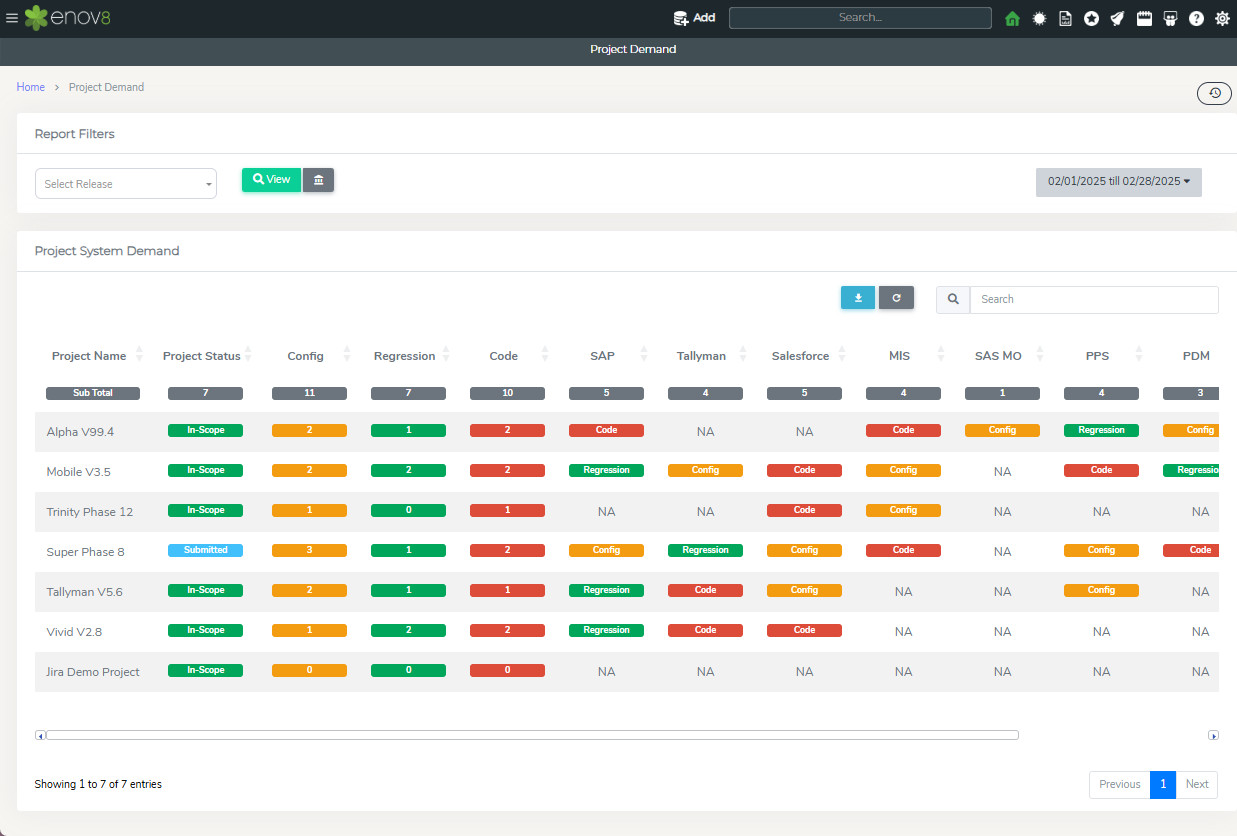
The "Project Demand" report within the Enov8 platform offers a heat map view that illustrates the system demand of various projects within a Release, enabling project managers to identify potential resource contentions. This visualization is particularly useful for understanding how different projects interact with shared systems and resources.
Accessing the Project Demand Report
To view this report, follow these steps:
- Navigate to Project Management.
- Click on Reports.
- Select Project Demand.
Features of the Project Demand Report
-
Heat Map Visualization: The report utilizes a heat map to display system demand across various projects, making it easier to identify high-demand areas and potential conflicts where multiple projects require the same system resources.
-
Color-Coded Change Types: The heat map uses different colors to represent various types of changes such as Code Change, Config Change, and Regression, allowing for quick and intuitive interpretation of the data.
-
Contention Identification: The report highlights scenarios where more than one project is vying for the same system resources, helping project managers to proactively address and resolve potential contentions.
-
Interactive Filters: Users can apply filters to the report to focus on specific aspects of project demand, enhancing the report's relevance and usability in different contexts.
This report is an essential tool for project managers, providing valuable insights into how projects interact with systems and each other, aiding in resource planning, conflict resolution, and efficient project execution.
Project Environment View
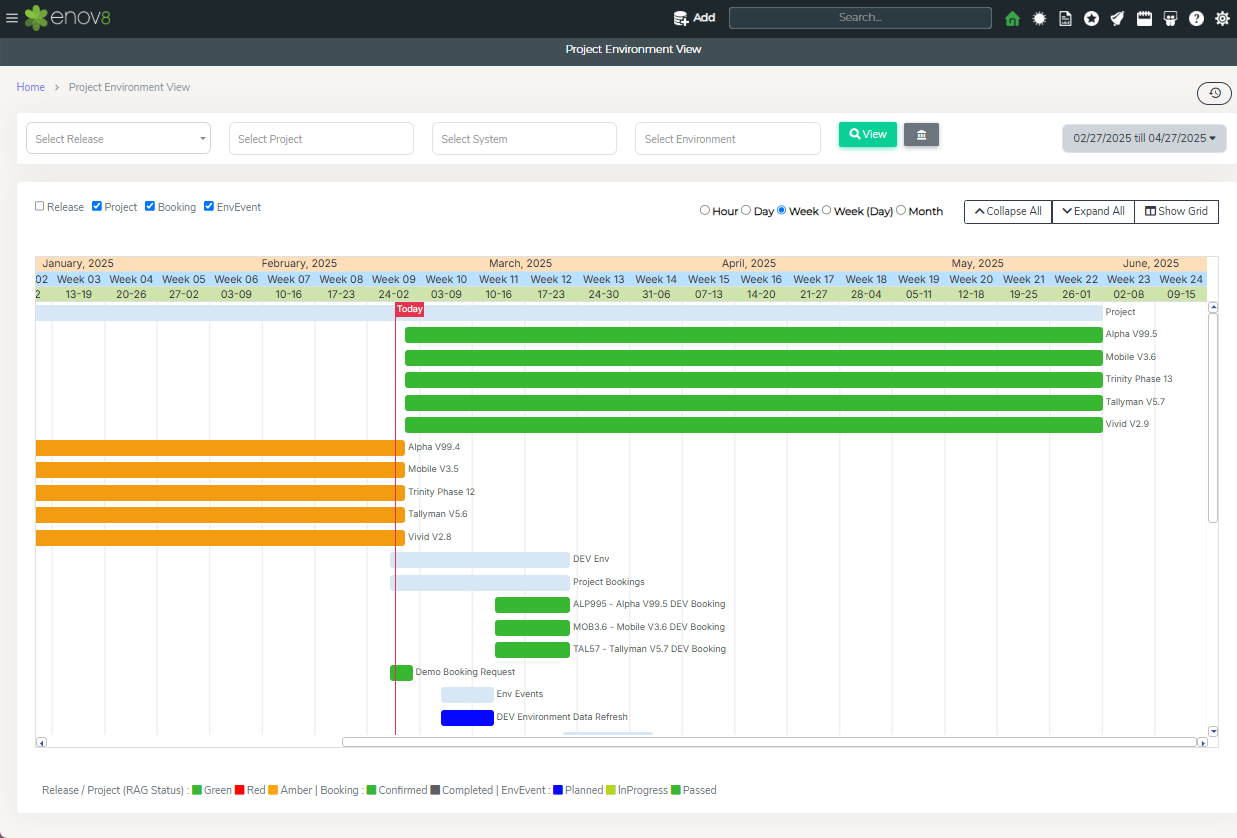
The "Project Environment View" report in the Enov8 platform offers a Gantt style visualization, encompassing various components such as releases, projects, bookings, and events. This comprehensive view is instrumental in visualizing the interconnectedness of different elements within a project's timeline, aiding in the assessment of their collective impact.
Accessing the Project Environment View Report
To view this report, follow these steps:
- Navigate to Project Management.
- Click on Reports.
- Select Project Environment View.
Features of the Project Environment View Report
-
Gantt Style Visualization: Provides a timeline-based representation of releases, projects, bookings, and events, enabling users to see how these elements overlap and interact over time.
-
Filtering Options: Users can filter the view by release, project, systems,environment, and date range, tailoring the visualization to specific needs or areas of interest.
-
Comprehensive Overview: By integrating different project-related components into a single view, the report offers a holistic perspective on the project's environment, facilitating a deeper understanding of the project's structure and dependencies.
This report is a valuable tool for project managers, team members, and stakeholders, offering insights into the project's environment and helping them make informed decisions based on the interplay and timing of various project components.
WorkItem Board
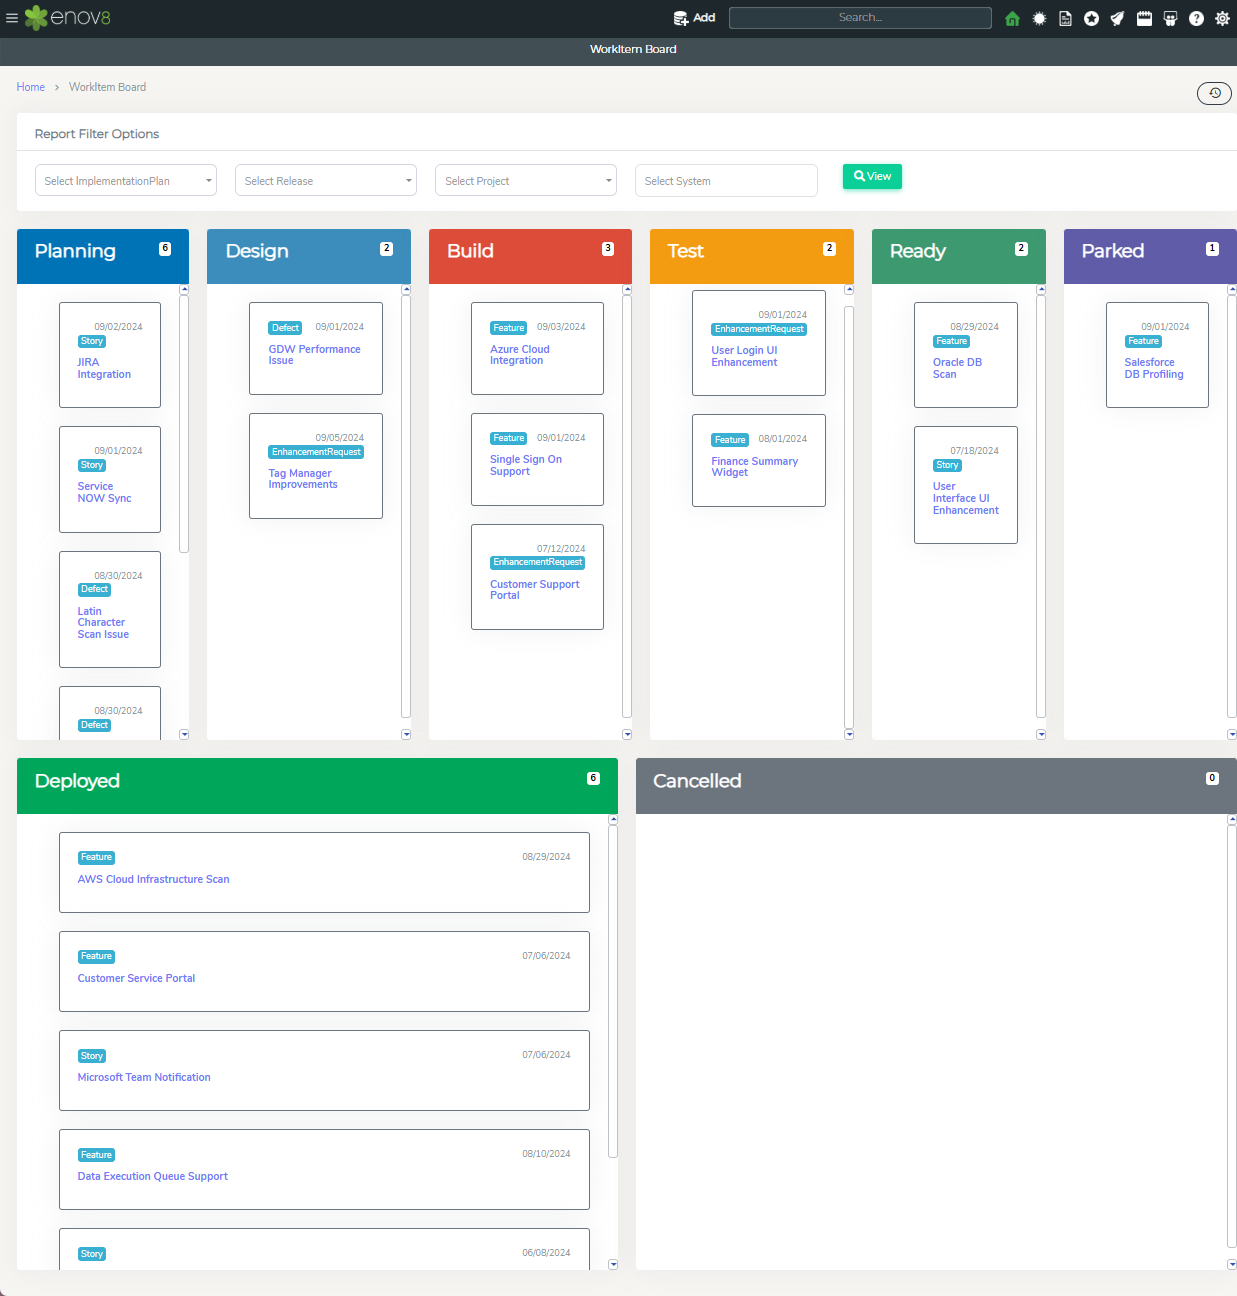
The "WorkItem Board" within the Enov8 platform is a Kanban style report that provides a dynamic and visual way to manage and track workitems across different status lanes. This interactive report allows for an at-a-glance understanding of the progress and distribution of workitems.
Accessing the WorkItem Board
To view the WorkItem Board, follow these steps:
- Navigate to Project Management.
- Click on Reports.
- Select WorkItem Board.
Features of the WorkItem Board
-
Kanban Style Visualization: The board organizes workitems into different lanes based on their status, offering a clear, visual representation of their progress and current state.
-
Filtering Options: You can filter workitems displayed on the board by Implementation Plans, Release, Project, or System, allowing for a tailored view that focuses on specific areas or aspects relevant to your needs.
-
Interactive Management: The Kanban board not only provides a visual summary of workitems but also allows for interactive management, where items can typically be moved between lanes or updated as they progress through various stages of completion.
This tool is particularly useful for project teams, managers, and stakeholders to monitor and manage the flow of work, facilitating better organization, prioritization, and tracking of project tasks and objectives.
