Administration
Datasource Management
Adding a Connection
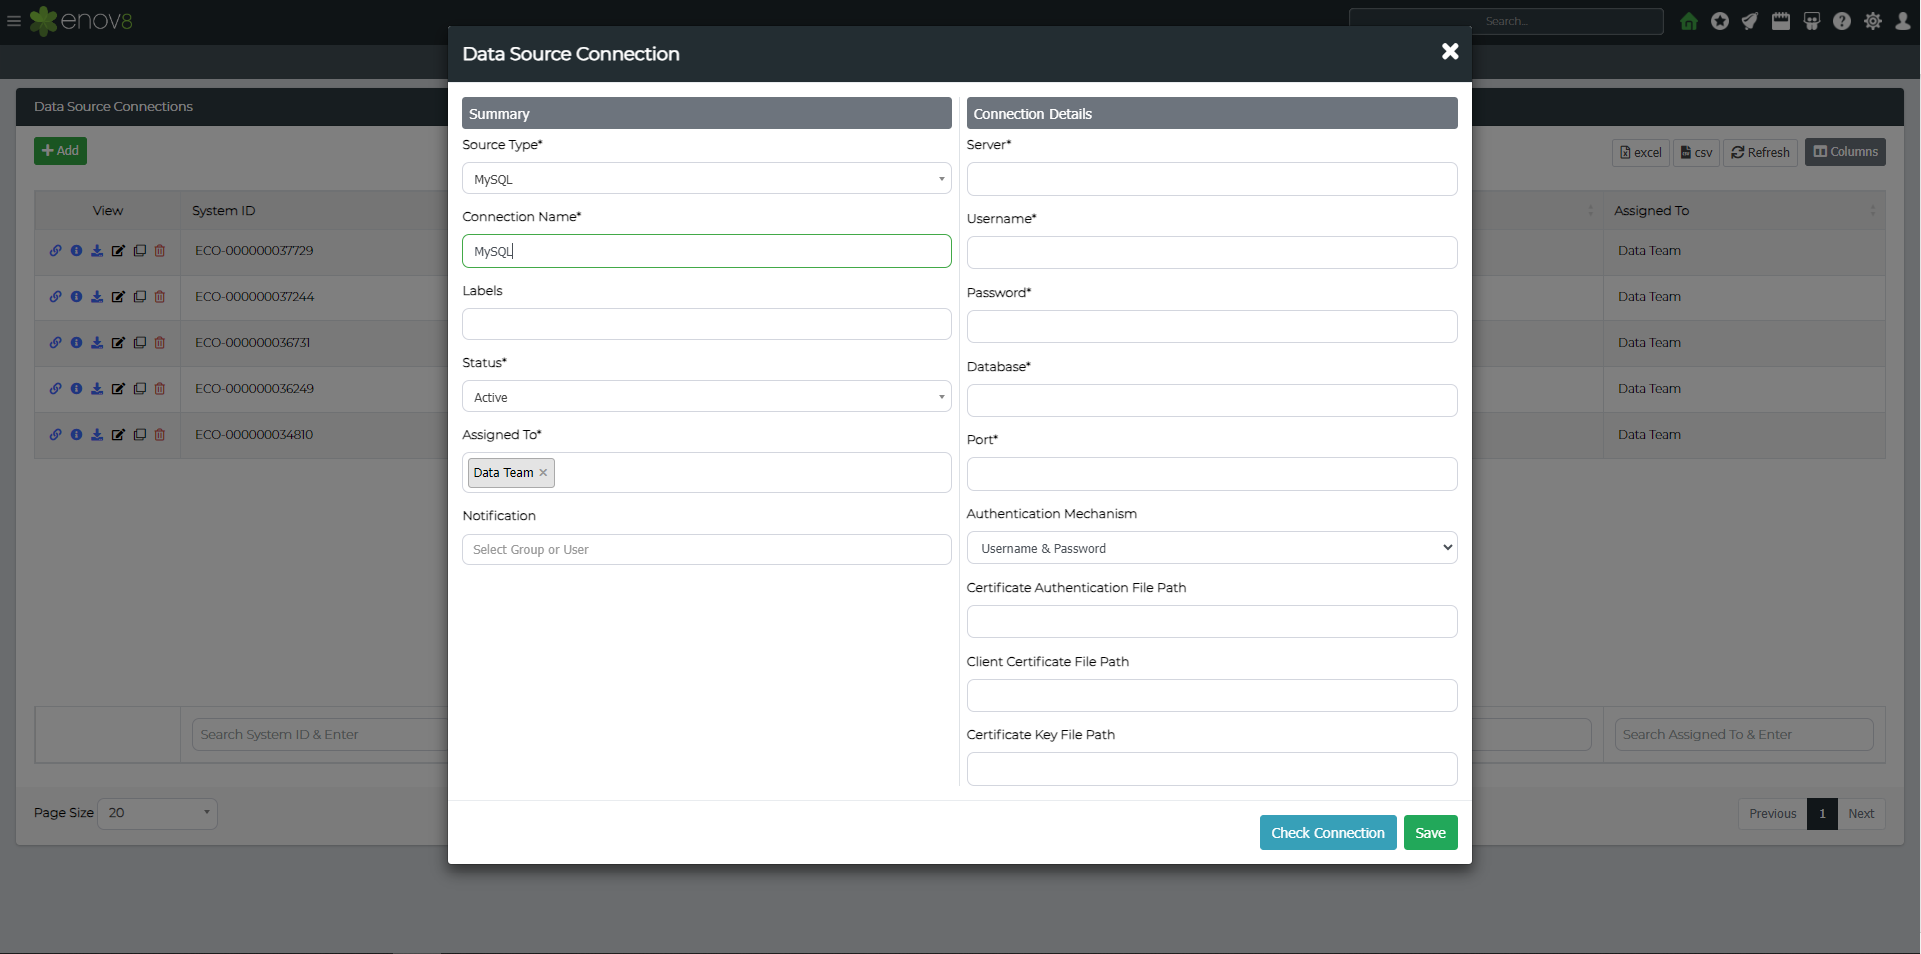
Click the Add Data Source Connection button. This will present a popup form allowing you to choose your Data Source Type and fill in associated details.
The example below is for MSSQL but will differ depending on the data source type you choose.
| Type | Description |
|---|---|
| Source Type | Database or File type (e.g., Oracle, MSSQL, Delimited File, etc). |
| Connection Name | The name you want to provide the data source connection. |
| Labels | One Word information attached to the object for better search and filtering. |
| Status | Current Status of the Data Connection. |
| Assigned To | User Group which can edit this data connection. |
| Notification | List of users who will be notified for the execution results. |
| Agent | Worker Bee which will be used for the data source (Need Separate Setup). |
| Server | The database IP Address or Hostname. |
| Username | The database username. |
| Password | The database password. |
| Port | The port the database is running on. |
| Authentication Mechanism | Either "Username and password" or "SSL". Supported for MSSQL, MySQL, PostgreSQL and Sybase. |
Note: Please ensure that all details are correctly inputted as they are case sensitive.
You can then optionally click Check Connection to validate the details are correct and/or Save.
File Server Types (TDM3.6 only)
Outside of local file storage, TDM3.6 supports retrieving files from file servers. The following table shows the file server types that are currently supported:
| File Storage Server Types | Description |
|---|---|
| FTP | Connects to servers via FTP protocol for file transfer. |
| Amazon S3 Standard | Connects to standard Amazon S3 buckets. |
| Amazon S3 Compatible | Supports S3-compatible services for file storage. |
| Amazon S3 EC2 IAM | Uses EC2 IAM roles to connect to S3 buckets. |
| Amazon S3 AssumeRole | Uses AssumeRole for accessing S3 resources. |
| Azure File - Shared Access | Connects to Azure File shares using shared access. |
| Azure File - SAS | Uses SAS tokens for accessing Azure Files. |
| Azure File - Connection String | Connects to Azure File shares using a connection string. |
| Azure Blob - Shared Access | Connects to Azure Blob storage using shared access. |
| Azure Blob - SAS | Uses SAS tokens for accessing Azure Blob storage. |
| Azure Blob - Connection String | Connects to Azure Blob storage using a connection string. |
You can access this through the server type drop-down menu after selecting any file type in the data source connection menu.
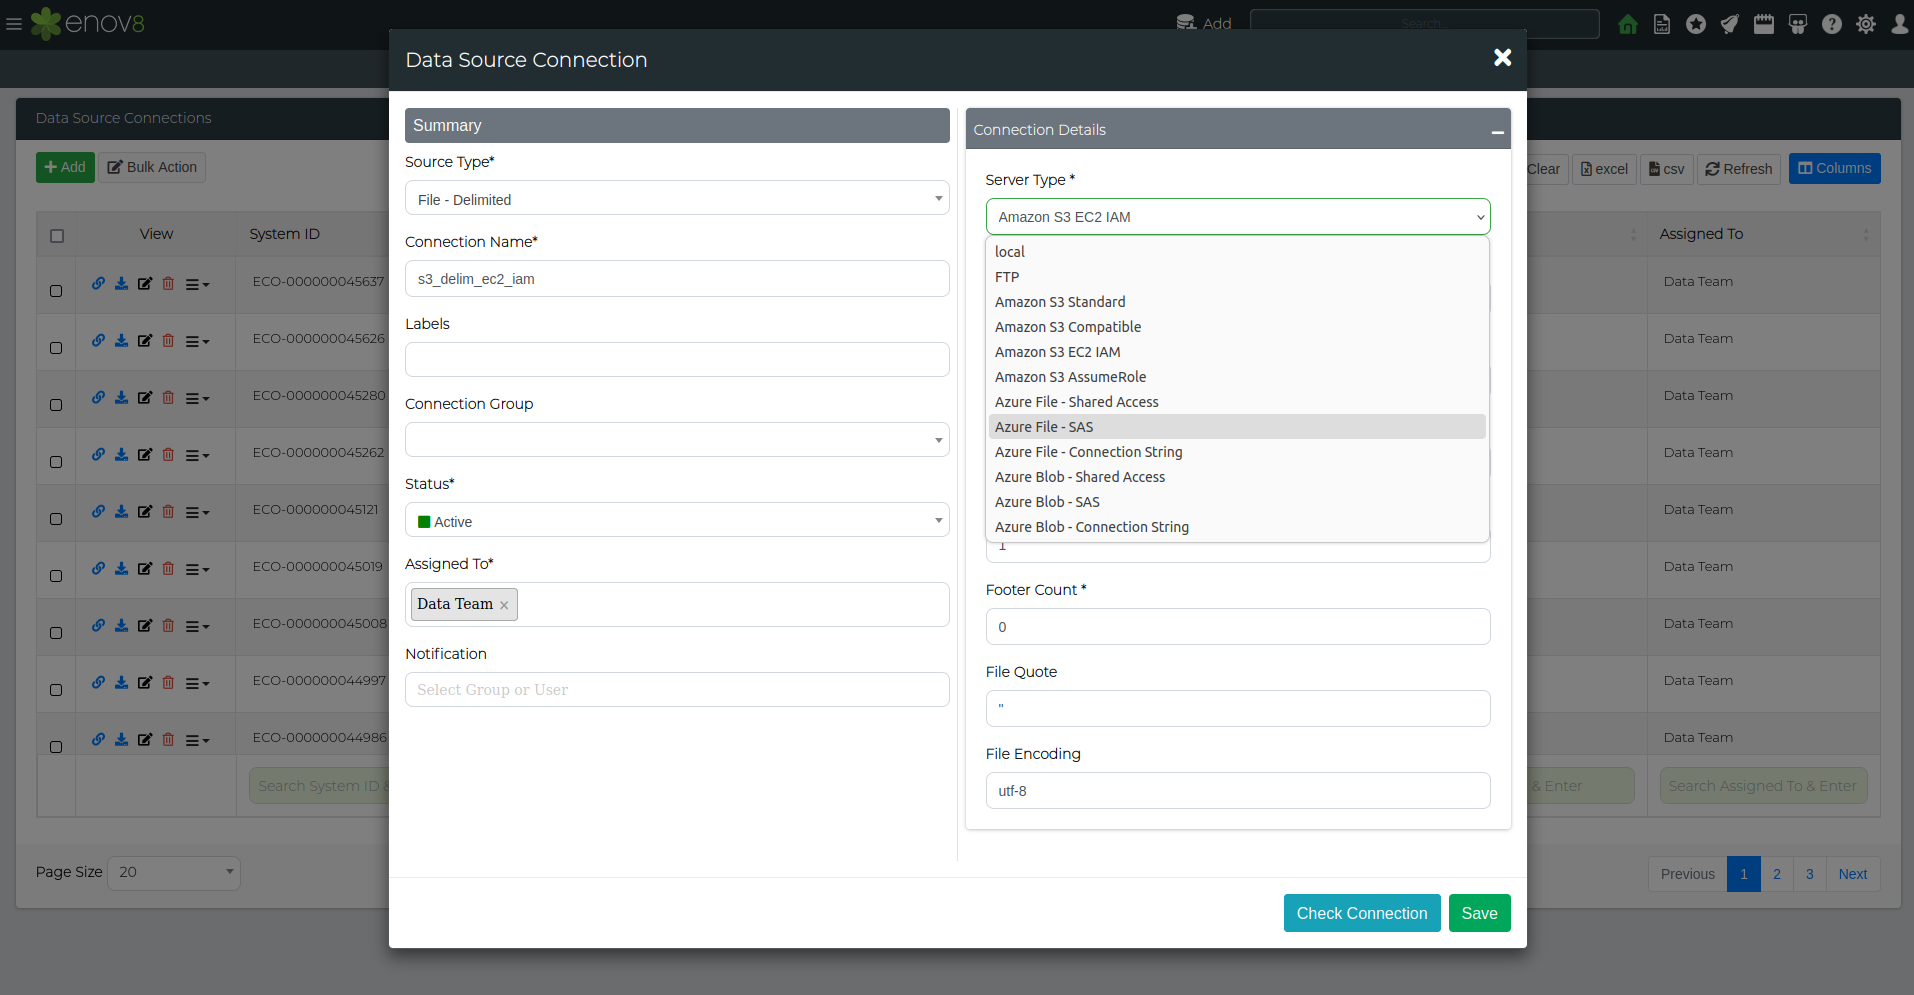
After selecting the desired server type, add the connection details required for that file server type and save. A connection test using the check connection button can also be used to ensure a successful connection.
Editing a Connection
Click the Edit button to edit the Data Source. This will popup a similar form to the Add form but with existing details available for viewing/editing.
Cloning a Connection
Click the Clone Icon to create a copy the Data Source. A popup will be presented with copied information. Press Save to save the new cloned data source. Please note that the password needs to be inputted and won't be automatically copied as part of clone feature.
Deleting a Connection
Click the Delete button to edit the Data Source. A popup will be presented to confirm deletion.
Check/Test Connection
Click the Check Connection button to confirm/test that connectivity to the database or file can be achieved via the details provided and/or the database or file is accessible.
A green success message will be displayed if connection was successful or a red error message if it was not.

Note: If connection fails the details entered in the form may be correct but the database may be shut down or inaccessible preventing connectivity.
Grouped Data Connection
TDM 3.6 enables bulk executions for profile, mask, and validate scans by utilising connection groups. This section outlines the steps to create new connection groups, as well as adding data connections to these groups.
Creating A Data Connection Group
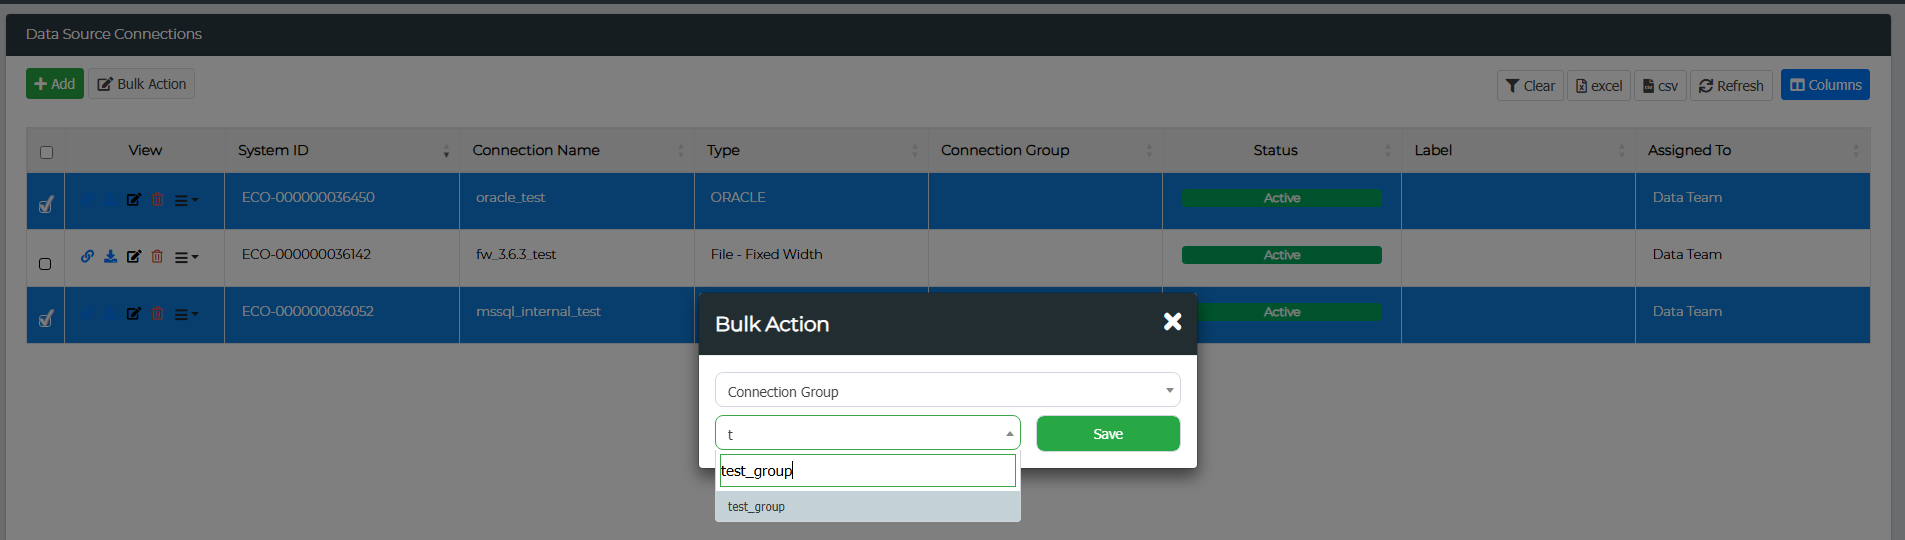
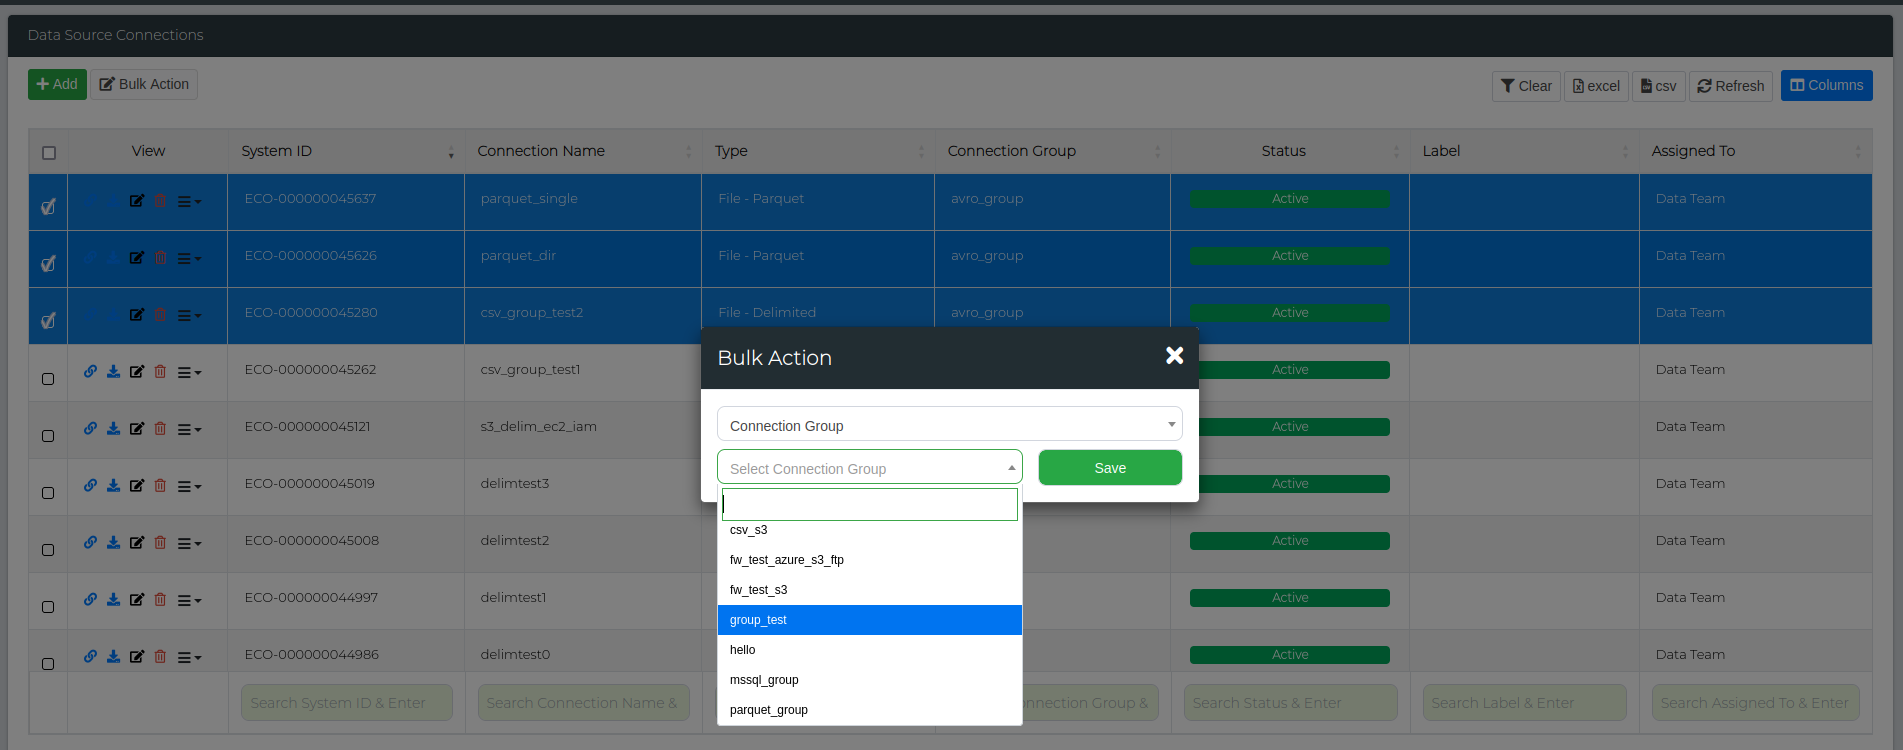
Start by navigating to Administration > Data Source Management. Select the data connections you want to add to a group, then click on the Bulk Action button. From the first drop-down menu, choose Connection Group, and from the second drop-down menu, type in the name of the group you wish to add in the text box (as shown below). Click Save, and all selected data connections will be added to that group.
Adding Data Connections to Groups
If you want to add data connections to existing groups, the process is very similar to creating a data connection group. Start by navigating to Administration > Data Source Management. Select the data connections you want to add, then click on the Bulk Action button. From the first drop-down menu, choose Connection Group, and from the second, select the specific group you wish to add them to. Click Save, and all selected data connections will be added to that group.
You can verify this by checking the Connection Group column on the Data Source Connections page.

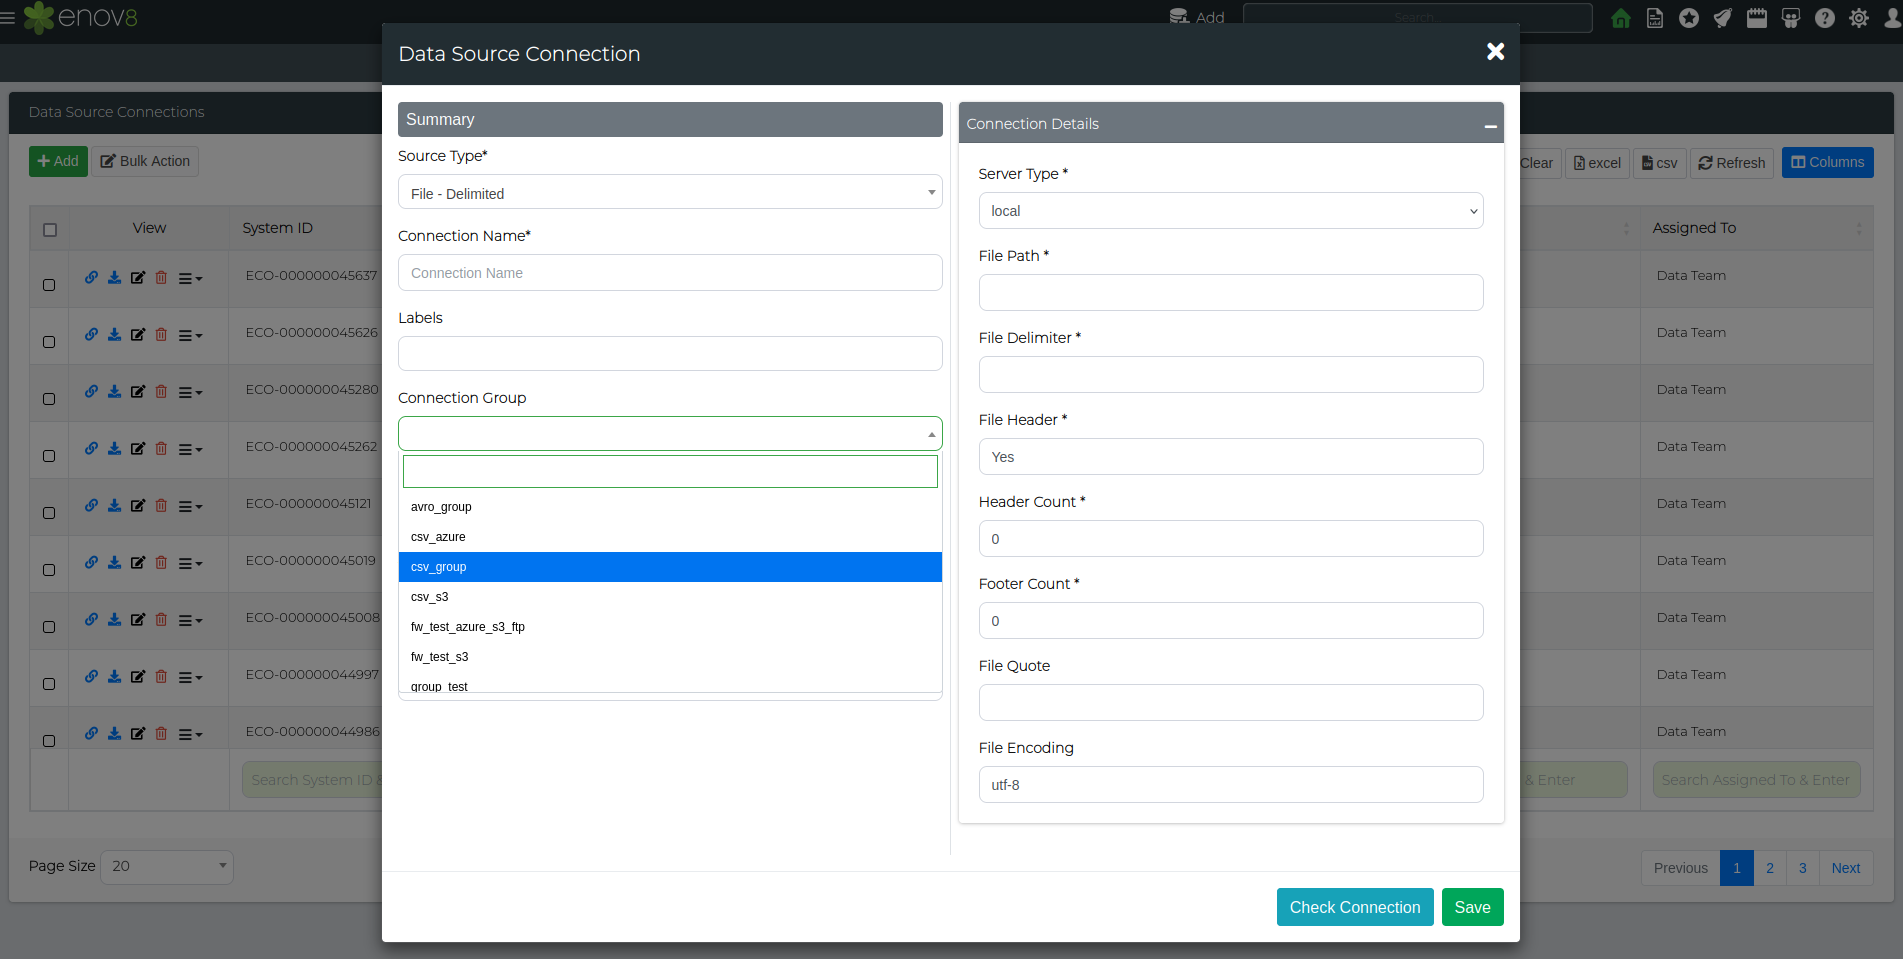
Alternatively, you can assign a group while creating a data connection. In the create/edit window, simply select the appropriate Connection Group from the drop-down before saving.
Bulk Upload/Edit Connections
TDM3.6 supports bulk upload/edit for data connections to streamline the process of bulk executions (also added in 3.6). Firstly, navigate to Configuration Management > Add Data > Bulk Data Upload. The Organisation can be anything, however for the object name, select Data Connection from the drop down menu.
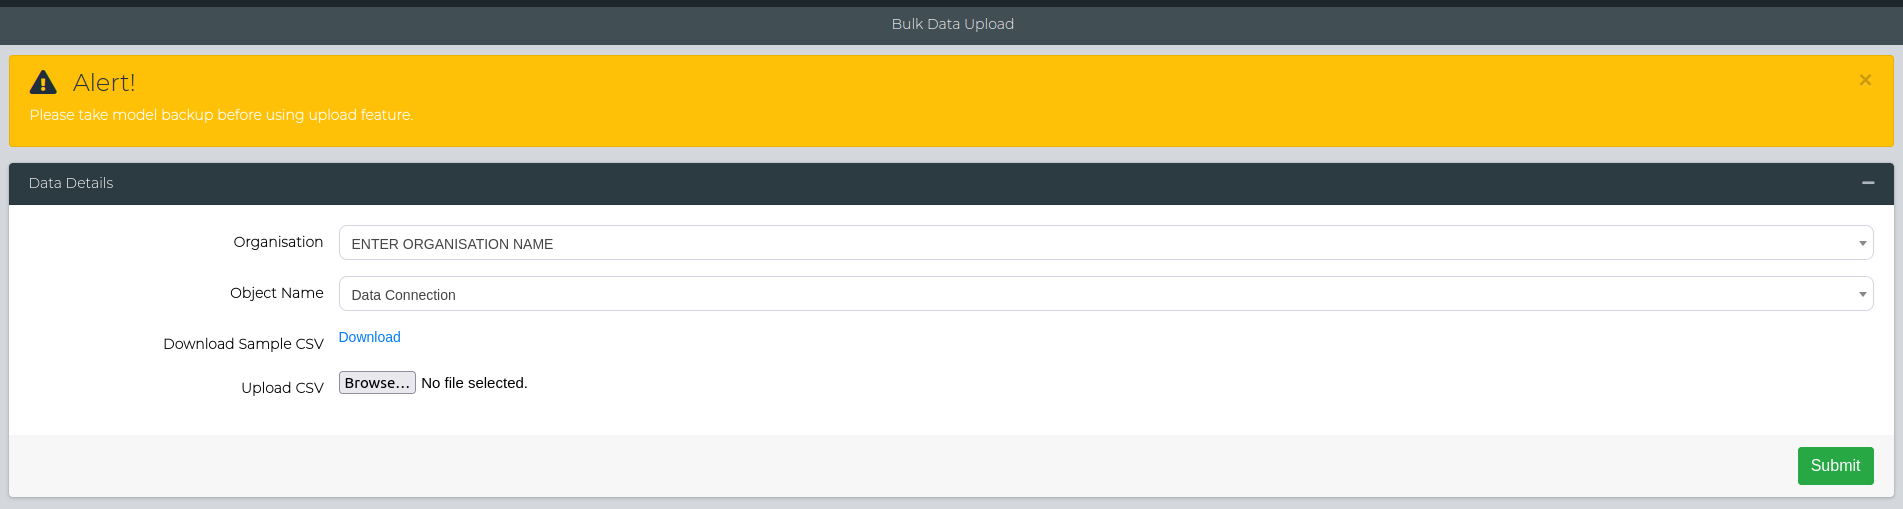
Here, you want to upload the CSV with all the connection fields required to add that specific data source connection. You can download the sample CSV to have a look at what the structure should look like.
Note: Use an underscore(_) prefix to specify database/file specific connection fields. An example of this is shown in the sample CSV.
Once the CSV has been uploaded, you can click the Submit button to proceed to the next step. The 'Data to be uploaded' section will appear, detailing all the fields that were in the CSV file. You can double check the details here, and reupload if needed.
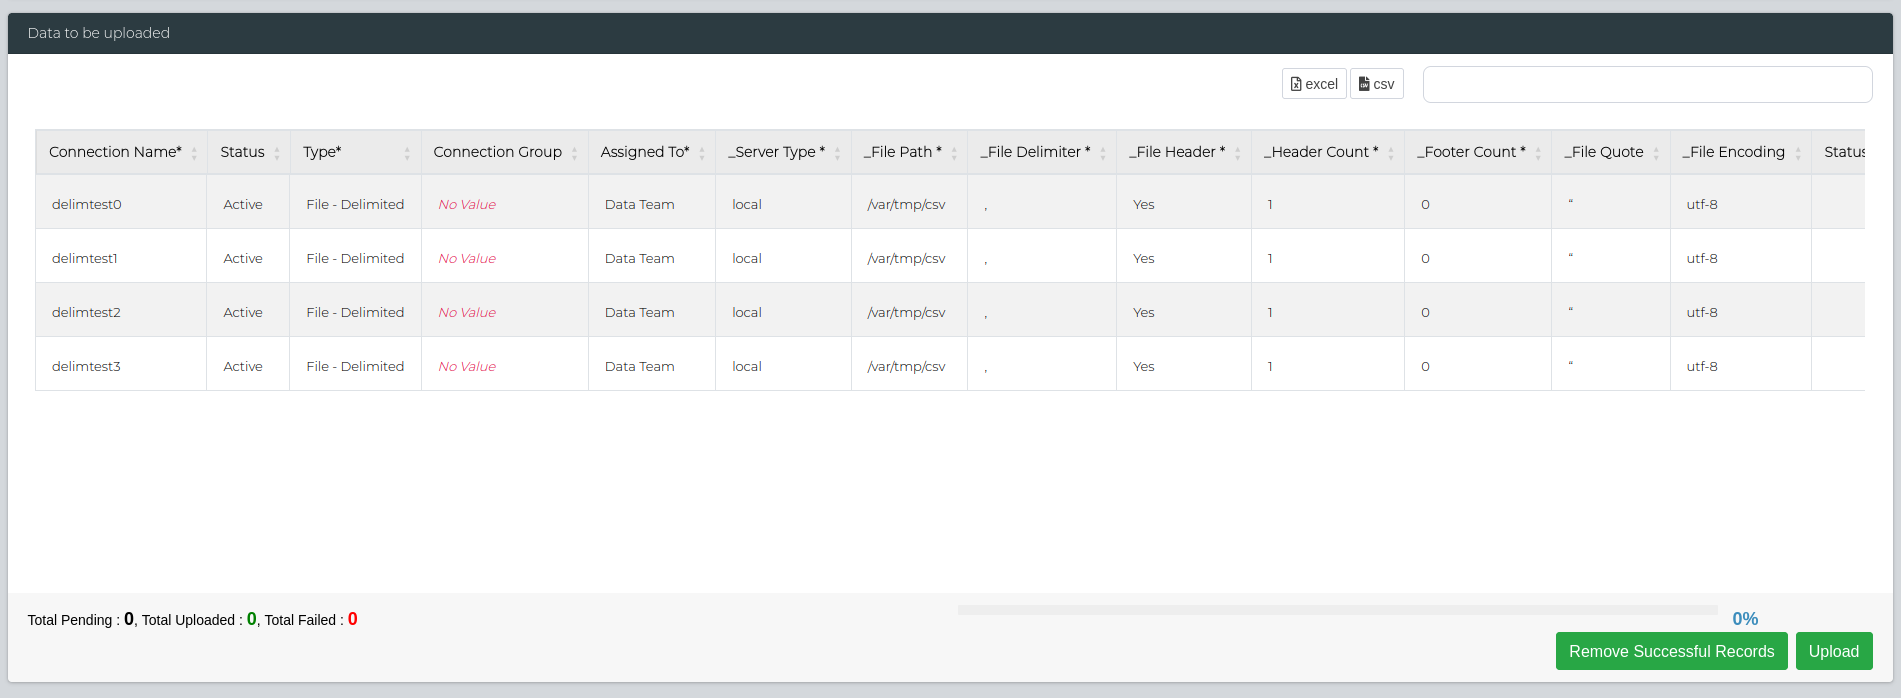
Important: For bulk editing data connections, change the Connection Name field to the System ID of the data connection that you want to edit.
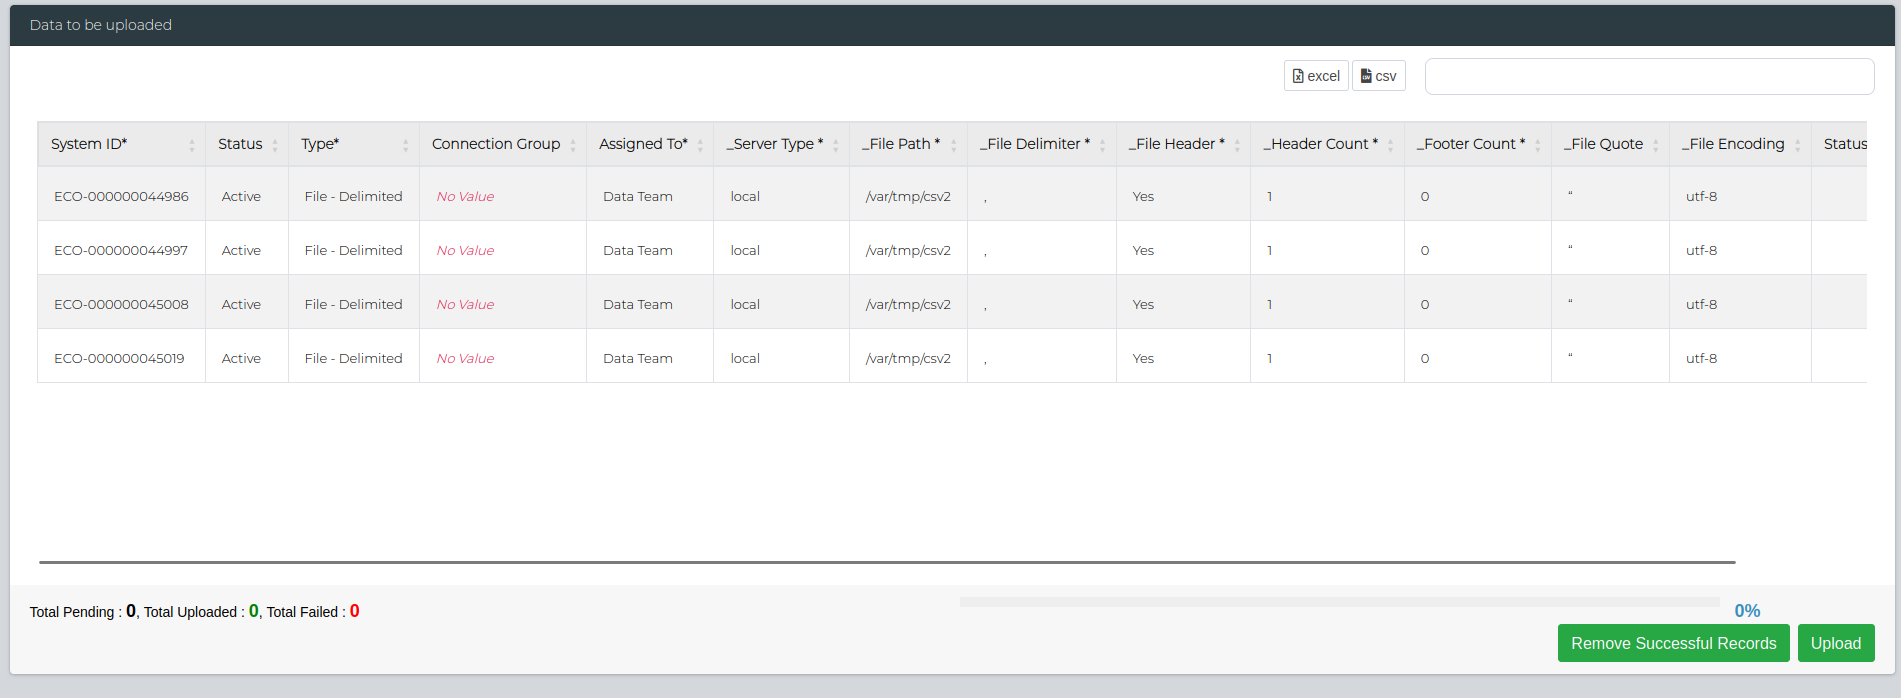
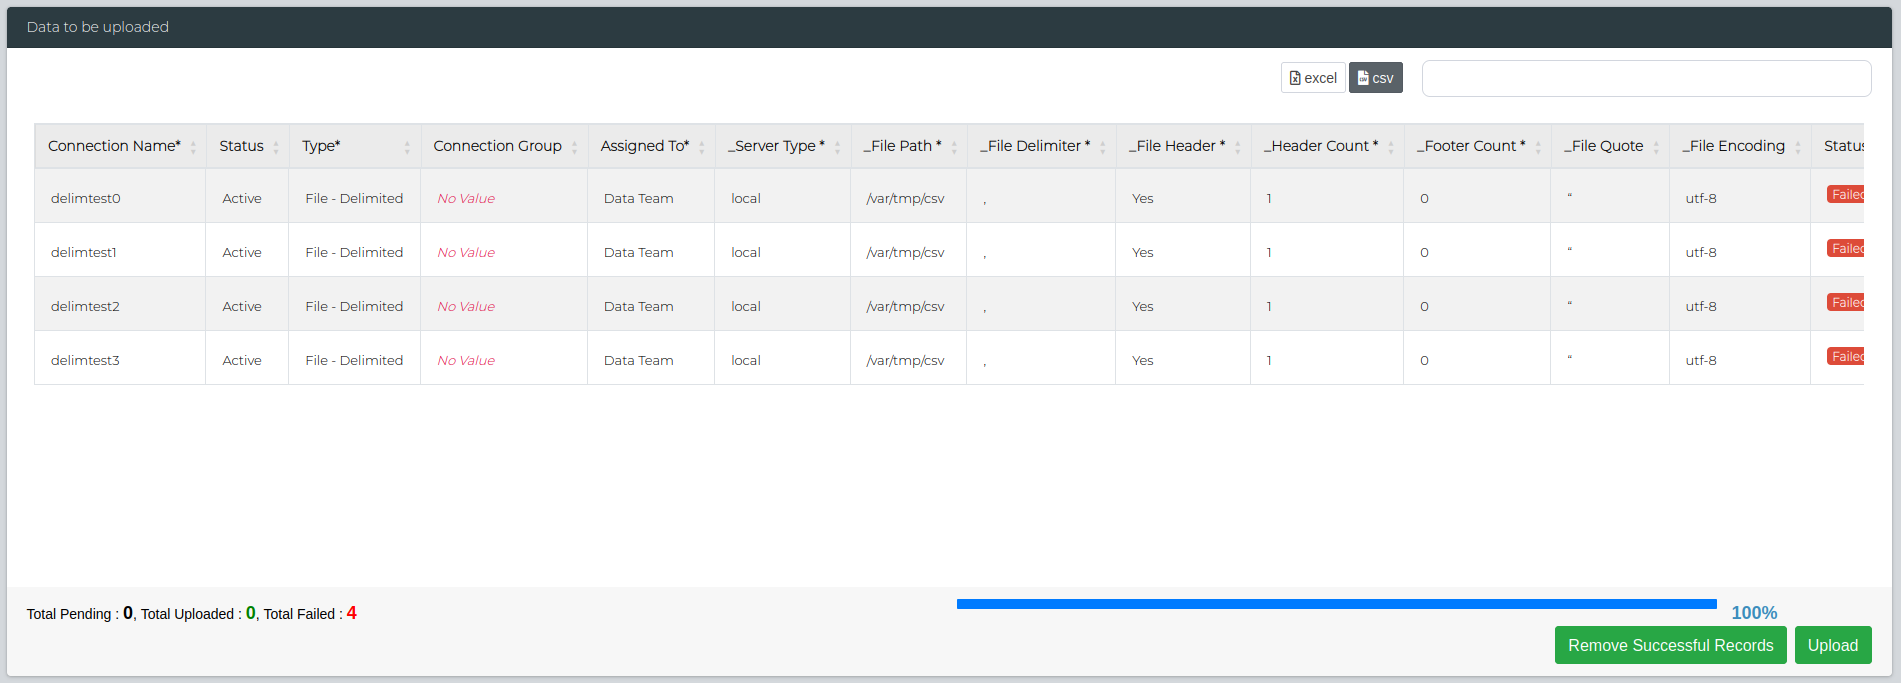
Once you're satisfied with the fields, click on Upload button on the bottom right. This will show the number of failed/successful uploads. You can check if they were successfully added by navigating to Data Management > Administration > Data Source Management.

If there's any failed uploads, you can use the Remove Successful Records button to keep only the failed ones and redownload the CSV to edit the details as needed.
Data Library
Overview of Data Configuration Library
In Enov8's test data management suite, patterns are the data structures in which personal identifiable information (PII) data is categorised as. For example, a pattern could be first name, credit card information or a tax file number.
These patterns are crucial for profiling the data, as they help in distinguishing sensitive information from non-sensitive elements. Once these patterns are identified, masking techniques come into play. Masking involves replicating the identified patterns using functions that transform the original PII data into dummy or anonymised equivalents. For example, a function might replace actual credit card numbers with randomly generated, but structurally valid, dummy credit card numbers. Similarly, first names could be replaced with fictional names while preserving the original format.
Note: Out of the box data library objects are view only.
Pattern Table Mapping
| Pattern Name | Description | Key Information |
|---|---|---|
| Many To One | Produces a value from a lookup file, using a hash to generate the value. | - Not unique and utilises hashing |
| Fixed Value | A value will be provided by the user, and which will replace all source values for that column. | - User defined variable and replaces all values with the parameter |
| Unique ID | A unique value will be generated for each source value found. The value will keep the same length and case as the source value. | - Unique data and preserved Data length and case |
| Hash last 4 digits | Hashes the last 4 digits and pad 0s to the front if the hashed digit was less than 1000. | - Utilises hashing |
| Date Many to One | Only days are masked, and the rest of the ‘date’ is preserved. | - Many to one |
| Multi PII | Masks each value in the specific field with the required category and defined parameter. Best for when multiple values are placed in a single field. | - For multiple values |
| Replace with empty | Replaces all values with an empty string. | - Clears whole column |
| Replace with null | Replaces all values with “null”. | - Nulls whole column |
| Name char replace | Replaces the source value with the user-specified character. It also removes all non-letters. For example, Jake -> Xxxx. | - Replaces source value with specified character |
| Hash one to one | Converts the source value to a byte sequence and calculates the checksum twice. It essentially performs a two-step CRC calculation. | - CRC Calculation |
Keywords
| Keyword | Definition |
|---|---|
| Lookup File | A file that contains a large amount of data for a specific category (for example 10,000 first names) |
| Function | A Python script is generating the value algorithmically |
| Custom Function | User-defined Python script that can manipulate the source value |
Profiling
Profiling pattern objects are utilised to identify data content (Database Records) based on three different pattern types
-
Keyword: Uses a list of keywords separated by a pipe ("|") to identify data records that matches the keywords. (e.g. SMITH|WILLIAMS|MOORE|ZHANG|MACDONALD)
-
RegEx: Identifies data rows that match a regular expression.
-
Function: Identifies data rows that match a php function.
In Addition to Database Content profiling, the platform also allows scanning for database column names (Meta) that match a keyword. This is generally suggested as a means of identifying tables to exclude from profiling (Such as System tables or temp tables) for very large databases.
- Meta: Identifies database column names that match a string of keywords.
Important:
-
Profiling by Meta only is not recommended as database column naming conventions can vary and are not a reliable indication of if the data content in the column is sensitive PII or not.
-
Columns that match based on Meta only are not automatically added into the Masking or Validation configuration.
Masking
Masking data library objects are made up of two different types.
-
Function: A masking function for replacing the source data. A masking function can operate in many different ways, for example;
-
Replacing the original production value with a lookup file value;
-
Generating a replacement value on the fly based on the original production value;
-
Replacing all values in the column with a fixed value;
-
Nullifying the column if the database column supports a null value.
-
Note: Methods 1 & 2 utilise a hashing algorithm, this ensures the replacement value is consistent across tables and databases as long as the original production value is the same.
- Lookup: A lookup file which contains replacement values used by a corresponding masking Function (e.g. Function example 1).
Note: Lookup tables can also be created to add synthetic test data into the database such as real test email addresses.
Validation
Validation data library patterns are made up of patterns only. These are used to confirm after successful masking if any production patterns still exist in the sensitive masked data that would indicate that real production data still exists after masking.
- Validate: A pattern that is made up of a distribution of data between most common and least common.
Custom Masking Functions
TDM now allows users to utilise their own Python functions to replace masked data. This functionality supports lookups, parameters, or a simplistic source value solution.
To create a custom function, navigate to Config Library Management. This can be done by going to Data Management ➨ Administration ➨ Config Library Management.
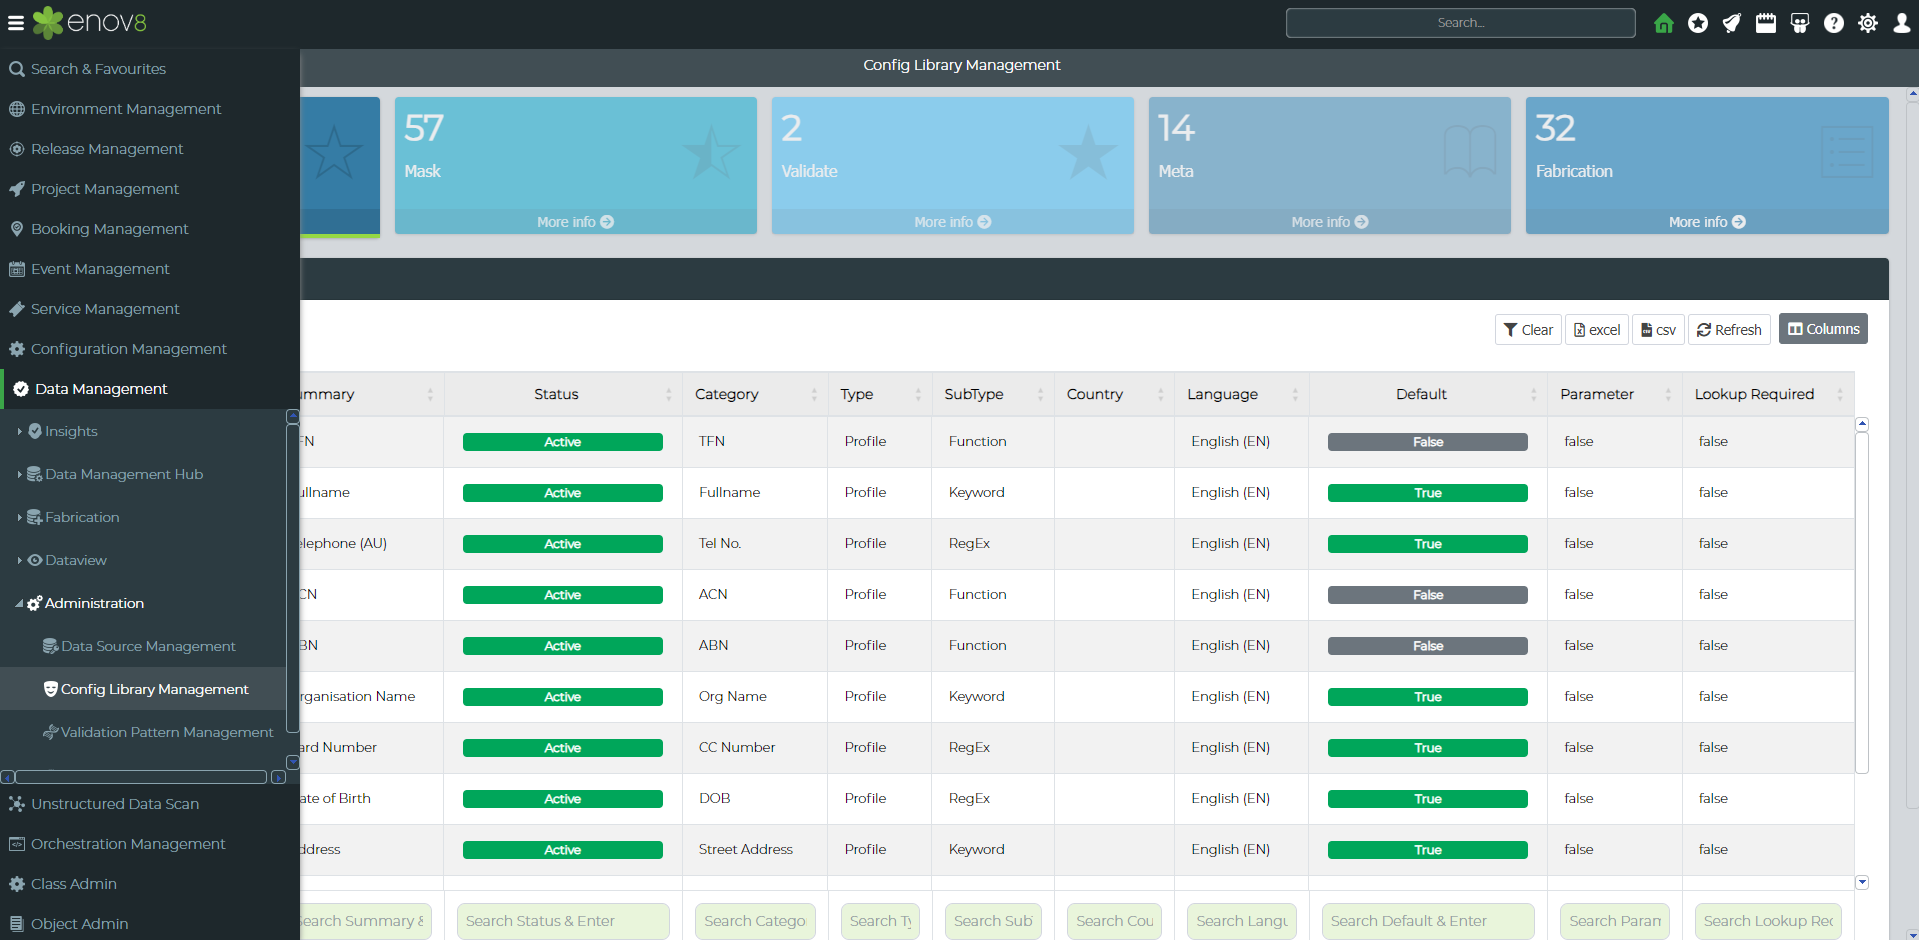
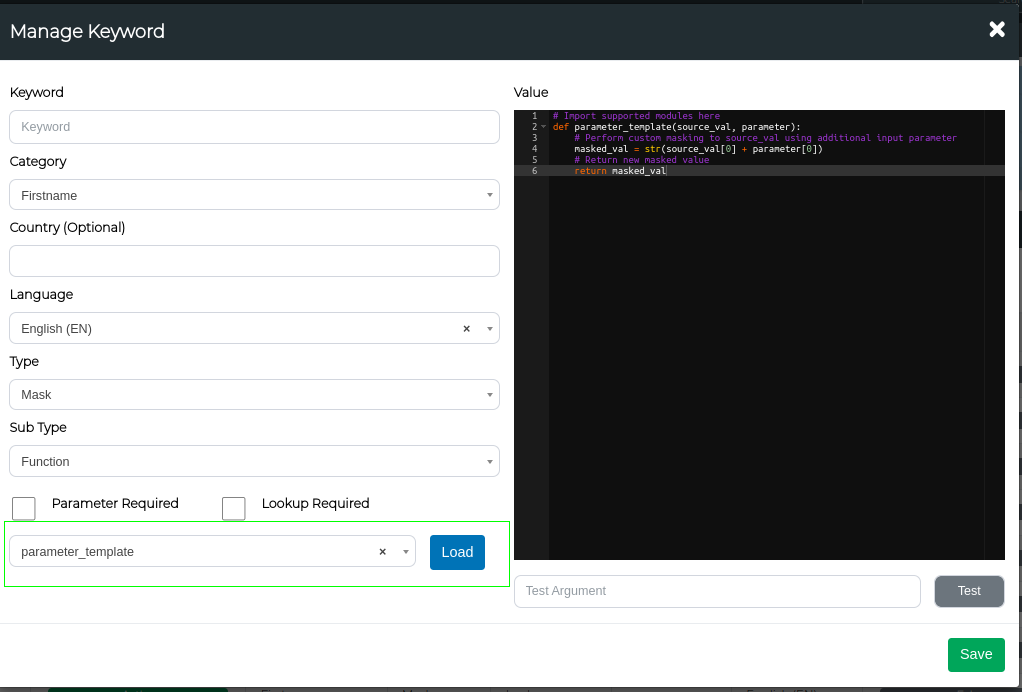
Next, click on the “add” button. Then, change the Type to “Mask” to create a masking pattern. The following window should appear:
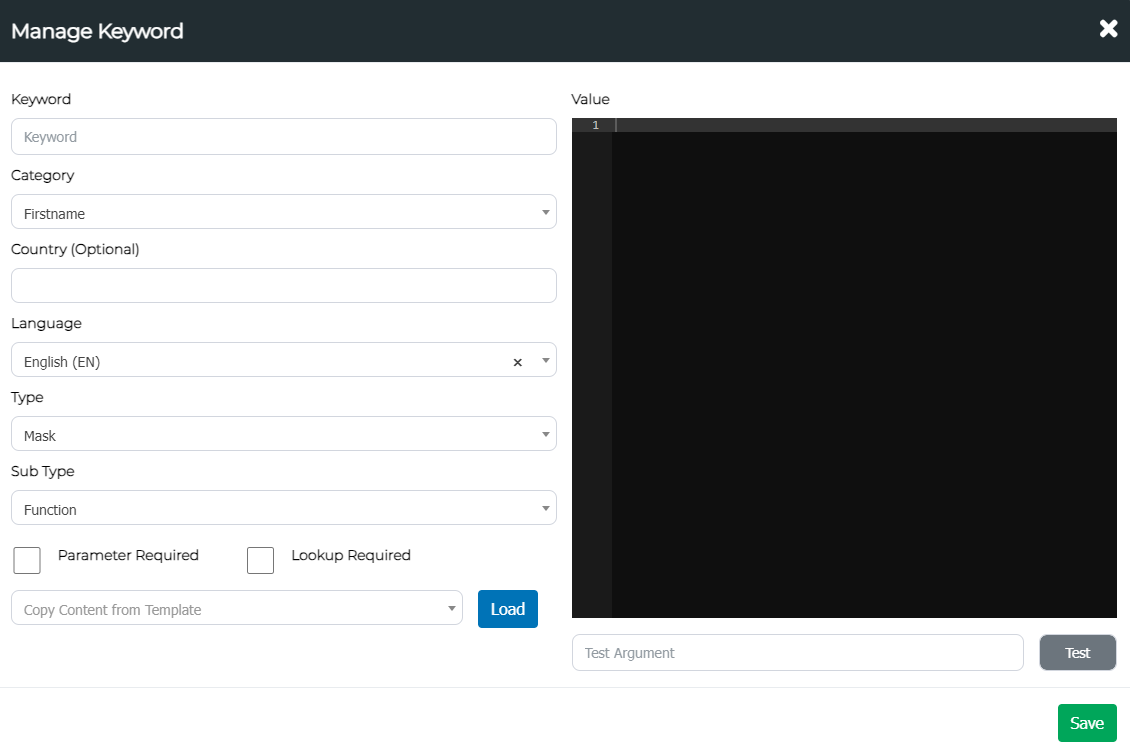
Configurable Fields
| Field | Definition |
|---|---|
| Keyword | The name of the pattern. This should also be the name of the function. |
| Category | The type of the pattern. This can be either Firstname, Surname, etc. |
| Country | The country the pattern should belong to. |
| Language | The language of the pattern respective to the country. |
| Type | The scan types the pattern will be used for. |
| Sub Type | The type of the pattern. This should be “Function” to utilise custom functions. |
| Value (the right text editor) | The screen where the function should be written or pasted to. |
Note: The function name should be the same as the Keyword.
Templates
Additionally, we recommend copying content from the template and modifying it as needed. The templates offer examples for simple source value changes, lookup utilisation, and parameter usage.
Note: It is best practice to load these templates and then modify the code.
Parameter vs Lookup
Parameters and lookups can be enabled by selecting them from the checklist. If both options are selected, you can use both features simultaneously.
Parameter masking involves using an argument in your function to manipulate the input data. This will also need to be added in the "Parameter" field in your masking config. Conversely, lookups refer to files that the function can utilise to mask the data. Both parameters and lookups can be used together within a single function.
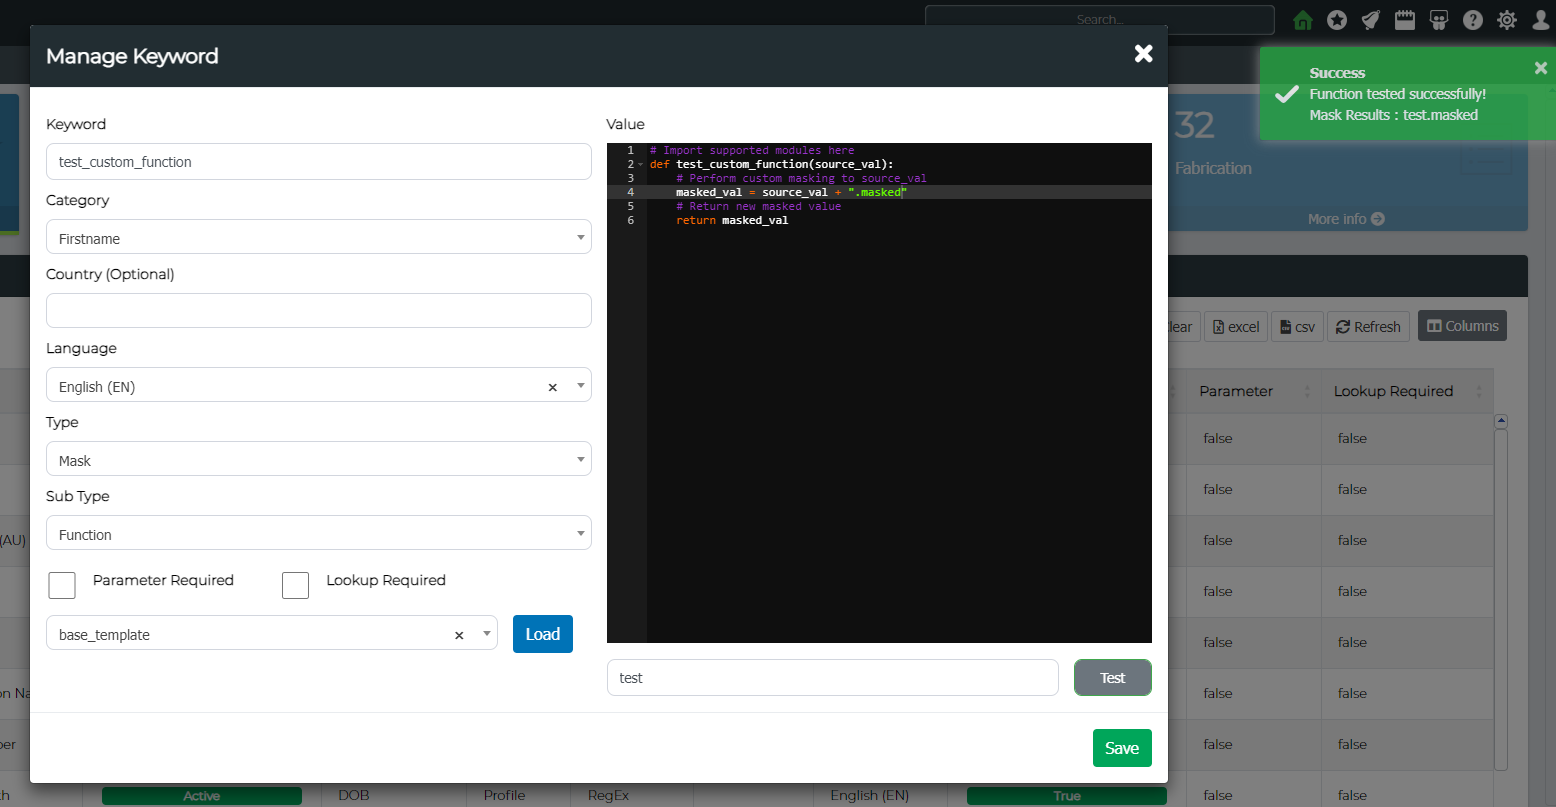
Test
Next, to test whether the function is working as required, use the Test button by providing an example source value. This will return a masked value after using your algorithm.
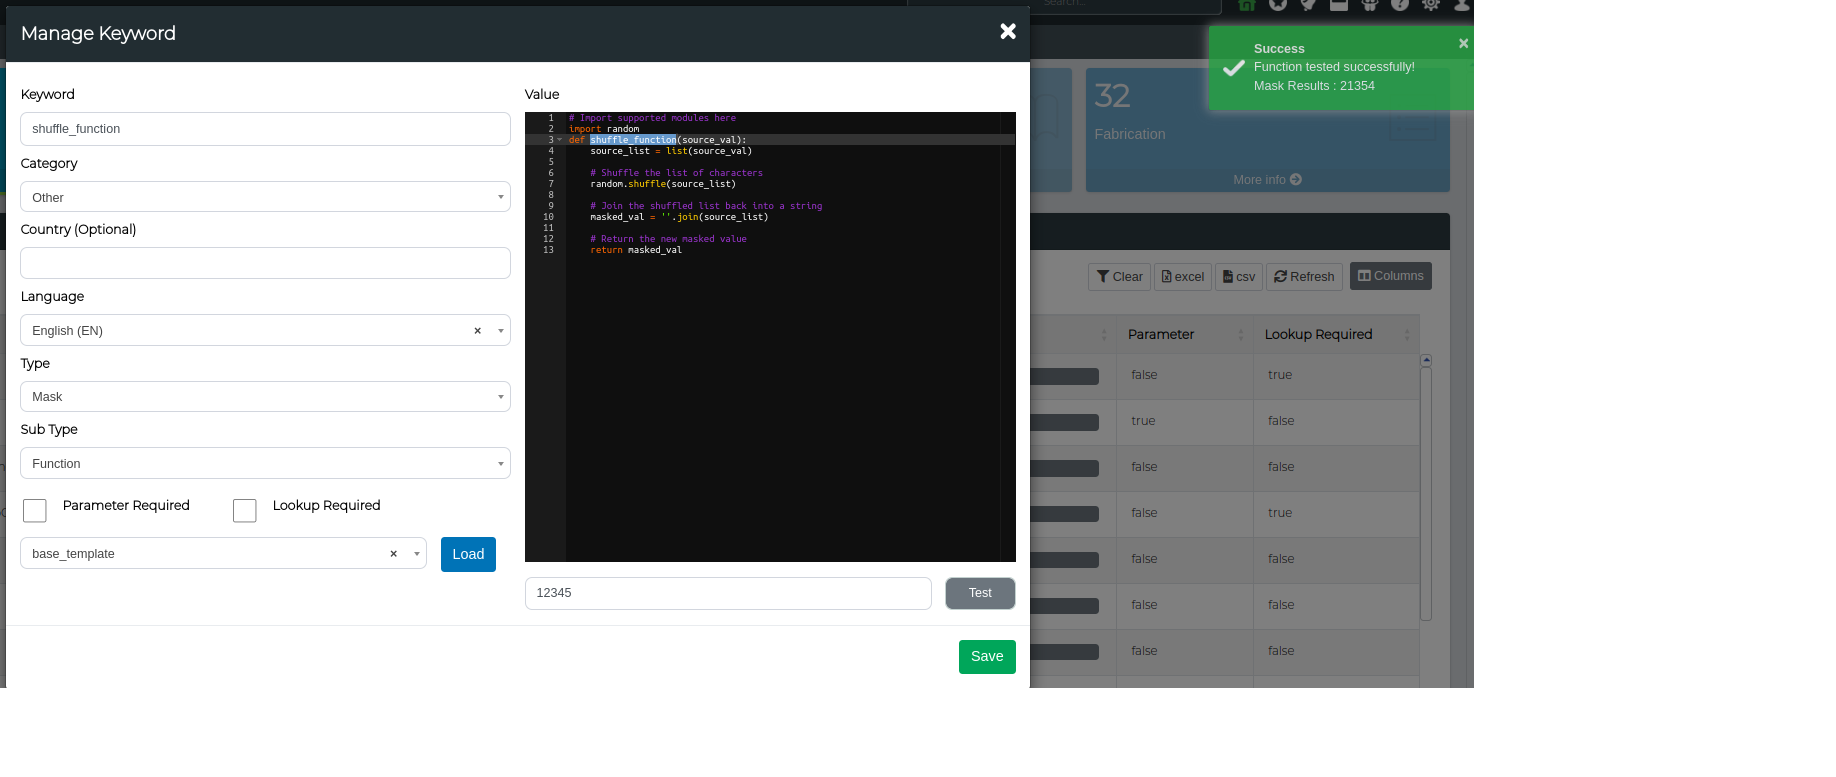
Standard Setup Example
Lets create an example custom function where the source value is shuffled around.
Source Value: Source value to be masked
Return Value: Return the shuffled value
Step 1. Change the Type to "Mask"
Step 2. Import the template
Step 3. Lets write some code to generate a value based off a regex.
Note: the function name must be the same as the keyword
# Import supported modules here
import random

def shuffle_function(source_val):
    # Change source_val into a list
    source_list = list(source_val)

    # Shuffle the list of characters
    random.shuffle(source_list)

    # Join the shuffled list back into a string
    masked_val = ''.join(source_list)

    # Return the new masked value
    return masked_val
Step 4. Lets Test the function using a source value 12345
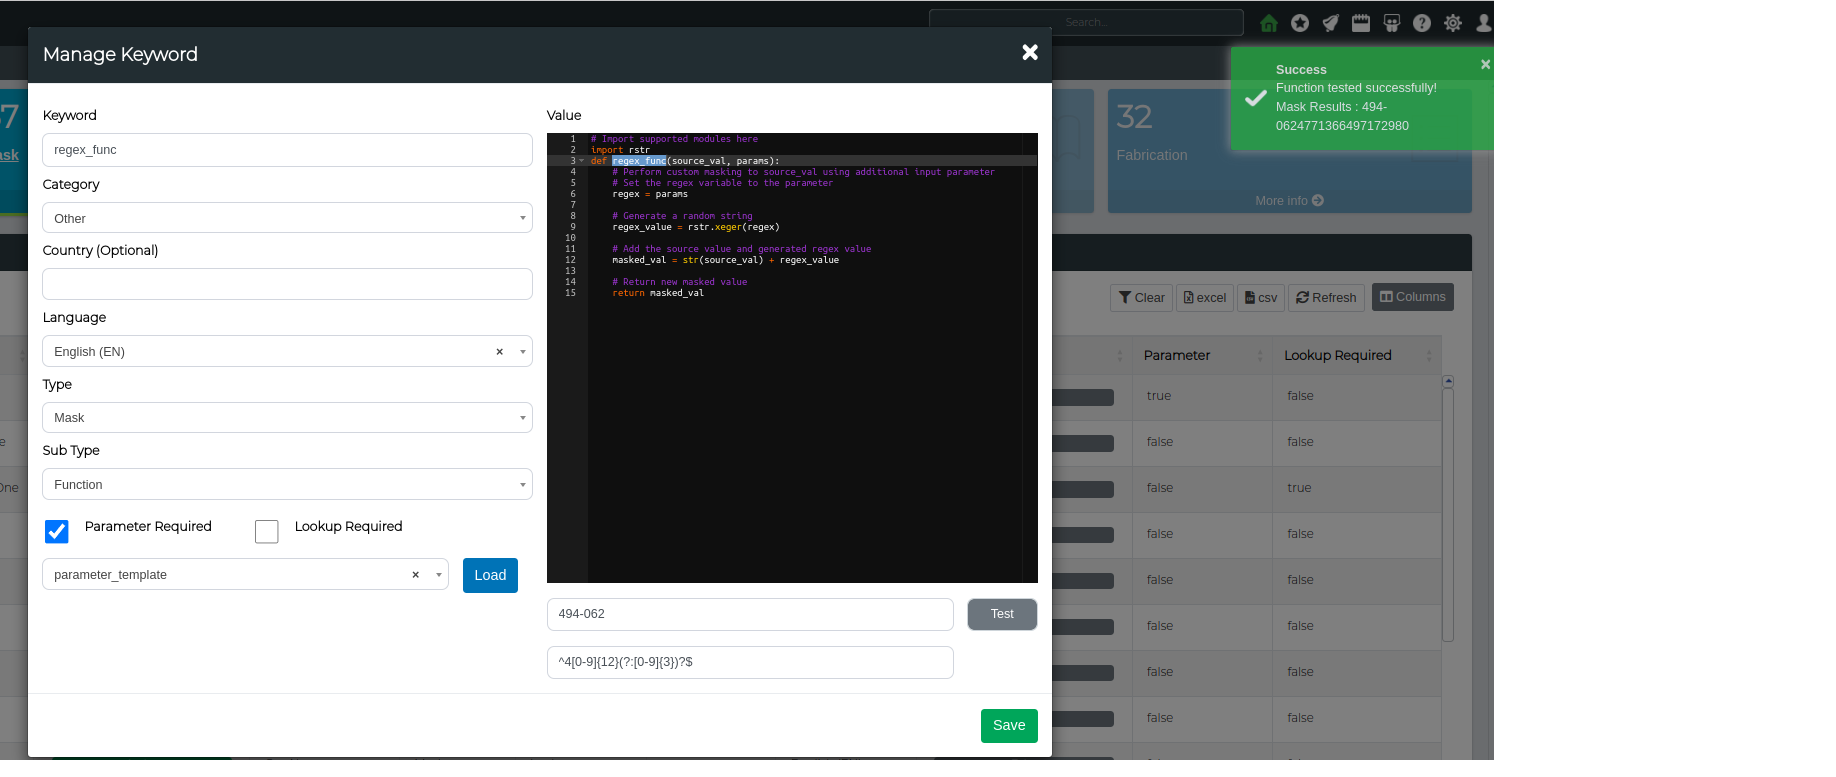
Parameter Setup Example
Lets create an example parameter based custom masking function. For this example, lets generate a value based off a regex and then append it to the source value.
Parameter/Input: Regex
Return Value: Masked value built from the regex
Step 1. Change the Type to "Mask"
Step 2. Import the template
Step 3. Lets write some code to generate a value based off a regex.
Note: the function name must be the same as the keyword
# Import supported modules here
import rstr

def regex_func(source_val, params):
    # Perform custom masking to source_val using additional input parameter
    # Set the regex variable to the parameter
    regex = params

    # Generate a random string
    regex_value = rstr.xeger(regex)

    # Add the source value and generated regex value
    masked_val = str(source_val) + regex_value

    # Return new masked value
    return masked_val
Step 4. Lets Test the function using a Visa regex ^4[0-9]{12}(?:[0-9]{3})?$
Lookup Setup Example
Lets create an example lookup based custom masking function. For this example, lets take a balance value and add a random lookup based value to it.
Source Value: Source balance value
Lookup Value: Lookup list of random balance amounts
Return Value: Masked balance value
Step 1. Change the Type to "Mask"
Step 2. Import the template
Step 3. Lets write some code to append x amount to a balance
Note: the function name must be the same as the keyword
# Import supported modules here
from math import fmod

def balance_add(source_val, lookup):
    # Use custom logic to calculate lookup index based on source value

    hash_index = abs(hash(source_val))
    lookup_index = int(fmod(hash_index, len(lookup))) + 1

    # Obtain masked value from lookup using index
    lookup_val = lookup[lookup_index]
    masked_val = int(lookup_val) + int(source_val)

    # Return new masked value
    return masked_val
Step 4. Lets Test the function using a sample source value and a balance amount lookup (this is a custom lookup)

Validation Pattern Management
Validation patterns for the data library can be created by connecting TDM to a copy of sensitive production data and running the Administration > Validation Pattern Management feature within TDM.
From Administration > Validation Pattern Management click on Execute Pattern Search.
Select the Data Source, Table Name and Column Name you want to perform a Pattern Search on.

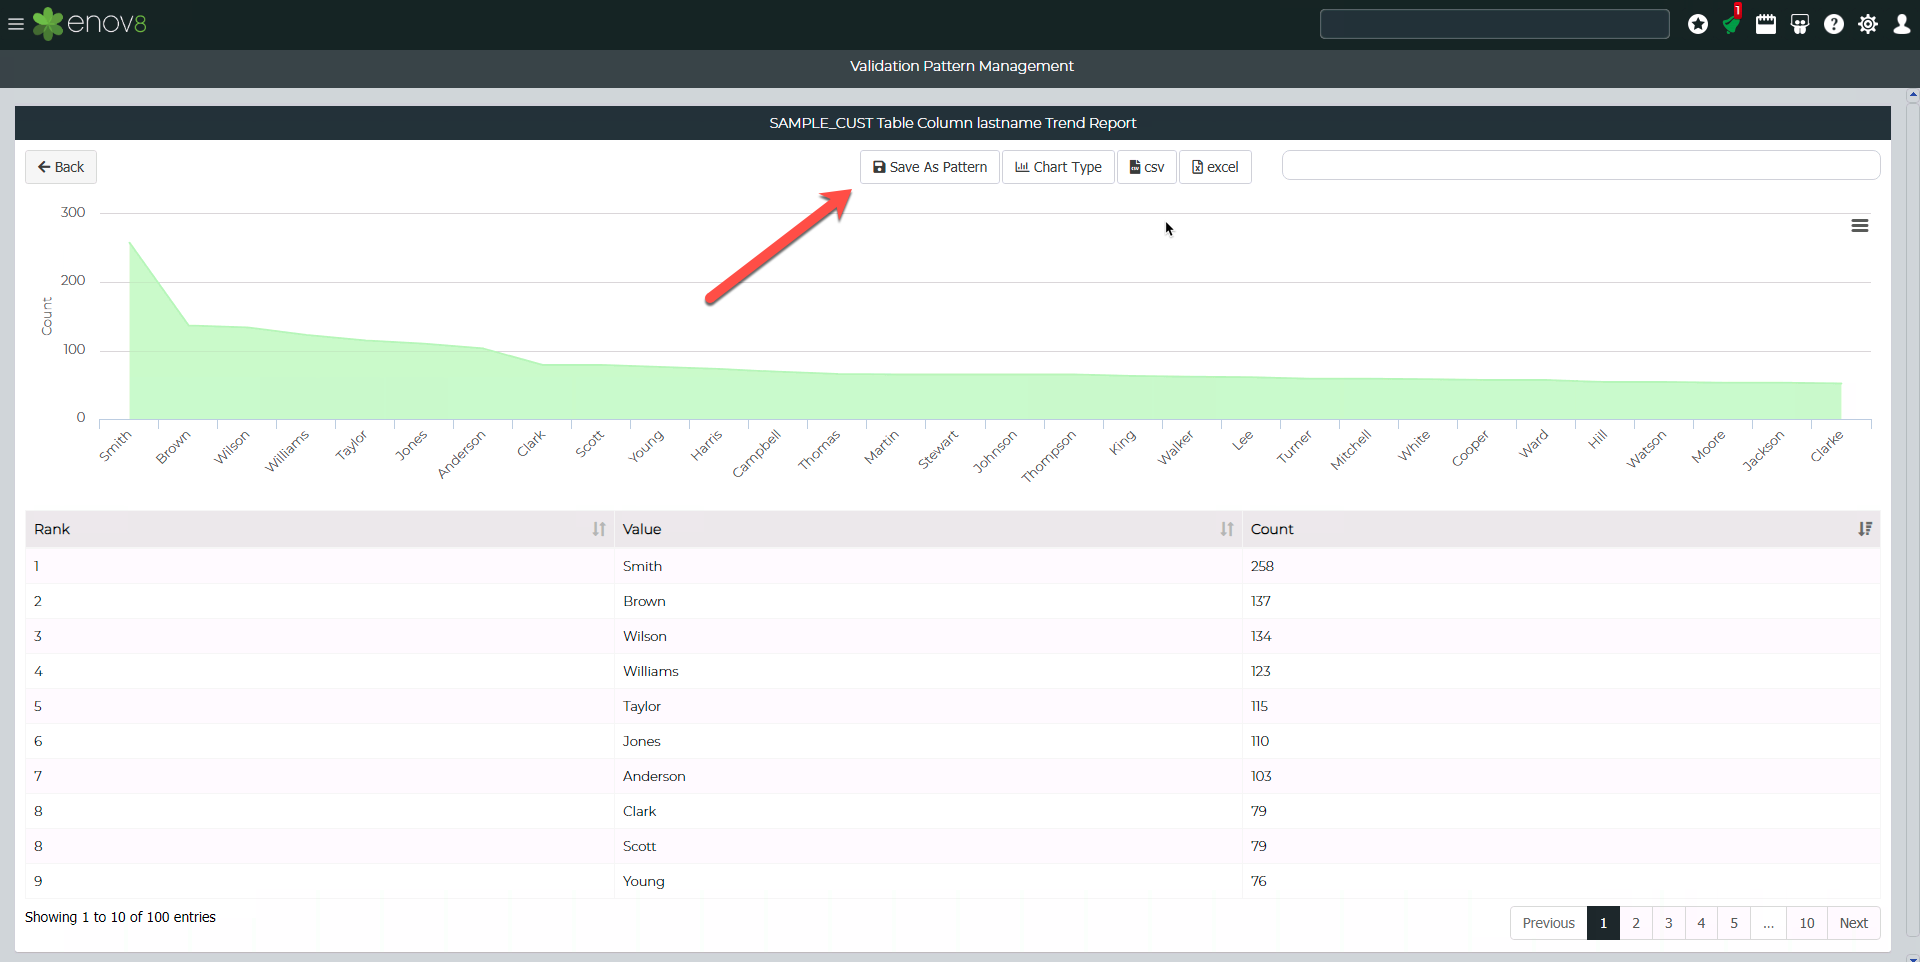
Once the search has been completed, indicated by the "Passed" status. Click on the View button.

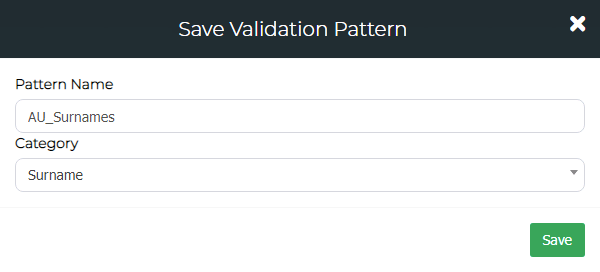
This will show the pattern search results. A validation distribution pattern can be created by clicking "Save As Pattern".
This will open up a form to enter a name for the pattern and category.
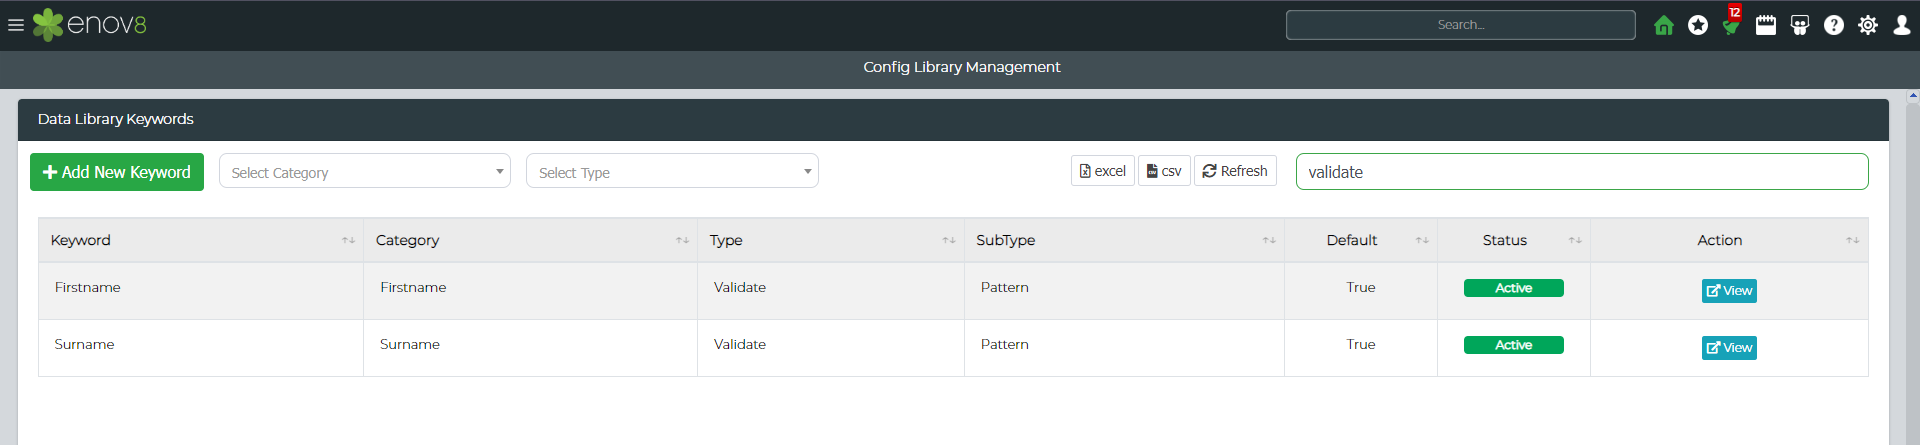
Once saved navigate to Administration > Config Library Management filter the grid by typing in "Validate" in the Config Library search box.
You should be able to View, Edit and Delete the new validation pattern created.